
Forest Highlands Kitchen Garden

Kitchen Garden in a Challenging Climate
Cindy and I recently visited the kitchen garden at the Forest Highlands Meadow Clubhouse. Forest Highlands was established in 1987, with the original raised bed concrete forms poured shortly afterward.
We don’t know how long they were garden beds. They were filled in and covered with sod for a children’s play area and family picnic grounds.
In 2015 the kitchen staff uncovered half of the original concrete terraced raised beds. They kept the upper part in sod, using it as a reception area for weddings or parties with 4 large raised beds.
This kitchen garden is just south of Flagstaff, AZ in a very short season climate. Some years they have less than 60 days of growing time, while others are just over 70 days.
This limits what they can grow. Creative use of existing advantages helped them be successful in their first year. The result has been a surprising amount of fresh vegetables and herbs for the kitchen.
They grow unique and unavailable varieties showing the chef’s talents with heirloom flavors.
Let’s look at some of the techniques used to create a successful kitchen garden in a challenging climate!

Original Beds Revealed
This uphill shot shows the concrete forms of the original stepped landscape garden beds giving way to the remains of the sod used for the children’s play area and picnic area. Four raised beds grow vegetables needing a deeper soil and host a reception area.
The raised bed soil is rich and fertile while the terraced beds need improvement. Rains left standing water in the beds on the lower right which made growing difficult this season. The staff is planting our cover crop mix to help. The mix will open up the moderate clay soil and improve drainage, soil structure and fertility.

New Raised Beds
The terracing is harder to see from this angle, but the size of the raised beds is clearer. Each raised bed is about three feet deep, giving plenty of water drainage and depth for root crops.
The semi-intensive planting has gone well with a successful harvest considering it is the first full year of growing there.
The concrete retaining wall topped with solid fencing is at the far end of the garden, providing wind protection as well as shelter from hungry critters ranging from rabbits to deer.

Carrots, beets and radishes are growing in this raised bed. After harvest the bed is mulched with straw and left dormant until early spring. The mulch protects the soil from temperature extremes, allowing earthworms to be more active.
The raised beds are full of earthworm activity. If you create the proper environment the earthworms will appear!

This left side view shows how different the soils are just 10 feet apart from the right side. The growth is lush and full, unlike the right side beds holding water with struggling plants.
There may only be 2 – 3 weeks of growth for our Garden Cover Up Mix before the frosts kill them. This is enough time to establish a root system and mulch cover, starting improvement for the soil.
Next season they will interplant cover crops among the root vegetables. The cover crops go in once the vegetables are a month old so they don’t compete with each other. This gives more time for better soil improvement.
South Facing Thermal Mass Wall
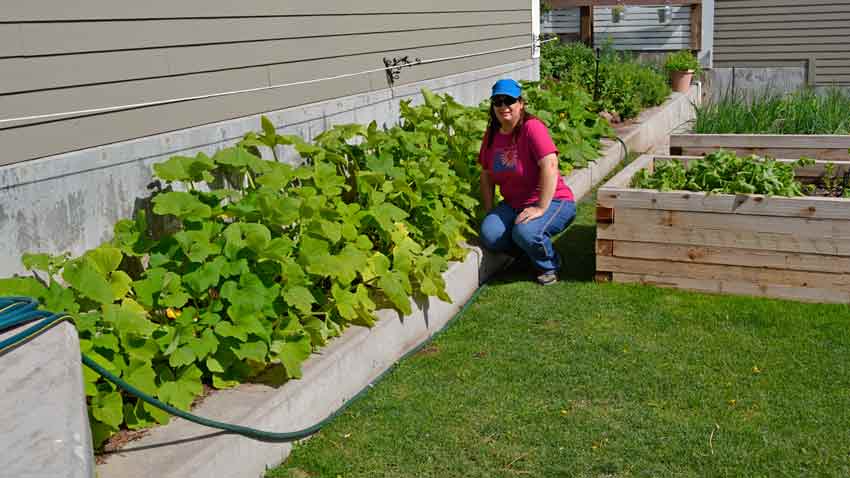
Cindy next to a long bed of pattypan squash. These summer squash are very cold sensitive and love warmth. This planting bed takes advantage of the concrete walls thermal mass, effectively moving this bed two or three zones south. It is unusual to see such vigorous and healthy growth in a colder climate.
This thermal mass technique has been used just outside Paris, France for over 300 years. Farmers grew extensive fruit tree and grape orchards in the cold climate of Paris.
Thick south-facing brick walls kept fruit trees and grape vines warm. Horticultural books showed why these orchards were so productive and grew such delicious fruits.
There are still remnants of these horticultural walls still standing outside of Paris today. Many of the current residents do not know why the walls are there, or what function they served!

When we looked in the bed, sure enough there was a large pattypan squash ready for harvest! This is about 2 – 3 weeks prior to the first expected frost.

The same concept is used for the tomatoes and basil, for different reasons.
This east facing retaining wall supports the pool and is not a traditional thermal wall. This growing spot is unique because the pool provides the moderating temperature. The pool has a lot of thermal mass, maintaining a steady temperature to the concrete.
In the summer, the wall absorbs warmth during the morning and gives shade during the hot afternoons. The water temperature is cooler than the air, so the wall’s effect is shading and cooling.
During cooler weather, the pool temperature is warmer than the air, warming the bed. The sun warms the bed during the first part of the day.
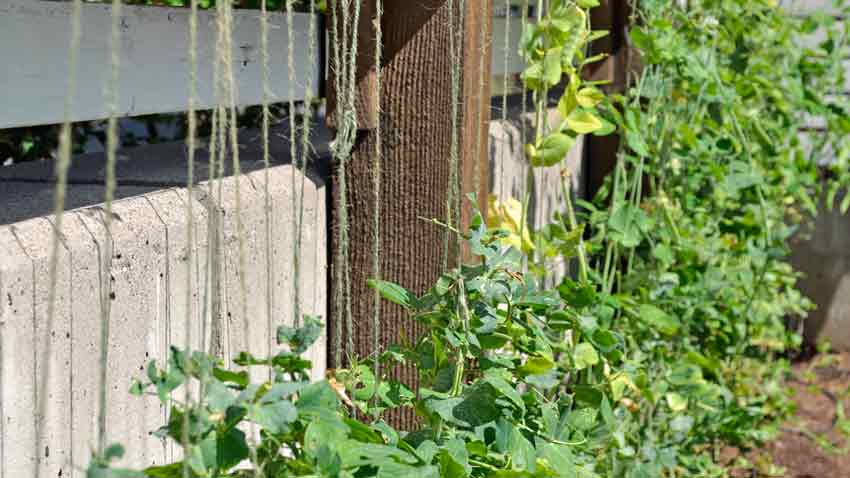
Up at the top of the herb garden section, the same technique is at work helping the snap peas have a good second season. They are climbing twine strings in front of the south-facing driveway retaining wall. The gardeners use this spot for an early planting of peas using the warmth as a jump-starter, transitioning to herbs later in the spring and back to peas in the fall.
Pretty clever to coax three plantings out of a 60 day growing season!

A different angle gives another look at the upper herb garden section. Notice the peas don’t extend past the warmth of the concrete retaining wall.
Some of the herbs are in pots, while others grow as annuals in the beds.
Notice the high fencing, which acts as walls for wind breaks and critter proofing. The garden is protected from chilling and drying winds and breezes, allowing more vigorous growth than if it were more exposed.
The hanging buckets are at the top right, seen in more detail at the top photo of the article. Individual herbs grow in each bucket, giving more fresh herb variety to the kitchen.
Your Turn
Now you see how simple techniques are used in creating a successful kitchen garden, no matter the size.
Take a close look at your garden to see if some of these approaches would work for you, or with a smaller container garden close to the house!


 2019 Terroir Seeds
Leave a Reply
Want to join the discussion?Feel free to contribute!