
Growing Your Salad In A Container Garden
We recently completed our second salad growing bed in our greenhouse, and here’s how we did it!
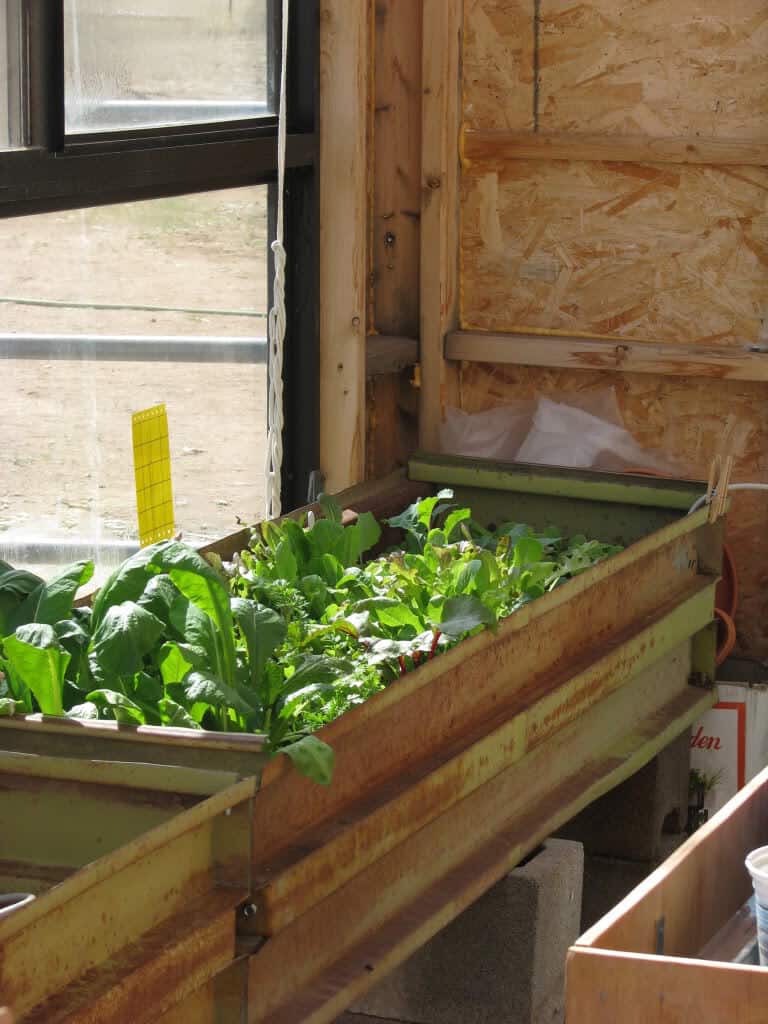
We started the salad growing bed so that we would have fresh salad greens during the Fall, Winter and early Spring when the garden wasn’t growing or things were just coming up. We can supplement our diet with fresh, healthy and extremely nutritious greens like lettuce, Swiss Chard, beets and beet tops, carrots, mustards and even some kale if we want to.
The salad bed has it’s own heat cable buried at the bottom of the sand under the growing soil, so the roots stay warm and don’t need external, expensive heat in the greenhouse during the colder seasons. We grew fresh greens almost all winter in one bed, and have expanded into a second bed.
Both beds are 6 ft long, 18 inches wide and 13 inches deep. The material was from a local metal recycling facility and is really heavy corrugated sheet metal. We bought 3/4 inch thick exterior grade plywood, drilled 21 drain holes in the bottom and sealed it with an exterior decking stain. We then screwed the corners of the sheet metal together and inserted the plywood bottom into the bottom slot made by the corrugations, and screwed it to the sheet metal as well.

Next we put the heating cable in. This is a sealed unit made to heat seed beds that has a built in thermostat. We attached it to the bottom side of 1/4 inch hardware cloth- a heavy metal mesh- to prevent damage to the cable if we needed to dig into the soil. You can see the drain holes in the plywood here.
This is part of the magic that allows us to be able to grow tender greens year round in an unheated greenhouse. Many people don’t realize how little it takes to be able to grow their own fresh green produce year round at their home. They are used to the idea of the Spring through early Fall garden, but that is it. The thought of growing farther into the year, and starting earlier, is new to most people.
However, there is much more time available to grow if you look at things a little unconventionally, and look at ways to manage the temperature and moisture to extend your growing season. Whether it is a weekend project like this, or it is constructing a small row cover from PVC and heavy weight painter’s plastic drop cloth from your local hardware store, you can positively affect your growing season with a little work that will pay you back for several years.

After the cable/mesh was laid down, we put about 2-3 inches of sand. The sand acts as a medium of heat exchange to heat the growing soil from the bottom up. It is surprising how little heat is needed to make a real difference. We had several nights at freezing after we started the salad pit growing, with a plastic sheet draped over the top, and the little “saladlings” did just fine. The water trickles down and keeps the sand moist, which acts as a perfect heat conductor to the soil above.
The soil was put in next- about 5-6 inches of good organic potting soil. We saved some time and bought some pre-made potting soil that is certified organic and has mycorrhizae added to it to help the roots develop into the soil better. The mycorrhizae are microscopic fungi that help both the plant get more nutrition out of the soil, as they extend the reach of the root’s micro tendrils into the soil and bring in nutrients that were out of reach of the roots. The plants will grow stronger and have more vigor, production and disease and pest resistance. In return the plants feed a sugar substance to the mycorrhizae. A wonderful symbiotic relationship!

After some gentle watering to get the soil and sand below well moistened but not wet, the salad bed is ready to plant! The new bed is in the foreground, with the established bed in the background. You can see the difference in growth in the first salad bed from this photo as compared to the top photo.
One of the hidden benefits to growing salad greens this way is the lack of dirt in the greens when harvested. There is no wind or rains to push dirt up on the leaves and stems, so the greens only need a light rinse before they are ready to eat. As we don’t use any type of chemicals to grow with, we don’t have to worry about chemical or fertilizer contamination to wash off.
The white box in the foreground is a small hydroponic setup, the blue top is rigid foam with 5 holes in it for the lettuce cups and growing medium, which is rock wool. There is a small aquarium pump in the bottom to recirculate the nutrient solution to the roots. We have grown lettuce indoors in the winter in our small house, so the greenhouse will be an expanded experiment. If if works well, and it should, we might expand this to be a vertical hydroponic rack made from several sections of roof guttering along the North wall, which is straw bale and tires.
This could give us a substantially expanded growing opportunity with very little square foot commitment. We will keep you posted on the progress!
If you don’t have your own greenhouse, a similar container system can be done in a sunny window, in your garage under some lights or even on a back deck. Let your imagination be your guide. If you are interested in the heat cables, post a comment. If there is interest, we may carry them in the near future.


Built old pvc pipe, framework inside the 12 x 24 greenhouse. Lightest weight, painter dropcloths draped over. Water jugs and 5 Gal containers under benches. Heated with couple of light bulbs in inner tent. All OK for years as long as electricity on…..things all froze when electricity off for 48 hours during storm. Best have backup emergency heat. Dropcloths floated back to sides on warm days. Think the heat coils would work as well as light bulbs to keep inner tent toasty warm. I had some tall things in the greenhouse, so fixed the inner tent so it covered the benches and I could walk around the whole 12 x 24 house.
This is great, a simple yet effective method to grow greens and fresh food throughout the cold season! Thanks so much for sharing this.