The Stale Seedbed Technique
Harness Nature’s Cycles for Less Weeding, More Gardening
What is a Stale Seedbed?
Weeding – it’s the chore every gardener loves to hate. Those tiny green invaders can quickly overwhelm your carefully planned beds, stealing precious resources from the vegetables, herbs, and flowers you actually want to grow. But what if there was a way to outsmart those weeds, reducing the need for constant hand-pulling throughout the season?
A stale seedbed might sound counterintuitive, but it’s a prepared garden bed intentionally left undisturbed to encourage all those dormant weed seeds to germinate.
Once those young seedlings emerge, they’re easily destroyed before you plant your desired crops. This natural, organic weed management technique is a powerful weapon in the fight against weeds, dramatically reducing your weeding workload by reducing the weed density and saving you valuable time and energy while reducing and sometimes eliminating herbicide use.
Done correctly, a stale seedbed can reduce the amount of viable weed seed in your garden for that season by up to 90%, giving you a significant head start in the battle for a weed-free harvest.
If you’re tired of being a slave to weeding, keep reading!
How Does a Stale Seedbed Work?
The beauty of the stale seedbed technique lies in its simplicity and strategic manipulation of a weed’s natural life cycle. Here’s how it works:
- Seedbed Preparation: Start by shallowly tilling or digging your garden bed, at most two inches deep. This disrupts the top layer of soil where most weed seeds lie dormant while minimizing disturbance to beneficial soil organisms living deeper down. Remove any existing weeds, including roots. The goal is to create a loose, inviting seedbed with minimal tillage.
- Watering for Germination: Lightly water the prepared bed. The soil moisture will trigger the germination of weed seeds lurking near the soil’s surface.
- Waiting for the Weed Emergence: Patience is key! Allow about 1-2 weeks for the first flush of weed germination. These seedlings are most vulnerable at this early stage.
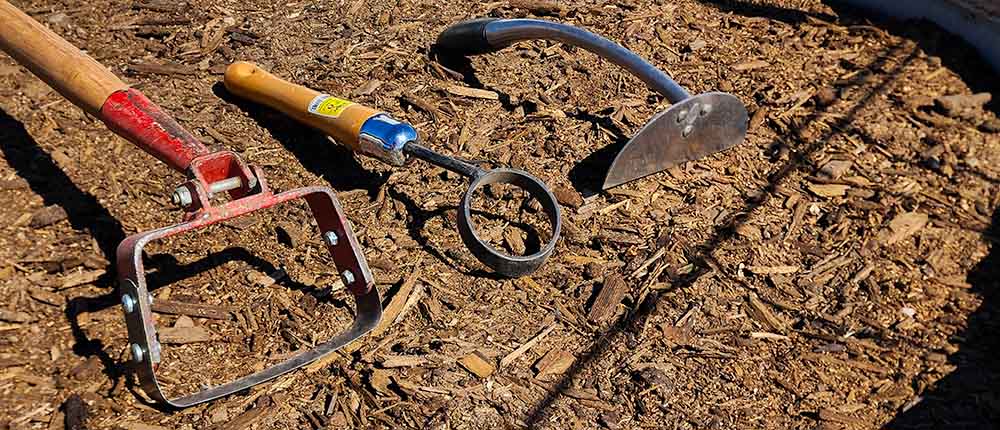
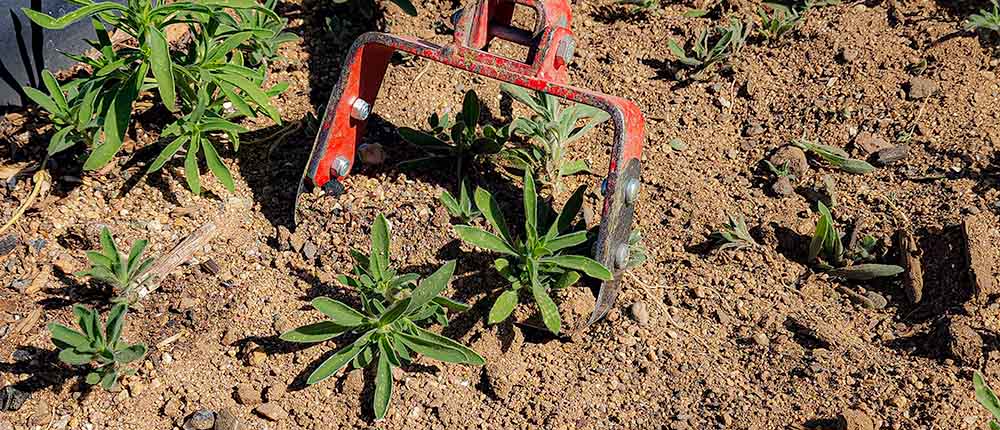
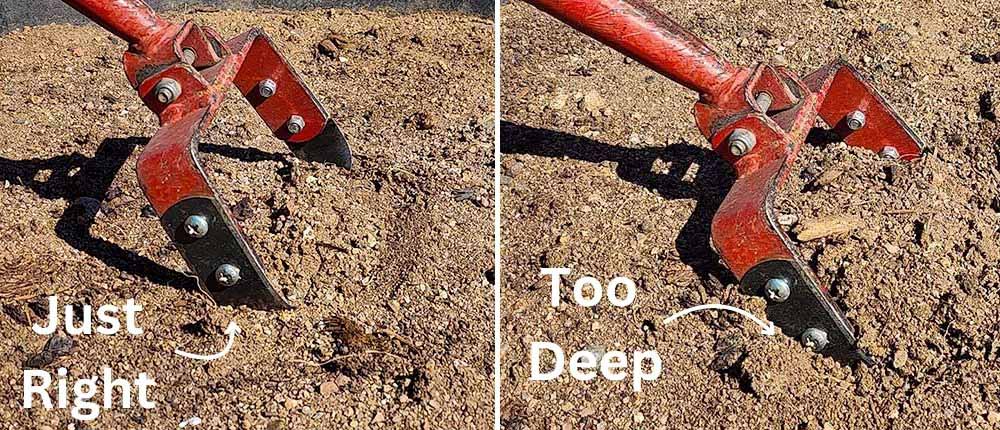
- Destroying the Seedlings: Here’s where the magic happens. Carefully destroy those young weeds with shallow cultivation, using a hoe like a stirrup or a flat collinear hoe. The crucial point is to disturb the soil as minimally as possible – shave the soil’s surface, cutting the tiny weed seedlings. Disturbing the soil deeply risks bringing a new batch of weed seeds to the surface, defeating the entire purpose.
A Stirrup hoe and a variety of other garden weeding tools.
Why It Works
Most weed seeds need light and closeness to the soil surface to germinate.
By preparing the bed, you’ve created ideal conditions for them to sprout, only to eliminate them before they can establish themselves.
With each cycle, you deplete the ‘weed seed bank’ in your soil, significantly reducing the weeds that will compete with your crops later. Additionally, young weed seedlings release natural chemicals called auxins. These auxins have an allelopathic effect – meaning that they suppress the germination of other nearby seeds for up to six weeks, further boosting your weed control efforts and giving your crops a head start of several weeks.
The Persistence of Weed Seed Banks in Your Soil
Weeds are incredibly resilient, with an uncanny ability to pop up year after year, no matter how diligently you weed. This persistence is partly due to the remarkable longevity of weed seeds buried in the soil. One of the most famous experiments in weed research illustrating this was started in 1879 by Professor William Beal at Michigan Agricultural College (now Michigan State University). He buried bottles filled with multiple common weed species seeds, and for over 130 years, scientists have periodically dug them up to test their viability. Incredibly, some still germinate, as the American Journal of Botany reports!
Understanding Germination Triggers
This experiment highlights why stale seedbeds are so valuable. Surface tilling your soil, as you would when creating any garden bed, is a major trigger for weed seed germination. The act of tilling brings dormant seeds closer to the surface, exposing them to light and moisture, the perfect conditions to sprout. Stale seedbeds exploit this vulnerability. By preparing the bed and then waiting for those weeds to appear (and destroying them), you significantly reduce the number of weed seeds ready to compete with your actual crops later in the season.
Stirrup hoe cutting weed seedlings for a stale seedbed.
Benefits of Using Stale Seedbeds
The stale seedbed technique isn’t just about the here and now; it offers benefits that extend throughout the growing season and beyond. Here’s why you should consider adding this simple practice to your gardening toolbox:
- Reduced Weeding Throughout the Season: Perhaps the most immediate benefit is the dramatic reduction in weeding. Depleting the weed seedbank in your soil before planting prevents many weeds from sprouting. This means less time crouched over battling unwanted plants, freeing up time to enjoy the more enjoyable aspects of gardening.
- Organic Weed Control: Stale seedbeds are a fantastic tool for gardeners who prefer to avoid herbicides, especially in vegetable gardens. This method relies purely on natural processes and clever timing, providing an effective organic weed management solution.
- Improved Soil Structure: Every time you till or deeply dig your soil, you disrupt the delicate network of beneficial fungi, bacteria, and other soil organisms that contribute to healthy soil. Stale seedbeds involve an initial shallow till followed by minimal soil disturbance during the weed removal stage. This helps protect your soil’s structure, promoting better water retention, nutrient cycling, and overall plant health.
Considerations for Using Stale Seedbeds
While the stale seedbed technique is incredibly valuable, it isn’t a magic solution for every gardening scenario. Here are some important things to keep in mind:
- Time Commitment: Stale seedbeds require some upfront planning – they aren’t a quick fix. You’ll need to factor in the time it takes for weeds to germinate and be destroyed (usually 1-2 weeks) before crop planting. Careful planning will help integrate this technique smoothly into your gardening schedule.
- Not a One-Time Solution: Unfortunately, weed seeds are persistent. Some weed seeds may remain dormant, and new seeds can be blown in or deposited by birds. This means you might need multiple stale seedbed cycles for maximum control. While stale seedbeds dramatically reduce your weeding workload, they won’t completely eliminate the need for weeding. Be prepared to repeat the process throughout the season for subsequent weed control.
- Crop Compatibility: Stale seedbeds are best suited for direct-sown or transplanted crops with a longer growing season, giving you time to eliminate those initial weed flushes. If you mostly grow quick-maturing crops that are directly seeded, the time investment in a stale seedbed technique might not make sense for your garden.
- The Critical Period: Stale seedbeds greatly decrease the overall weed pressure, but you’ll still need to proactively manage weeds during the first 4-6 weeks after initial crop emergence. This critical period of crop growth is when weeds can most impact yields. Consistent weeding after this point prevents weeds from setting new seeds – and adding to the weed seed bank – but becomes less crucial to your harvest.
Just shave the surface of the soil, as in the left picture. Going too deep, like on the right, risks bringing up more weed seeds to deal with.
Adapting Stale Seedbeds for Different Planting Schedules
The beauty of the stale seedbed technique lies in its adaptability. With a little planning, you can tailor it to your specific planting schedules and needs. Here’s how:
- Early Spring Planting: Stale seedbeds are a fantastic way to prepare beds for early-season crops. Since the soil is often already workable in spring, you can initiate the stale seedbed process a few weeks before your desired planting date. This will dramatically lessen the weeds you’ll face as the weather warms.
- Fall or Cool-Season Planting: Many cool-season crops thrive when planted in late summer or fall. Stale seedbeds can be incredibly helpful in this scenario. Preparing your beds in the weeks leading up to fall planting will give your crops a head start against weeds, ensuring strong establishment before winter.
- Succession Planting: If you practice succession planting (sowing crops in stages throughout the season), you can work stale seedbeds into your crop rotation. As one crop finishes, prepare the bed with a stale seedbed technique to ready it for the next planting.
- Transplanting: Stale seedbeds are compatible with transplanting techniques. Prepare your beds in advance, allowing time for at least one cycle of weed seed germination and removal. This way, your transplants will enter a much cleaner environment where they can quickly establish themselves.
Embrace the Stale Seedbed Advantage
Stale seedbeds might sound unconventional, but their simplicity and effectiveness make them a true gardener’s secret weapon.
By understanding weed biology and strategically manipulating their germination cycles, you gain a significant advantage in the ongoing battle against weeds.
Less weeding, healthier soil and the option for organic control make stale seedbeds well worth incorporating into your gardening practices.
Experiment and Discover
Like all gardening techniques, stale seedbeds are best adapted to your specific garden, climate, and preferred crops. Don’t be afraid to experiment! Try stale seedbeds on a portion of your garden – a small section or a single bed – this season and observe the results. Adapt it to your specific conditions, and see how much easier it becomes to maintain a flourishing, weed-free space.
You might be surprised at how much time and effort you save while enjoying a more bountiful harvest.


