What is the Best Way to Build the Health and Resiliency of my Garden Soil?

Welcome to the second part of Terra Preta, or how using Stone Age agricultural techniques may just be the best way to build the health, fertility, resiliency and nutrient cycling of the soil several fold. We will start with the second part of the article from Acres USA, which is a Q and A session, then will look at several points to consider.

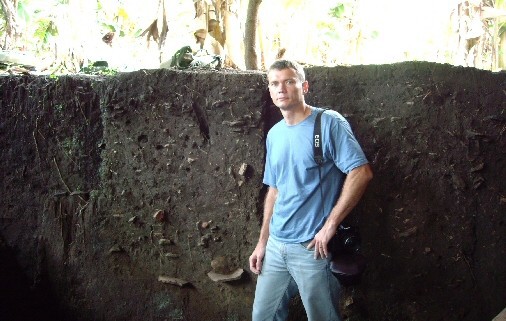
The photo is of a section of Terra Preta that is being studied by Dr. Etelvino Novotny of Brazil, a PhD in Physical Chemistry with a Masters in Soil Science. You can see the depth of the Terra Preta!

Terra Preta Q&A

Why did production of terra preta stop after European contact?
Although the decimation of the Amazonian population and the collapse of the elaborate social systems that supported terra preta creation (to make all that pottery and to make all that charcoal and incorporate it up to 2 feet in the ground really does take a village) was a contributing factor, it was undoubtedly the introduction of the steel axe by the Spanish that, in combination with the impact of contact, led to slash-and-burn by small bands replacing slash-and-char by large groups. When clearing land with a stone axe, a conservation of all biomas and an intensification of soil production becomes a necessity. Steel axes – and, later, chainsaws – contributed to exploiting the very short-term benefits of ash. It must be remembered that traditional methods can die out in a single generation, and that in Amazonian social structure, the elders were responsible for all technical knowledge. It makes sense that the elders were the hardest hit by epidemics, and the loss of their cultural knowledge combined with social disruption would lead to the replacement of a deeply effective technology with an less-effective mimicry.

Did natives use special microbial brews to inoculate the soil to create terra preta?
There is no proof that a “mother” culture was used for starting terra preta. Current research indicates that the incorporation of charcoal of certain qualities (created in relatively low heat, for example) in combination with appropriate initial fertilization (often, in university tests, with conventional fertilizers that are damaging to soil life) will produce a substantial increase in yields. It is assumed that the char provides such an effective habitat for microbes that effective communities will rapidly develop within most soils. What we don’t know yet is whether the simulated terra preta will have the ability to maintain its fertility for as long as the ancient form.

Has terra preta been discovered outside of the Amazon?
Yes, high-carbon terra preta-like dark soils have been discovered in Holland, Japan, South Africa and Indonesia and are currently being studied.

Can carbon inputs other than charcoal be used?
The Japanese are extensively investigating the use of coal dust for promoting field fertility. Coal dust does seem to reproduce many of the positive effects of wood charcoal. The research of Siegfried Marian on the benefits of carbon incorporation, as reported in Leonard Ridzon and Charles Walters’ The Carbon Connection and The Carbon Cycle, led to the development of Ridzon’s NutriCarb product (no longer being produced), which claimed agricultural benefits very similar to those claimed for terra preta . Those who want to use coal dust for soil fertility need to make certain that the dust is from brown coal, which is more humic, and that the coal does not contain toxins.

Why is terra preta often linked to alternative energy and climate change?
Terra preta is a carbon sink, as is most carbon in the soil. Slash-and-burn agriculture contributes greatly to global warming. If terra preta technologies were applied to tropical farming, less land would have to be cleared for farming, and if farmers in temperate zones such as the Midwest incorporated charcoal or other chars into their soil, more carbon could be sequestered. If this char is produced by appropriate technology, such as pyrolysis, both fuel and a “restorative, high-carbon fertilizer” can be produced. This process does not require wood – it is just as effective when agricultural wastes, such as peanut shells, are used as input. A good place to learn about this technology is at www.eprida.com.

How much charcoal needs to be incorporated?
In published reports on pot tests of the effect of charcoal on plant growth, incorporation at 20-30 percent by weight tended to consistently produce the most benefit. In row crops, this would translate to 30 percent by weight of the top 6 inches.

Are there benefits for plant health from terra preta ?

Better plant growth and health is evident with the use of native terra preta. Current investigations are primarily being conducted by archaeologists, geologists and soil scientists. There is no evidence of terra preta studies by an agriculturist, but positive reports from growers suggest that eco-farmers would be well advised to investigate terra preta technology.

Allan Balliett is a biodynamic farmer and educator who operates a CSA serving families in the Washington, D.C. metro area. He is the founder and moderator of BD Now!, the international progressive biodynamic food and farming discussion listserve. He can be reached at Fresh and Local CSA, P.O. Box 3047, Shepherdstown, West Virginia 25443, phone 304-876-3382, email allan@FreshAndLocalCSA.com, website www.freshandlocalcsa.com.

This ends the article from Acres USA.

It is interesting to note that of all the research and reading that I have done, most of the knowledge is indeed from the University research departments. Some are archeological based, others are looking at the carbon sequestering elements of charcoal or bio-char, and more than a few are interested in the continual fertility and regeneration of the soils once they have had charcoal incorporated into them.There are very few resources devoted to the thought of  how to incorporate charcoal into gardening and current agricultural practices.

The following is from a Biochar Discussion List

The following benefits occur with additions of biochar to the soil, in amounts ranging from 3 oz. per square foot up to 16 oz. per square foot-

  • Enhanced plant growth
  • Suppressed methane emission
  • Reduced nitrous oxide emission (estimate 50%)
  • Reduced fertilizer requirement (estimate 10%)
  • Reduced leaching of nutrients
  • Stored carbon in a long term stable sink
  • Reduces soil acidity: raises soil pH
  • Reduces aluminum toxicity
  • Increased soil aggregation due to increased fungal hyphae
  • Improved soil water handling characteristics
  • Increased soil levels of available Ca, Mg, P, and K
  • Increased soil microbial respiration
  • Increased soil microbial biomass
  • Stimulated symbiotic nitrogen fixation in legumes
  • Increased arbuscular mycorrhyzal fungi
  • Increased cation exchange capacity

Sounds pretty impressive, doesn’t it? There are many pages of discussions on the positive impacts of charcoal or biochar, what is the best method of making  biochar, how much to add to the soil, etc. and etc. It is easy to read oneself blind. It is wonderful to see so much attention devoted to studying the benefits of charcoal and how it interacts with the soil. The home gardener, however, is usually more concerned with how to incorporate an idea into their garden than reading all of the latest research. Let’s face it, sequestering carbon, qualifying for carbon credits, and reducing greenhouse gases for the home gardener is a smaller interest than the increased soil fertility, nutrient cycling, nitrogen fixing and improving plant growth, health and productivity that charcoal provides.

What we do know is this-

  • Charcoal is created by burning wood or similar materials in an oxygen free environment. Charcoal is not ash that comes out of your wood burning stove.
  • The addition of charcoal to soil has profoundly positive effects that are extensive and long lasting. By some estimates the lifespan of charcoal in soil is in excess of 1,600 years.
  • The amount needed is quite small- from 3 oz. per square foot to an upper limit of 16 oz. per square foot.
  • There is a definite, noticeable period of productivity lag after adding charcoal directly to the soil.
  • Charcoal needs to be “charged” or “activated” with minerals and trace elements prior to it being able to contribute to soil fertility. The best way to do this is in compost, preferably a manure-based compost that already has minerals and trace elements.
  • Adding a mineral and trace element rich supplement to the charcoal/compost greatly increases the nutrient cycling and “activation” of the charcoal
  • The time period needed to “charge” the charcoal is at least six months, preferably a year.
  • Soon after adding charcoal to compost, the fungal, microbial and earthworm activity drastically increases.
  • Adding charcoal to compost speeds up the decomposition by several times.
  • The ideal size for the charcoal chunks is between the size of rice and corn.

So how, exactly, does one go about incorporating charcoal into the garden? Charcoal is relatively easy to find. Lowe’s or Home Depot have it in the grill section. Look for “Lump” or “Hardwood” charcoal. Stay away from briquets, as they are pressed and formed out of much more than plain charcoal. They usually have chemical or petroleum fire-starting compounds in them along with fillers. Come to think of it, you probably don’t want to be cooking with them, either, as you don’t want the fillers and fire-starters on your burgers! Right now a 8.8 Lb bag is $6.99 locally. Sam’s Club has 40 Lb bags of mesquite charcoal for $17.00 in the spring and summer. It will look just like a burned log or branch.  Once you get your charcoal, it needs to be broken or crushed to smaller pieces. The optimum size is between a grain of rice and a kernel of corn. Be aware of the dust created from crushing the charcoal, as you don’t want to breathe it. The dust is fine for the compost pile. To crush it, you need to get creative. I have cut an old propane tank in half to make an industrial pestle and mortar, but a 3 Lb drilling hammer or hand sledge hammer on a piece of concrete will do just fine. A rock will do just fine. Remember, this is Stone Age technology here, so don’t over-think or over-complicate it! You want to create crushed charcoal with what tools and materials you have available. Once it is crushed, add it to the compost pile or bin. Make sure to mix it in so it will make the most contact possible with the compost. A very good technique is to crush a little each time you add to the compost. This mixes the charcoal evenly.

After incorporating charcoal into your compost, make sure it has sufficient moisture and let it do it’s magic for the next 6 months. You should see microbial, fungal and earthworm activity starting in about a month, along with an accelerated breakdown of the compost. At the end of the 6 months, it should resemble rich, humic soil that is full of life! Then you feed the garden soil with a top layer of about 2 inches in the fall and spring and watch everything in your garden grow like crazy.

Our next installment on building your garden soil will focus on the mineralization aspect, or how to get a sufficient amount of minerals into your soil without having to lug around endless bags of soil amendments! It ties in closely with the charcoal and compost, so stay tuned…

Lorem ipsum dolor sit amet, consectetuer adipiscing elit. Aenean commodo ligula eget dolor. Aenean massa. Cum sociis natoque penatibus et magnis dis parturient montes, nascetur ridiculus mus.

Donec quam felis, ultricies nec, pellentesque eu, pretium quis, sem.

Read more

A person holding onto a piece of paper


What is the Best Way to Build the Health and Resiliency of my Garden Soil?

This is an exploration on how best to build your garden soil. These are the results of much reading, experimenting and talking with several people who have been engaged in this exact pursuit for over 30 years. Our personal experiences span 20+ years, from rangeland monitoring for Holistic Resource Management, to researching how long it takes to build soil in the arid South West, to examining and monitoring cryptogammic soil crusts and how they fix nutrients that begin the process of building a foundational soil from rock and sand.

Much has been learned or re-learned in the last 30 years by sustainable and biological large scale farmers. These techniques have been combined with state of the art diagnoses and tests to confirm movement in a positive direction, and to correct drift or fall back. The complex but identifiable chemistry of the interactions and sequencing of specific elements and chemicals show us that nature is much, much more complex and inter-related than we originally thought when we came up with the N-P-K fix-all formula for successful farming.

As one farmer puts it, “It’s not difficult, it’s just different.” This is a different approach for many in creating a healthy garden, in starting with the soil. What we have learned is that everything really does start with the soil. Not only the health of the plant, and the attending nutrition that the produce has; but the pest and disease resistance or lack thereof has its foundation in the soil. Something that the commercial sustainable farmers have discovered- once there is enough copper in the soil that is picked up by the plant, grasshoppers won’t come near the crops. Additionally,  insects are attracted to the scent of phosphates, which are given off by diseased or stressed plants. Chemical farming over-utilizes phosphates which worsens the insect attacks, creating more demand for chemical pesticides. Using sustainable, biological farming methods balances the amount of phosphates so that the insects aren’t attracted to the plants. This is all done in and with the soil, not chasing from one perceived “problem” to another. Insects,  diseases and weeds are seen as indicators of weakness and imbalance, not problems in and of themselves.  This is not to say that there will never be the need to address particular pest or disease or weed issues, but they will be smaller, less frequent, and easier to manage.

One of the basic tenants of any scale agriculture is to get more carbon into the soil. There are three types of carbon- green, brown and black. Green carbon is readily used by the soil and its’ organisms for food and energy. It consists of grass clippings, green manures, and young compost. Brown carbon is a more stable form and consists of dried stalks of plants, straw and dead leaves. This is food for the fungi in the soil. Black carbon is the reserve of the soil and is obtained from decomposed brown carbon and mature, aged compost. It is also obtained from charcoal, or bio-char. This is the basis of creating a vibrant, dynamic and healthy soil structure with its attendant communities of fungi and micro-organisms that all play their parts in making nutrients available to the plants, and getting the plant sap sugars in return.

The first article is on Terra Preta, or black soil that is found in the Amazon, one of the harshest agricultural areas in the world. The soil is heavy clay and the enormous rainfall washes most nutrients off or out of the soil within just a few years. Until finding Terra Preta, that is. The results of people systematically working charcoal into the soils are astounding. This is the basis for creating dynamic, resilient soils in our gardens. Read this first article, and our discussion notes afterward. This is in two segments, with the notes after the second segment.

The original article was published by ACRES USA.

Terra Preta- Magic Soil of the Lost Amazon

by Allan Balliett

It’s like finding a lost chapter from Peter Tompkins and Christopher Bird’s Secrets of the Soil – Terra Preta (literally “black earth”) is a manmade soil of prehistoric origin that is higher in nitrogen, phosphorus, potassium and calcium than adjacent soils. It controls water and reduces leaching of nutrients from the rhizosphere. Rich in humus, pieces of pre-Columbian unfired clay pottery, and black carbon, it’s like a “microbial reef” that promotes and sustains the growth of mycorrhizae and other beneficial microbes, and it has been shown to retain its fertility for thousands of years. In university trials, terra preta has increased crop yields by as much as 800 percent. It regrows itself when excavated. It is even possible to produce carbon-negative usable energy (such as diesel or hydrogen) while making the major input (bio-char) for terra preta on the farm.

If these amazing properties haven’t convinced you that terra preta is important to eco-agriculture, then consider this: experts say that terra preta sequesters carbon at such a high rate that, in the near future, farming with this technique could be eligible for lucrative carbon credits.

Perhaps most amazing, though, is the fact that, unlike many if not most of the eco-ag technologies reported in Secrets of the Soil, the incredible properties of terra preta are not denied by myopic academics. In fact, almost everything we know about terra preta is coming from university studies!

Much is still unknown about terra preta and “Amazonian Dark Earths,” but as the key component of a proposed agricultural system that would both feed starving populations and solve global warming, grant money is coming in to fuel university investigations of the technology. For every unanswered question on terra preta, there appears to already be a funded study underway.

TERRA PRETA DEFINED
Terra preta do indio is a black, earth-like, anthropogenic (manmade) soil with enhanced fertility due to high levels of soil organic matter (SOM) and nutrients such as nitrogen, phosphorus, potassium, and calcium embedded in a landscape of infertile soils. Terra preta soils occur in small patches averaging 20 hectares (50 acres), but 350 hectare (865 acre) sites have also been reported. These 2,000-year-old manmade soils occur in the Brazilian Amazon basin and other regions of South America. Terra preta soils are very popular with the local farmers and are used especially to produce cash crops such as papaya and mango, which grow about three times as rapidly as on surrounding infertile soils.

South American terra preta soils are also full of pieces (sherds) of unfired pottery. It is generally believed that the pottery was introduced into the soil much as modern growers add perlite or sand to potting mix, as a way of keeping the soil from baking completely tight under the tropical sun before a cover of vegetation could grow over it. Much is made of these sherds as “proof” that terra preta deposits are really prehistoric trash piles, but Charles C. Mann asserts there are indications that much of this pottery was actually made specifically for incorporation into the soil.

Associated with terra preta is terra mulata, soils which are lighter than terra preta and tend not to contain cultural artifacts but are said to have similar qualities. Terra preta soils are found near historic settlements, while terra mulata soils are found where agricultural fields were once located. It is assumed that the village- related terra preta is darker because it received continual inputs of household wastes (including humanure), and that terra mulata fields were amended chiefly with bio-char, which was initially created by burning forest cover and later by slow-burning brush, weeds and crop wastes. Because of their overall similarities, terra preta and terra mulata are often grouped under the title “Amazonian Dark Earths” (ADE).

William Devan, a geologist from the University of Wisconsin who is prominent in terra preta research, offers these comments: “The black terra preta is associated with long-enduring Indian village sites, and is filled with ceramics, animal and fish bones, and other cultural debris. The brown terra mulata, on the other hand, is much more extensive, generally surrounds the black midden soils, contains few artifacts, and apparently is the result of semi-intensive cultivation over long periods. Both forms are much more fertile than the surrounding highly weathered reddish soil, mostly oxisol, and they have generally sustained this fertility to the present despite the tropical climate and despite frequent or periodic cultivation. This is probably because of high carbon content and an associated high microbial activity which is self perpetuating.”

Ironically, information about the agricultural value of terra preta is only emerging now because of a paradigm shift among archaeologists that has reevaluated the role of indigenous people (AmerIndians) in the pre-Columbian Americas. Put simply, before contact, there were heavy populations of indigenous people in the Americas, in fact, until the mid-16th century, some of the world’s largest and most sanitary cities were in the Americas. Pre-Columbian Indians made great achievements in architecture, art and agriculture. Not only did they breed many of the economically important plants of today’s world (corn, sunflower, beans, potato, sweet potato, tomato, peanut, avocado, tobacco and cotton), but they also developed incredibly productive methods of agriculture such as raised beds and “three sisters.” As Jerry Brunetti has pointed out, the rate of production of calories by Iroquois agriculture at the time of the New England settlement was unimaginable to Europeans. Not only did the Iroquois Nation produce high-value foods, they were also able to produce enough of it to ensure two to three years’ worth of food in storage at any given time!

What the AmerIndians lacked, unfortunately, was resistance to European diseases. Hard to believe as it is, precontact Amerindians apparently had no human-to-human diseases, with the possible exception of syphilis. According to Charles C. Mann, they didn’t even have the common cold until Europeans arrived. Several waves of deadly diseases (such as small pox and measles) swept through the Americas after Columbus’ first visit, spread not only by subsequent European explorers, but, after contact, by the AmerIndians themselves through their well established, hemisphere-wide, socially motivated trade routes.

By the mid-1500s, most of the indigenous Americans had died as a result of epidemics. Undermined by pain, suffering, superstition and loss of leadership (many important Incan leaders died of European diseases, including the most powerful, which opened the door for Pizarro’s conquest of this powerful empire), AmerIndian society began to collapse. Urban populations could not be fed, and cities were abandoned. In the stone-free Amazon, this meant that metropolises built of wood and soil were absorbed by the jungle at such a rate that areas reported by the first explorer as heavily populated with massive structures were, just 50 years later, reported as jungle wildernesses populated by small bands of scraggly natives.

The bottom line for mainstream archeological interpretation of the history of the Amazon was based on the assumption that the area was a “counterfeit paradise,” with all of its nutrients locked into its canopy, leaving soils poor, acidic and toxic. Although terra preta was described to academic America as early as 1870, rich soils in the Amazon were considered to be an anomaly, the result of prehistoric lakes or hydrological accidents. (An enjoyable period view of the value of Amazon agricultural land can be found in an 1867 book entitled Brazil, the Home for Southerners, by Confederate expatriate Ballard S. Dunn, which lauds the high fertility of Brazil’s Amazonian dark soil among other aspects of “planterlife” in Brazil; it is available online in its entirety through Google Books, www. books.google.com).

Caught in a “believing is seeing” syndrome, archeologists assumed that because typical Amazonian soils were thin and infertile, large populations could never have existed there. Accepting this assumption, they saw no point in looking for evidence of settlement. Betty J. Meggers, the Smithsonian archaeologist, said, “The apparent lushness of the rainforest is a sham. The soils are poor and can’t hold nutrients – the jungle flora exists only because it snatches up everything worthwhile before it leaches away in the rain. Agriculture, which depends on extracting the wealth of the soil, therefore faces inherent ecological limitations in the wet desert of Amazonia.”

Views are changing, however, and a new school of archaeologists, geologists and soil scientists have asserted that the Amazon was in fact heavily populated and that the fertility of terra preta was what made feeding these large groups of people possible. Although many questions remain unanswered, this new school of Amazon investigators feels that there is substantial physical proof that not only was the Amazon rainforest home of very large populations supported by an effective agriculture based on the robust fertility of the manmade terra preta soils, but also that the Amazon forest itself is better thought of as a manmade landscape.

It is important to note that the good news about terra preta is not the news about the physical soils in Brazil. Although soils are illegally mined and sold as potting mix and soil amendments in Brazil and Bolivia, native terra preta is not accessible to U.S. growers. Because they are filled with pre-Columbian artifacts and because they are associated with archaeological sites that have yet to be fully investigated, terra preta cannot be purchased or imported.

The current goal of scientists studying terra preta is to learn what it is and how it works so that it can be replicated anywhere in the world. The focus of most of this work, however, is not on benefiting small farm American agriculture, but on how to make more fertile land available in tropical South America and Africa, along with an interest in carbon sequestration. The time is ripe for innovative eco-growers and agricultural researchers to explore the benefits of the magic soil from a lost world.

Allan Balliett is a biodynamic farmer and educator who operates a CSA serving families in the Washington, D.C. metro area. He is the founder and moderator of BD Now!, the international progressive biodynamic food and farming discussion listserve. He can be reached at Fresh and Local CSA, P.O. Box 3047, Shepherdstown, West Virginia 25443, phone 304-876-3382, email allan@FreshAndLocalCSA.com, website www.freshandlocalcsa.com.

Part two concludes this article. 


When a friend mentioned the Loofah gourd, I thought of a scrubby for the shower. When he mentioned eating the Loofah, I had to stop and really think for a minute. This is probably the same situation for most of us, as this Asian vegetable is not very well known here for cuisine. We tend to grow them or know them as bath or scrubbing sponges, the result of growing a long green gourd, then drying, peeling, seeding and pounding it to make it soft enough to use as a sponge. Virtually unknown in American kitchens, this very same gourd is harvested young across Asia when it is a tender and adaptable vegetable. It has a porous texture and cucumber-like flavor that lends itself well in dishes that use a sauce base or where it can soak up the other flavors of the dish. Very popular in China, it is steamed, boiled or stir-fried with various ingredients such as garlic, onions or dried- sometimes salted- prawns. In spicy dishes, it is used as a cooling ingredient.

There are two physically different kinds of Loofah. One has ridges on it that must be peeled to remove the sharp ridges before cooking. The second type, which is more common in the US, is round and when small looks like a zucchini. It only needs to be washed and sliced for cooking, though some recipes will call for it to be peeled. Terroir Seeds carries a round Loofah that can be eaten and used as a sponge.

Here are a couple of stir-fried Loofah recipes to get you used to the idea of the Loofah as a food.

Chao Sigua (Stir-Fried Loofah)

This is an extremely simple side dish that is deceptively delicious.

2 Tbsp Peanut oil

4 Cloves garlic, thinly sliced lengthwise

1 Lb. Young Loofah gourd, cut 1/4 inch diagonally, then in 1/4 inch julienned

1 Tbsp Water

1/4 Tsp sugar

Sea salt and freshly ground pepper to taste

Heat large wok or cast iron skillet over high heat, then add oil once wok is hot. Keep heat on high- this cooks in under a minute. Immediately add garlic, stir quickly 10-20 seconds. Add Loofah and water, give a good stir then add salt and pepper, stir again then add sugar. Stir for 30-60 seconds and serve immediately. Do not overcook, more than 60 seconds. The high heat will cook with very little oil and create a very delicious taste.

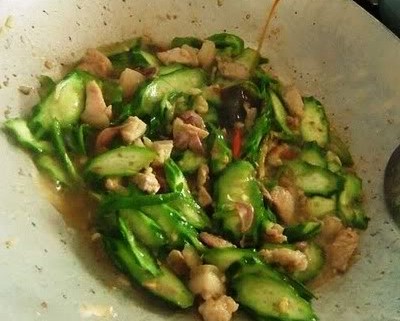
Stir-Fried Loofah and Chicken

This is another unusual, but delicious Chinese dish that will amaze your guests. Make sure everything is sliced, at hand and ready to be added to the wok, as once the cooking starts you will only have time to add ingredients and stir, as the whole process will take only about 5-7 minutes.  I prefer to use a cast iron wok, as it retains the heat better and makes the fast cooking of the Chinese stir-fry much easier. I start cooking the dish when the rice is just finishing up, and both are usually ready about the same time.

1/2 Lb skinless boneless chicken breast, cut across grain into 1/8-inch-thick slices

1  Tsp Sesame oil

2 Tbs Oyster sauce

1 Tbs Soy sauce

1 Tsp Sugar

1/2 Cup Chicken stock or  chicken broth

1/2 Lb Young loofah  (about 12 inches long). Slice diagonally into 1/4 inch slices, then cut in half.  You may peel this if you want, but not needed.

1/8 to 1/4 Cup Peanut oil

3 Small fresh shiitake mushrooms, stems discarded and caps sliced 1/8 inch thick

1 Tsp Chinese fermented black bean sauce

5 Small (2-inch) fresh red chiles such as Thai, seeded and cut into fine julienne (2 Tsp)

2 Tsp Garlic, finely chopped

2 Tsp Fresh Ginger, finely chopped

2 Tsp cornstarch mixed with 2 tablespoons water

Stir chicken, soy sauce,  sugar and 1/2 Tsp Sesame oil in a bowl, set aside for 10 minutes. This acts as a quick marinade. If you want, add 1/2 of the chiles to the mix.

Stir Oyster sauce, corn starch, and chicken broth/stock in another bowl, set aside.

Heat dry wok or cast iron skillet on medium-high to high heat. It needs to be just almost smoking before you add the oil. Once you add the oil, you will immediately start cooking and not slow down to get the best flavor and texture. When wok is hot, add Peanut oil, swirl wok to coat sides and immediately add chicken, stirring constantly. Cook for 1-1 1/2 minutes, until no longer pink, but just barely.

Remove chicken with slotted spoon to a bowl and set aside. Increase heat to high, add remainder of oil if needed, swirl wok to coat sides and add mushrooms, cook until lightly browned and tender, stirring constantly. This should be 1-2 minutes.  Add black bean sauce, chiles, garlic, and ginger and stir-fry until fragrant, about 30 seconds.

Add loofah and stir to coat, then add Oyster sauce mix and bring to a boil, stirring well. It should boil and start to thicken and turn translucent in 30-45 seconds. Lower heat to low at this point, let Oyster sauce with the cornstarch finish thickening to your liking and serve immediately over sticky rice. Drizzle remaining 1/2 Tsp Sesame oil over dish just before serving.