Strawberry Rhubarb Pie


 Ellen shares her research and experiences with rhubarb, that unusual but loved garden vegetable.

A deep red stalk is more popular among consumers, but often has poor growth and yield. Green varieties are often much more productive. People often assume red stemmed rhubarb is sweeter than other colors but color and sweetness are not necessarily related. The Victoria variety, which is probably the greenest variety, often produce some very sweet stems.

It is interesting to note that the Victoria variety, also known as Large Victoria is easily raised from seed, but the best flavor is often the second year or later. Pull the plant when the flavor starts to diminish and replant. It has juicy, medium sized greenish to red leaf stalks, is a heavy producer and is excellent for farmer’s markets or market gardeners.

Rhubarb (Rheum)

Rhubarb is one of my favorite food plants; its red-green stalks beckon summer on and strawberry-rhubarb pie is one of my favorites. During a trip to Chile, I was introduced to nalka, the Chilean wild rhubarb. The plants grew well along the coast and coastal rivers. We cooked the stalks with sugar the same way garden rhubarb is traditionally cooked. The stalks were so bitter and tough we had a hard time eating them. Rhubarb is a seed-bearing perennial that is thought to originate in Alaska. Rhubarb was first known as a medicinal plant 5,000 years ago. The Chinese prized dried rhubarb root for its astringent, laxative properties.

In the last two hundred years, rhubarb has been cultivated as a vegetable (some consider it to be a fruit because it pairs so well with fruits). Only the young stalks are eaten as the leaves of the plant contain high amounts of oxalic acid, an acid that is present in much lesser quantities in other vegetables such as spinach, sorrel, and beet greens. Oxalic acid has a somewhat sour taste.

There are two types of rhubarb that have been cultivated, the difference between the two groups are the color of the stalk and the size of the plants. “Victoria” varieties vary in color from green to light red with a green interior. Red rhubarbs, such as “Canada Red” are smaller plants, with less disease resistance. The stalks are a deep red inside and out.

Rhubarb is usually propagated by cuttings but can be grown from seed. Rhubarb plants grown from seed sometimes do not exhibit the same characteristics as the parent plants. Rhubarb comes quickly in the spring, when temperatures begin to warm up and is harvestable 6 weeks or so after the weather turns. Plants do not grow in hot weather, and will wilt through the summer. In cooler areas, or in beds with high moisture and well-fed soil, rhubarb can be harvested again in the fall.

Harvesting from plants less than three years old will cause the plant to grow less vigorously and to produce fewer stalks. Rhubarb can be harvested twice a year, if half of the plant biomass is left intact.

My favorite way to eat rhubarb is undoubtedly in strawberry rhubarb pie. There is something unreal about the combination of the sweet and sour tastes!


Strawberry Rhubarb Pie
Author: Ellen Brand
Ingredients
  • 1 pound 454 grams rhubarb, cut into 1/2 inch (1.5 cm) pieces
  • 1 pound 454 grams fresh strawberries, cut into 1 1/2 inch (4 cm) pieces
  • 3 tablespoons 30 grams cornstarch
  • 3/4 cup 150 grams granulated white sugar
  • 1 teaspoon fresh lemon juice
  • 2 tablespoons 28 grams unsalted butter, cut into small chunks
Instructions
  1. Preheat oven to 400°F. Pre-chill pie crust in refrigerator.
  2. Cut and place strawberries and rhubarb in a large bowl.
  3. Mix cornstarch and sugar together and turn in the fruit to the mixture.
  4. Remove the chilled pie crust from the fridge. Pour the fruit mixture into the prepared pie shell. Sprinkle the fruit with about 1 teaspoon of lemon juice and dot with 2 tablespoons of butter.
  5. Add lattice as top crust, bake at 400°F for 45 minutes, or until the crust is a golden brown color and the fruit juices begin to bubble.
  6. Transfer pie to wire rack to cool. When fully cool (several hours later) the juices will gel.
Recipe Notes

Pie should keep for up to three days at room temperature but I have never, ever seen one last that long!

Sour Cream Biscuits


Sour cream biscuits are a delicious use of extra sour cream,  for a special occasion or just for the fun of it. Using extra sour cream or sour milk to make biscuits or pancakes is an old technique that dates back to farm house days when there would be extra milk or cream from milking the cow. Organic sour cream will give a noticeably richer flavor.

This recipe comes to us via “Chile, Corn and Croissants” by Joan Stromquist who traveled all across New Mexico visiting inns to compile the favorite recipes of the innkeepers and owners. She shares almost 400 dishes, from spicy Southwestern standards to old favorites. Casita Chamisa, run by Arnold Seargeant, is in Albuquerque and sits on an ancient Pueblo ruins dating from around 720 BC to the mid 1600s AD. This is an old recipe and has been updated for today’s cuisine.
Sour Cream Biscuits
Says Arnold, the proprietor at Casita Chamisa, "This recipe comes from an old, old cookbook I found many years ago. The biscuits are light as a feather and the flavor is excellent. You can use sour milk instead of the sour cream, and they will taste just as good."
Author: Joan Stromquist
Ingredients
  • 3 Cups flour - White Sonora Wheat is excellent
  • 1 Teaspoon raw sugar
  • 1 Tablespoon baking powder
  • 3/4 Teaspoon baking soda
  • 1 Teaspoon natural salt - like RealSalt
  • 1/2 Cup coconut oil warmed or vegetable oil
  • 1 1/2 Cups sour cream
Instructions
  1. Preheat oven to 450°
  2. In a large bowl add the flour, sugar, baking powder, baking soda and salt. Stir together well.
  3. Add the coconut oil and cut it in well with a pastry blender or stand mixer so that the mixture is crumbly.
  4. Add the sour cream and mix in so that everything is blended, but do not overwork.
  5. Place the dough on a lightly floured surface. Knead the dough about 10 times or just until smooth.
  6. Roll out the dough to about 1/2" thick.
  7. Cut out the biscuits with a 2 1/2" round biscuit cutter.
  8. Place the biscuits on an ungreased cookie sheet. Bake for 10 - 15 minutes, or until they are lightly browned. Check at 10 minutes for doneness.
Recipe Notes

These keep very well for a couple of days. It's doubtful that they will last longer than this!
You can also use Greek strained yogurt in place of the sour cream.

Adapted from Chile, Corn and Croissants

A plant growing in the dirt on a sunny day.


These are really easy and quick to make, taking about 10 – 15 minutes to mix, knead, roll and punch out.

A plant growing in the dirt on a sunny day.

I rolled the dough out to about 1/2″ thick…


A plant growing in the dirt on a sunny day.

Then punched out the biscuits.


A plant growing in the dirt on a sunny day.

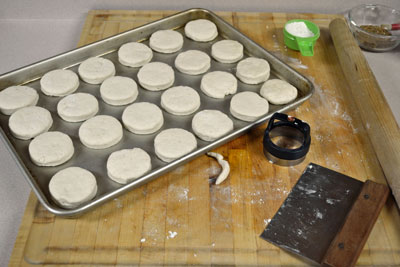
The recipe made exactly 24 biscuits, after re-rolling the dough from the scraps left over after cutting the biscuits out. Ready to go into the oven.


A plant growing in the dirt on a sunny day.

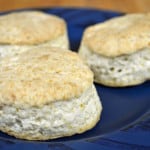
Fresh baked biscuits, fresh from the oven! The description is very accurate, they are light and fluffy with a great flavor.


Discover the secret to successful seed planting. Learn how the orientation of seeds can significantly impact their germination and growth.