Aurora and Pumpkin


Pumpkin is an essential part of the fall season in my humble opinion, but it is much more than the trendy “Pumpkin Spice” everything that suddenly jumps into our lives in the cooler weather. Real, home-grown pumpkin has a rich sweetness that is just plain lacking in almost all of the commercially available pumpkin products today. Let’s take that one step further and slow-roast that incredible goodness of a pumpkin and now you’ve got something that resembles that canned pumpkin as much as a brand new truck does a 100 year old buckboard!

The type of pumpkin does matter, so think about it before you dive in. Don’t fret about not growing your own – buy one this year from your local Farmer’s Market, local grower or CSA share, and then plant your own patch next spring. The smaller pumpkins tend to be sweeter, especially the ones called “pie pumpkins” like our New England Sugar Pie pumpkin have been selected and refined for their rich sweetness along with their smaller, easy to handle size. Larger pumpkins will not be as sweet, but have their own flavors so don’t discount them. Plan on using 2 to 3 of the smaller pumpkins to put up a goodly supply of puree, or one of the larger ones. You will want to put up more than you think you will use, as once your family and friends taste some of the deliciousness, it will go much faster than you initially think! Keep in mind that the commercially grown “Jack-O-Lantern” pumpkins are hybrids, grown specifically for carving and usually have absolutely no flavor at all!

The process is extremely simple and doesn’t require your presence in the kitchen, so this is a great thing to do when you are home but have other projects. Set the timer to keep you on track and you’ll do fine.

Let’s get into it!

A plant growing in the dirt on a sunny day.

Aurora and the Pumpkin

We are using the Connecticut Field Pumpkin for this, as we were shooting photos and had it available to roast. It has a mildly sweet flavor and is large enough to keep us in pumpkin puree for awhile. Aurora had to help, of course – inspecting and being part of the process!

A plant growing in the dirt on a sunny day.

Connecticut Field Pumpkin

The tools needed are pretty simple – a knife, cutting board, large spoon or spatula to scrape out the seeds and a colander if you want to keep the seeds for roasting and eating or saving and planting.

A plant growing in the dirt on a sunny day.

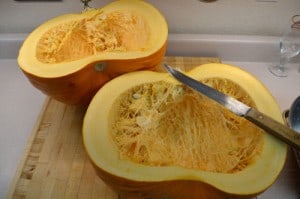
Pumpkin cut open

Cut the pumpkin open in half. This pumpkin weighed about 15 – 20 pounds, and you can see how thick the walls are, giving lots of pumpkin for cooking!

A plant growing in the dirt on a sunny day.

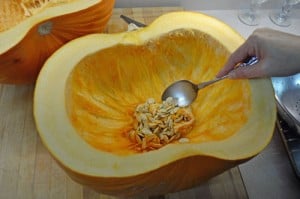
De-seeding

Use the large spoon or spatula to remove the seeds and as much of the pulpy connective tissue as possible.

A plant growing in the dirt on a sunny day.

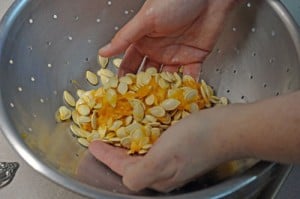
Cleaning the Seeds

Use the colander with a warm water spray to clean the seeds and remove the connective tissue. Then they are ready for roasting or drying and saving to plant next year.

A plant growing in the dirt on a sunny day.

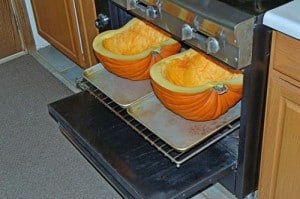
Roasting the Pumpkins

Ready for roasting! I wanted the slow roasted flavors that make the sugars caramelize a bit, so heated the oven to 300°F and roasted this one for about 2 hours, maybe a little more. I checked it every half hour or so with a toothpick – when it goes all the way in with very little resistance, the pumpkin is properly roasted.

If you need to roast it faster, you can – just use 350 – 400°F and peel the pumpkin, then cut it into 1 – 2 inch chunks or cubes. It will roast in about 30 – 45 minutes, you’ll need to check it every 15 minutes to make sure you don’t over-do it. It won’t have quite the slow-roasted flavors, but will be much better than the store-bought version nonetheless.

A plant growing in the dirt on a sunny day.

Peeling Roasted Pumpkin

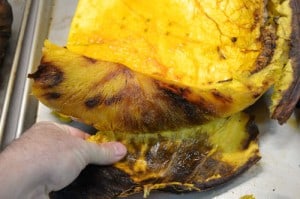
Next is peeling the pumpkin after it has cooled. You can see the darker spots, don’t worry, it isn’t burned – just well-roasted!

A plant growing in the dirt on a sunny day.

Chunks Ready to Puree

Cut the pumpkin into chunks after peeling. Cut them into manageable sizes for your food  processor, blender or whatever you will use to puree it. Keep the juices from the roasting pan, as you’ll add them to the puree later on.

A plant growing in the dirt on a sunny day.

Puree Time

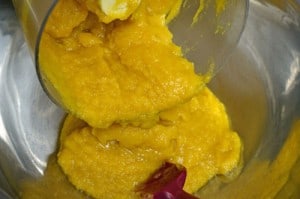
Into the food processor next! This shows the first batch and was a bit too full as it took a long time to work the pumpkin down and puree it. I added much less pumpkin to subsequent batches, and they processed  a lot faster.

A plant growing in the dirt on a sunny day.

Transferring the Puree

After pureeing, scoop it into a bowl large enough to hold all of the puree. You will need a bowl that is a bit larger than what holds the sliced chunks.

A plant growing in the dirt on a sunny day.

Stirring the Puree

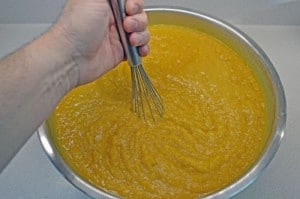
Remember the juices in the roasting pan? Add them to the puree and stir them in for added flavor.

A plant growing in the dirt on a sunny day.

Jars of Roasted Pureed Pumpkin

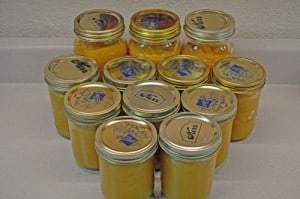
Here’s what we wound up with from one large pumpkin – 3 quarts and 9 pints of slow-roasted, pureed home-grown pumpkin! What is that worth at the store? We’ll use the quarts for soups and stews, with the pints going for pancakes, bread, muffins and cornbread.

We left about an inch of head room in the jars so we can freeze them without the jars breaking. Freezing is the preferred method, as canning is no longer recommended for pumpkin.

A plant growing in the dirt on a sunny day.

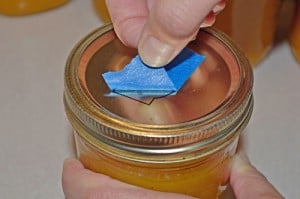
Painter’s Tape for Labels

Here’s a bonus tip: Use painter’s tape for labels that will go into the freezer. We use name brand such as 3M, as the store brand doesn’t stay on as well. Using it as labels is very inexpensive as a roll will last for several months, sometimes almost a year. The tape stays on in the freezer, but comes off afterward with no sticky, gummy residue.

A plant growing in the dirt on a sunny day.

Clean Tape Removal


Garden Tools


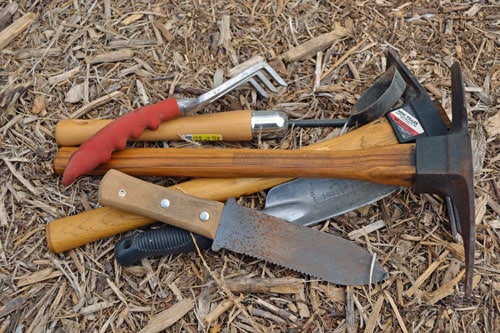
Fall and early winter is a great time to clean up the garden tools, do any needed repairs and see if there is any other tools needed for next year.

This includes:

  • Draining the gas from tillers or other power tools, checking oil levels and lubricating moving parts on power and hand tools.
  • Remove the batteries from any timers used.
  • Treat wood-handled tools with tung oil or other preservative.
  • Make sure to bring in any tools that should not be left out in the winter elements.
  • Drain all hoses, connections, soaker hose, drip tape, etc.
  • Collect up all plant markers and store in a box for easy access in the spring.
  • Add your dead plant material to the compost pile.
  • Make sure your seeds are properly dried, labeled and stored.
  • Make a list of seeds you are running low on.
  • Mend any fences, supports or other structures before you need them again in the spring.
  • Properly store your soil amendments and organic fertilizers in moisture proof containers.

Last but not least, enjoy the bounty of your harvest all winter and curl up with a good book!

Plated Roasted Brussels Sprouts


Brussels sprouts were not my friends when I was a kid. They always showed up unexpectedly, unannounced and taking up way too much space on the dinner plate with their hateful ultimatum – “No leaving the table until your plate is clean.” The worst part was the soggy, slightly slimy texture combined with the sulfurous, earthy, somewhat metallic taste from steaming.

Fast forward 30 odd years and after learning to cook, garden and eat healthy and tasty foods I’ve started to warm up to Brussels sprouts a bit more. I’m not having them twice a week or anything, but I’ve learned how to cook them a couple of ways that make them surprisingly tasty. This recipe is the first one that I tried where I really liked them, the other is Roasted Brussels Sprouts with Maple-Dijon Dressing which is completely unexpected but thoroughly delicious. That is a more sophisticated approach, this is rustic, simple and hugely satisfying. I’ve used this recipe to re-introduce others to an entirely different Brussels sprout than we all knew and hated as kids.

Take the time to properly roast the Brussels sprouts – in a cast-iron deep skillet is the absolute best way as the even heat caramelizes the sprouts, making them nutty, rich and very flavorful. Roasting opens up the flavors that are otherwise locked away and missed.

Here’s what you could grow in your garden for this recipe –

Classic Pan-Roasted Brussels Sprouts
Prep Time
20 mins
Cook Time
30 mins
Total Time
50 mins
 
Slow pan-roasting brings out the rich, nutty flavors of fresh Brussels sprouts. Combined with sweet pepper, onion and sausage, this will make a very satisfying one-course meal or a hearty side dish. Serves 6 as a side dish or 4 as a one-course meal.
Servings: 6
Ingredients
  • 1 pound of Brussels sprouts halved
  • 1 pound fresh sausage - Italian Polish or Sicilian, sliced
  • 2 medium onions diced large
  • 2 large bell peppers - preferably red or yellow diced
  • 3 cloves garlic sliced thinly
  • Olive oil
  • Balsamic vinegar
  • Sea salt and freshly ground pepper
Instructions
  1. Heat cast iron skillet over low to medium heat, add halved Brussels sprouts, making sure they are all cut side down. Add enough olive oil to lightly coat the bottom of the pan. Check every few minutes by slightly lifting a sprout to check the progress of the caramelization, about 15 - 20 minutes. Add a drizzle of olive oil if sprouts start to stick to pan.
  2. Once the Brussels sprouts have started to caramelize, add the sausage and stir to cook - about 5 minutes.
  3. When the sausage is beginning to brown, add onions, bell pepper and garlic. Stir to cook evenly, about 5 minutes.
  4. Add a generous splash of balsamic vinegar and stir to coat vegetables. Add salt and ground pepper to taste.
  5. Serve hot.
Recipe Notes

A good caramelization will have some dark spots on the Brussels sprouts, but don't worry - it adds to the flavor!

A plant growing in the dirt on a sunny day.

Pan Roasting Brussels Sprouts

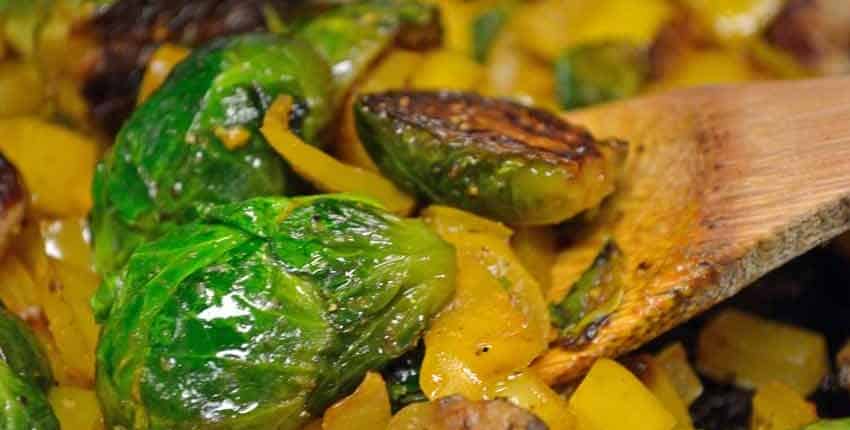
The hardest part of this dish is caramelizing the Brussels sprouts – which isn’t that difficult, just requiring a bit of patience. Allow time to let them slowly brown. Here’s what the caramelizing looks like… no they aren’t burned, but you don’t want to go much darker than this! The slow caramelizing adds an unexpected nuttiness and depth of flavor. 

A plant growing in the dirt on a sunny day.

Caramelized Brussels Sprouts Closeup

A closer view of what they look like when almost done. They will be slightly firm but not crunchy, yet a long way from limp and slimy!

A plant growing in the dirt on a sunny day.

Plated Roasted Brussels Sprouts

On to the plate and ready for a feast!

Roasted Brussels Sprouts


The much-maligned Brussels sprouts can be made into dishes that will win over almost everyone. The key is to roast them, bringing out their sweetness by caramelizing and tenderizing them. Their rich, nutty flavor can then come out. This unusual recipe combines the roasting with a delicious twist – a Maple-Dijon dressing that really sets these humble brassicas apart!

Here’s what could come out of your garden for this recipe –  Brussels Sprouts!

Roasted Brussels Sprouts with Maple-Dijon Dressing
Prep Time
20 mins
Cook Time
20 mins
Total Time
45 mins
 
Pan-roasting Brussels sprouts sweetens and tenderizes them, and adding this unique and highly tasty maple-Dijon dressing really kicks this dish up a notch. This works extremely well with oven roasted chicken or turkey as a side dish.
Servings: 6
Author: Mary Jane Butters
Ingredients
For the Maple-Dijon dressing
  • 1/4 cup plain yogurt - strained Greek works very well
  • 3 Tablespoons maple syrup
  • 3 Tablespoons Dijon mustard
  • 1/8 Teaspoon salt
For the Brussels sprouts
  • 1 pound Brussels sprouts about 4 cups
  • 2 Granny Smith apples diced (about 1 1/2 cups)
  • 1/4 to 1/3 cup dried cranberries
  • 2 Tablespoons butter
  • 1/2 Teaspoon salt
Instructions
Make Maple-Dijon dressing
  1. Whisk together all ingredients in a small bowl and refrigerate for an hour to let flavors mingle.
Prepare Brussels sprouts
  1. Use a food processor with a 2mm or 1/16 inch slicing blade to slice all the Brussels sprouts, set aside.
  2. Heat a large heavy (cast iron is preferable) skillet over low to medium heat and roast Brussels sprouts in butter with the salt until they soften and just start to caramelize, about 15 minutes. Stir often to prevent sticking.
  3. Increase heat to medium, add apples and dried cranberries. saute until apples are tender, about 5 - 10 minutes.
  4. When apples are tender and Brussels sprouts have caramelized, remove from heat and stir maple-Dijon dressing in.
  5. Serve immediately.
Recipe Notes

You can use other cool season veggies to add a different note to this dish. We had some left-over sugar snap peas that we added for a sweet crunch!

Adapted from Mary Janes Farm Oct-Nov 2014 issue

A plant growing in the dirt on a sunny day.

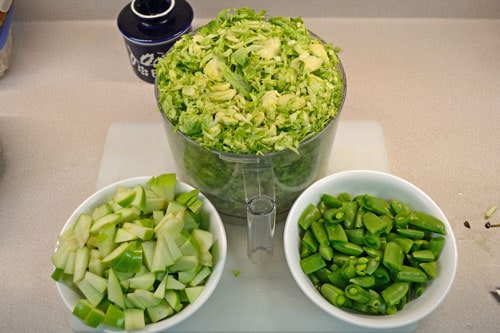
Slicing Brussels Sprouts

 After we whipped the Maple-Dijon dressing together and put it into the refrigerator, we started on the slicing. In just a few seconds we went from these…

A plant growing in the dirt on a sunny day.

Sliced Brussels Sprouts

… to this – ready for the pan! Slicing the Brussels sprouts made them much easier and faster to roast. 

A plant growing in the dirt on a sunny day.

Ready for the pan!

From there it was short work to dice the apples and chop the sugar snow peas. We added them because they were handy and weren’t tagged for another recipe.

A plant growing in the dirt on a sunny day.

Sauteing vegetables

Once the Brussels sprouts had roasted for a few minutes and started to caramelize, the apples and peas were added.

A plant growing in the dirt on a sunny day.

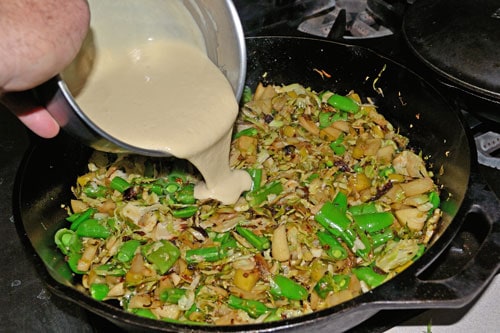
Adding Maple-Dijon Dressing

A few minutes later, the dressing was added and stirred in.

A plant growing in the dirt on a sunny day.

Roasted Brussels Sprouts

Ready to serve! The combination of flavors – rich and nutty from the sprouts to the sweet and light of the apples and peas, to the sweet/savory of the maple and mustard – all worked really well together.

A close up of many yellow flowers on a plant


Aphids and Nitrogen

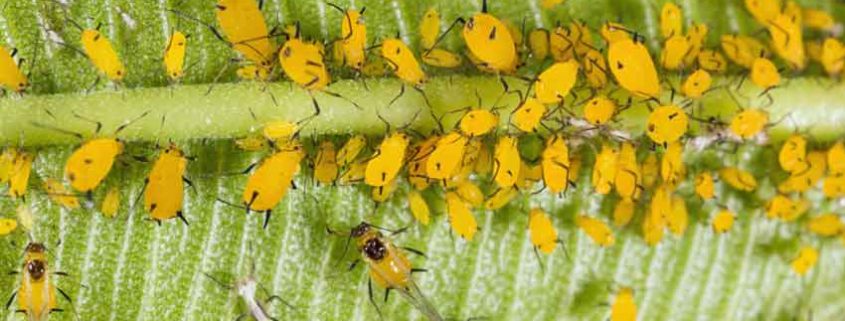
Aphids are one of the perennial pests that gardeners deal with, often with very mixed results. What works one year seems to fall flat on its face the next, with the reverse also being true. Aphids are tiny, soft bodied insects that have piercing, sucking mouthparts to feed on plant saps. They live in colonies, most often the underside of leaves and where the tender young growth is on a plant.

By themselves, aphids rarely outright kill a plant but they can inflict serious damage to both its flowers and fruit. It only takes a few aphids sucking on a young flower or fruit to weaken it or damage it beyond being edible. The sap they extract weakens the plant, stunting its growth and food production. The aphids can also be carriers or vectors of diseases or viruses, which they infect the plant with as they pierce the cell walls and extract the plant sap. Just a few seconds is all it takes for a virus to transfer from the mouth of an aphid to the plant.

Aphids will often arrive in a garden or on a plant by flying in. A small number will arrive and leave their wingless young who feed on the plant and immediately lay eggs, increasing the population quickly. The adults will then fly off and repeat this several times. This is why gardeners will often complain that the aphids overwhelmed the garden “overnight”. Each adult aphid can produce up to 80 offspring every week!

So what can be done about these insects? There are several methods of dealing with them, broken down into two main approaches – prevention and treatment. The prevention phase happens in the fall and early winter with soil testing and amendments that set the stage for success the next growing season. Treatment is just that – what to do when those pesky insects show up uninvited in your garden!

Aphids Love Nitrogen

Let’s start at the beginning, shall we? Nitrogen is a big, big player in the aphid dance. Aphids love nitrogen, plain and simple. They are attracted to the soft growing parts of a plant that are high in nitrogen, as it is a major factor in plant growth. Aphids are also really attracted to young seedlings, since everything on a seedling is growing and there is lots of nitrogen to be had.

Nitrogen plays a very important part in a plants growth as well as the content of its sap. Soils with excessively high nitrogen create very fast growing plants. This leads to rapid cell wall growth, which are elongated, thinner and much easier for the piercing mouth-parts of an aphid to penetrate than normal. The plant sap will also be high in nitrogen and will be especially attractive for the aphid. It is very important to understand that high nitrogen sap will be lower in overall sugar content – also known as brix – because nitrogen forms amino acids and proteins – such as chlorophyll – but specifically needs magnesium, phosphorus and carbon to form sugars. This can’t happen if there is excess nitrogen, as there aren’t enough of the other elements to form those sugars. Once the soil is amended with the correct nutrients, the plant will increase the brix/sugar levels and the aphids will die from sucking high sugar content plant sap as it is deadly – aphids can’t digest the sugars with no pancreas and thus die.

What all this means is that using high doses of chemical fertilizers will encourage aphids to call your garden home! Almost all commercial fertilizers are high in nitrogen and release their nutrients much faster than compost or other soil amendments, making aphid pressures much worse than they would normally be. They also contribute to lots of flowers with little fruit production or stunted and smaller than normal sized fruit.

It is interesting to note with soybean studies at Penn State University naturally occurring nitrogen-fixing bacteria – called rhizobia – provided a better form of naturally occurring nitrogen than the laboratory bred inoculated strains did. Plants growing in the naturally occurring rhizobia soils had markedly fewer aphids and stress than the inoculated ones. The amount of nitrogen provided by the lab developed rhizobia and the naturally occurring strains were the same, with the natural rhizobia having much lower aphid populations on the plants. They are continuing the study to see why this happens.

There is a concept at work here that we need to briefly discuss so that you can understand where we are going from here. The “Law of the Minimum” shows how interrelated many nutrients and elements are to healthy plants, not just the N,P and K that are listed on fertilizer bags.

The Law of the Minimum states,

“Plant growth is determined by the scarcest, “limiting” nutrient; if even one of the many required nutrients is deficient, the plant will not grow and produce at its optimum.”

Prevention and Preparation

The preventative method is to have a complete, comprehensive soil analysis done by a professional lab. I’ve mentioned these before, but they bear another – Crop Services International and Texas Plant and Soil Lab are great labs. They are thorough, friendly and will give you the info you need at a reasonable price. From this analysis, you will know exactly what soil nutrients, amendments and trace minerals are needed to eliminate a high nitrogen condition in your soil and plants, and by extension reducing the population and attraction of aphids.

Another, very simple method is to stop using commercially available chemical fertilizers! Without naming names, these come in a bag and sometimes have the word “miracle” attached to them. There are a number of brands that can be bought at any garden center or big box store in their garden section. Well-aged and decomposed compost – especially if you’ve worked with it how we discuss in our articles on compost – will give you a continuous supply of “soil food” to apply to your garden twice a year, in the early spring and again in the late fall. This compost with the amendments will slowly release the nutrients that the garden needs, along with attracting the biological elements in the soil that do the real work – earthworms, pillbugs, beneficial nematodes, fungi and all sorts of other hard-working critters that seriously improve the soil on a continuous basis.

Another aspect of prevention is cultural control, or removing the suitable environments where aphids can overwinter or establish an initial population to then swarm your garden. Standing weeds can be harbors of aphids, so remove them and remove dead plants from the garden in the fall. Don’t wait until the springtime to clean up the garden, as this can provide the perfect habitat for aphid eggs to be sheltered under. Inspect trees and bushes for aphid eggs in the fall, remove them by hand, vacuum or with a strong blast of water.

Treatment Options

Now that you’ve got the prevention and preparation covered, what can be done if and when the nasty aphids arrive? This is where the treatment portion comes in, and it would be wise to prepare for this as well. Early detection is very important for successful treatment, as if the aphids get a toe-hold, it will be much more difficult to rid your plants of several sizable populations instead of just one or two small ones. The incoming flights of adult aphids are random, so consistent inspection is best. This is very easy, just flip over the top, youngest leaves of several plants and look for the clusters of small aphids on the underside. Look around bud areas as well. If you see any aphids, they will be in small clusters or colonies and can be easily dealt with at this stage. Crush them by hand or prune the leaves or buds to remove them. Once you see the first small populations, go back and be very thorough with the rest of your plants, taking the time to examine them well. Trust me on this, the time spent now will save you much heartache, back ache, time and frustration in the very near future!

Aphids will excrete “honeydew” – a sweet, sticky substance – and is sometimes fed on by ants. This isn’t always the case; but in your inspections look for travel pathways of ants up and down the plant where the aphid colonies are. Sometimes the ants will lead you to the aphids that you would have otherwise missed.

Anytime you see any aphids, it is a good practice to set out yellow sticky traps. Aphids are highly attracted to the color yellow, which lures these little monsters into the traps. They are available at most garden centers and will be in squares or strips. Place several of them in the area where you find the aphids, and put out a few more than you might think. They are good inexpensive insurance.

If the aphids have colonized more than about 5% of the bud and young leaves of a plant, or are on more than that amount of your total garden plants, then it’s time for the next round of action.

Beyond physically removing the aphids, there are two approaches to treatment – biological and chemical controls. Biological controls use biology – predatory insects – to eat and control the aphids. Chemical controls are just what they sound like – using sprays of varying toxicity to reduce the aphids’ population.

Using the biological approach first combined with a non-toxic soapy spray is often the knockout punch needed for smaller aphid infestations. Releasing parasitic wasps that lay their eggs inside the aphids, ladybugs, lacewings, soldier beetles and the syrphid fly larvae are all highly effective if done in time, before the aphids’ population explodes. One of the best resources for biological controls is Arbico Organics. They will help you decide what species will work best for your garden situation, how many to release and how many times. Keep in mind that the goal is not to completely eliminate every single aphid, as then the beneficial and predatory insects won’t have a food source. The goal is to keep the aphids controlled, where they aren’t damaging the plants.

Remember, weather can be on your side when dealing with aphids. Heat and high humidity can really knock them back as they are fairly fragile and die off in droves when temperatures are over 90°F.

Soap sprays work by smothering the aphids by coating their skins. Start with a completely harmless soapy water spray like Dr. Bronner’s – using a tablespoon per half gallon in a hand sprayer. Make sure to apply the spray when beneficial insects aren’t around, as they will also be affected. From there, work up to an insecticidal soap like Safer Brand or horticultural oil such as neem oil. With both of these approaches, make sure to cover the underside of the infested leaves well for the smothering effect to work. These are contact controls, and depend on contact with the aphids to work, so they will need to be re-applied as often as needed until you’ve gotten control of the situation. This could mean once a day for a few days, then twice a week for a week or so, then tapering down to once a week. It might well take 2 – 3 weeks to really get a handle on persistent outbreaks, so be patient but persistent!

Moving up the toxicity ladder, multi part sprays such as our Home Garden Bug Solution work very well, but need to be used carefully as they do have a high level of insect toxicity even though they are made with no petrochemical ingredients. If you do need to bring out these big guns, test in a small area to see the effects before spraying your entire garden!

Hopefully you now see that there are a number of ways to reduce and control the pesky aphids in your garden. It all starts with prevention and preparation with improving the soil and balancing the nutrients it needs. From there you now have several new tools in your “pest control” toolbox to help you manage aphids in your garden next growing season.