Transform your garden with effective garden cleanup strategies to prevent pests and diseases for next season’s success.

Transform your garden with effective garden cleanup strategies to prevent pests and diseases for next season’s success.
Master the art of weed management and tackle the root causes of your garden’s weed problems effectively and strategically.
The counterintuitive gardening technique that gives you cleaner beds with less work. Discover the secret of stale seedbeds.
Discover the truth about homemade weed killers. Are social media recipes safe and effective? Find out before you try them in your garden.

Trap cropping – also called intercropping – is an older pest control approach used by commercial growers that is not widely known or used in home gardens, but it should! Essentially, a trap crop acts as a decoy or sacrificial plant for invading pest insects and luring them away from your vegetables. Once the destructive insects attack the trap crop, you can deal with them there instead of on your valuable food crops. Techniques include removal or spraying with a soap-based solution or natural recipe, all the way up to using insecticides on the trap crop.
Using trap crops isn’t a “one-size-fits-all” approach, as each crop attracts a specific set of pests. However, it fits perfectly into a home garden, no matter how big or small. Almost everyone can take advantage of trap crops, from traditional in-ground rows to raised beds to container gardens.
Trap cropping is one part of an integrated, organic management approach to gardening. Instead of just managing pests, this approach includes attracting beneficial insects that prey on the destructive ones while helping to pollinate your garden better. Other parts of organic management include planting cover crops and companion planting.

There are two main ways to use trap crops: to test for specific pest insects and then to attract those pests to better control and minimize or prevent their damage to your desired food crop.
When testing for specific pests, the most accurate results are obtained by using a border planting approach surrounding the garden. This way, pest insects have to pass through the desirable trap crop to reach your food plants, making it easier to monitor the pests and make better choices about identifying and controlling them.
Destructive pest insects are most attracted to plants in the reproductive stage of growth – flowering, fruiting, or setting seeds. This is why most trap crops are planted before your desired food crop – anywhere from a few days to a couple of weeks earlier, depending on how long the trap crop needs to start flowering.
After the insects attack your trap crop, you can be ruthless in controlling them – from spraying aggressive bug solutions and removing leaves up to removing the entire infested plant. Depending on the type of planting, this creates the first line of defense or an added layer of protection for your main vegetable, herb, or flower crop with no chemicals or sprays needed.
Just as there are different ways to grow a garden – traditional rows, raised beds, containers, hoop houses, and greenhouses – there are different ways to plant trap crops that increase their effectiveness and benefits.
Border planting – Just as it sounds, planting one or more pest-attracting crops outside of the garden or area where the desired crop is grown. This can be completely surrounding the garden or between the garden and where the pests come from – for example, between the garden and an open field.
Intercropping – Planting the trap crop in alternating rows or areas within the garden or desired crop. For example, planting a row of lovage on either side of your tomato row will attract tomato hornworms before they get to the tomatoes.
Mixed intercropping – Trap crops are planted among the desired crops with no distinction. This looks exactly like companion planting but for the opposite reason – you attract pest insects to the trap crop instead of bringing in beneficials. An example is planting red giant mustard among your cabbages to attract the cabbage caterpillar.
Now that you understand more about trap crops, how they work, and the different types of planting, it’s time to see exactly which crops can be used and what type of pests they help control.
Initially, you may be surprised to see so many familiar, common garden crops listed. However, remember your gardening experience – how many of these crops seemed to attract the exact pests listed here?
This is simply a different perspective or approach to deciding what to plant in your garden, when, and for what reason.
| Crop Protected | Pests Controlled | Trap Crop | Planting Method |
| Cabbage | Cabbageworm, Flea hopper, Mustard aphid | Chinese Cabbage, Mustard, and Radish | Intercropping |
| Cabbage | Diamondback moth, Cabbageworm | Collards | Border planting |
| Cabbage | Cabbage caterpillar, Harlequin bug | Red Giant Mustard | Mixed Intercropping |
| Cabbage and Squash | Aphids (blackfly, greenfly, whitefly), Flea beetle, Cucumber beetle, Squash vine borer | Nasturtium | Mixed Intercropping |
| Cabbage family | Flea beetle, Root maggot, Cabbage maggot, Harlequin bug | Radish | Intercropping |
| Carrot | Carrot root fly, Thrips | Onion and garlic | Border planting or intercropping |
| Corn | Leafhoppers, Leaf beetles, Mustard aphids, spider mites, whitefly | Beans and other legumes | Intercropping |
| Corn | Corn seedling maggot | Rye | Intercropping |
| Cucumber, Vegetables | Cucumber beetle | Amaranth | Border planting, Intercropping |
| Garlic | Thrips | Basil | Border planting |
| Potato | Colorado potato beetle | Tansy | Intercropping |
| Solanaceous family | Colorado potato beetle, spider mites, whitefly | Eggplant | Intercropping |
| Squash, Cucumber | Squash bug | Millet | Intercropping |
| Tomato | Tomato hornworm | Dill and lovage | Intercropping |
| Tomato | Colorado potato beetle | Potato | Border planting |
| Vegetables | Stink bug – attracts both pest and beneficial insects | Buckwheat | Border planting |
| Vegetables | Slugs | Chervil | Intercropping |
| Vegetables | Mexican bean beetle, Stink bug | Green beans | Intercropping |
| Vegetables | Thrips, Nematodes, Slugs | Marigold | Intercropping |
| Vegetables | Aphids early in the season, followed by ladybugs | Nettles | Intercropping |
| Vegetables | Stink bug, tomato aphids | Okra | Border planting |
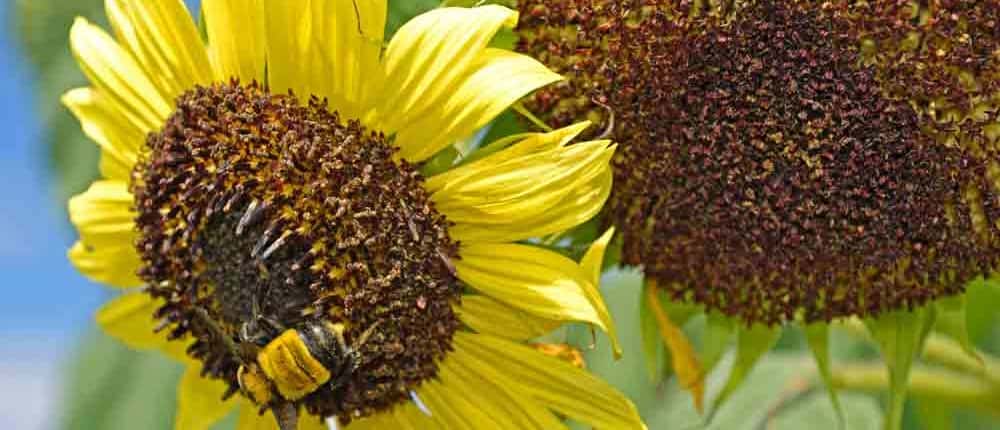
| Vegetables | Heliothis moth species, Leaf-footed bugs, Stink bugs | Sunflower | Intercropping |
| Vegetables | Japanese beetle | Zinnia | Intercropping |
| Vegetables, Tomatoes | Stink bugs, corn earworms, leaf-footed bugs | Sorghum | Border planting |
| Vegetables, Tomatoes | Cucumber beetle, Squash vine borer, Squash bug, Whiteflies | Squash | Border planting |
Remember, your main crops – vegetables, herbs, or flowers – are usually entirely different species than your trap crops, but not always. In long-season climates, an early group of cherry tomatoes is transplanted to attract common tomato pests, protecting the main planting 2 – 3 weeks later.
To get the most benefits from trap crops, you must be diligent in inspecting them for pest insects and take immediate, decisive action. This often means picking the bugs off, removing leaves, branches, or the entire plant in some cases. Appropriate action can also mean treating the pest insects by spraying, from a mild soapy solution or Garlic Juice Concentrate to our Home Garden Bug Solution.
Improper management of the trap crop can create “pest nurseries” – just the opposite of what you are trying to do!
You must be ruthless in taking action with the trap crop – remember, it is a sacrificial target to protect your valuable crops.
It can be difficult to manage multiple pests simultaneously, as planting multiple trap crops can be larger than your garden. It’s best to use trap cropping to manage your biggest pest insect infestation, then use companion planting to attract beneficial insects to work on the other pests.
As mentioned above, trap cropping isn’t a silver bullet, a one-size-fits-all solution, but it can be a valuable tool in an integrated organic management approach. A diverse mixture of plants makes it far less likely that the destructive pest insects will settle on your main crops, and when they arrive, they will be followed by beneficial insects that feed on them.
A comprehensive organic pest control plan includes –
The easiest yet most effective way to get started using trap crops in your garden uses these steps:
The level of your success depends on several factors, but you should see significant improvement in the population of pests, the amount of damage, and the health and amount of harvest in the first season you start using trap cropping.
Keep a notebook with your experiment’s details and results, successes and challenges, weather, and other related factors. After a couple of seasons, you should begin to form a clear picture of which direction is best for you and your garden in your particular climate.
This isn’t a quick-fix approach; it’s about understanding your garden better, more of a Systems Approach than a silver bullet. However, if you commit to an organic pest control approach, you will see a steady decrease in destructive pests and a comparable increase in beneficial insects. You will also see fewer damaged vegetables and increased harvests of healthy food from your home garden.
Did this help you better understand trap crops? Do you know a gardening friend who could use this information in their garden?
Please share this with your friends – either with the buttons below or on your social network of choice.
It not only helps them have a better garden, but you help introduce us to more gardeners who can use our unique approach to creating a better garden in partnership with Mother Nature!
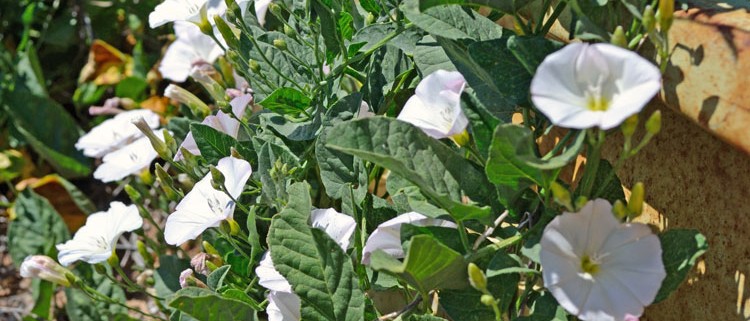
Field bindweed, also called perennial morning glory, has the scientific name of Convolvulus arvensis and is widely considered to be one of the most invasive and destructive weeds in cropland and gardens. It was first found in Virginia as early as 1739 and is thought to have originally brought to Kansas and the Midwest from the lower Volga region in Russia, hitching a ride in the oats and wheat brought by immigrants starting new lives. It and its close cousin hedge bindweed (Convolvulus sepium) are both perennials, reproducing from both seeds and shallow creeping roots which make control and eradication much more difficult than if it was an annual.
Bindweed has been so pervasive that in 1937 Kansas wrote official legislation outlawing field bindweed – among a number of other persistent weeds – requiring farmers to use every effort to remove them from their fields and state agencies to do the same with public lands. Several Midwestern states followed suit and adopted this legal approach, approving and vigorously promoting an “eradication through poisoning” approach. As you might assume, all of these laws and efforts were unsuccessful. Perhaps the legislators forgot, if they ever knew, that Mother Nature rarely obeys mankind’s laws.
Bindweed competes very aggressively with adjacent crop plants for water, nutrients, and light, reducing crop yield and quality as well as interfering with harvesting by intertwining with crop plants and clogging up farm equipment – thus giving its name of “bind-weed”. In farming, bindweed infestations can reduce grain crop yields by 20 – 50% and row or vegetable crops by 50 – 80%, with similar reductions in the home garden. This is not a weed to be taken lightly!
Identification and Growth

Bindweed Wrapped Around Morning Glory
It is pretty easy to identify field bindweed and its several cousins. If you’ve ever grown morning glory, then you are already familiar with what bindweed looks like because they are in the same family – Morning Glory. Bindweed has narrower leaves and smaller flowers than Morning Glory, as can be seen in the photo of bindweed vine wrapped around morning glory, and the photo at the top of the article. It is a low growing, drought tolerant with medium green narrow arrowhead-shaped leaves on vigorous vining slender stems. The flowers are funnel-shaped with colors from white to pink. The flowers produce small round capsules with 1 – 4 seeds in each, which can survive in the soil for up to 50 years due to their exceptionally hard and durable seed coats. There is a long central taproot on each plant that can drill down as far as 20 feet or more for moisture that develops numerous lateral roots, mostly in the top 2 feet of soil. Field bindweed reproduces from seed and from buds that form along the lateral roots, sending shoots up to the surface which then become entirely new independent plants. Lateral roots can spread about 10 feet per season, sending up new shoots along the way.
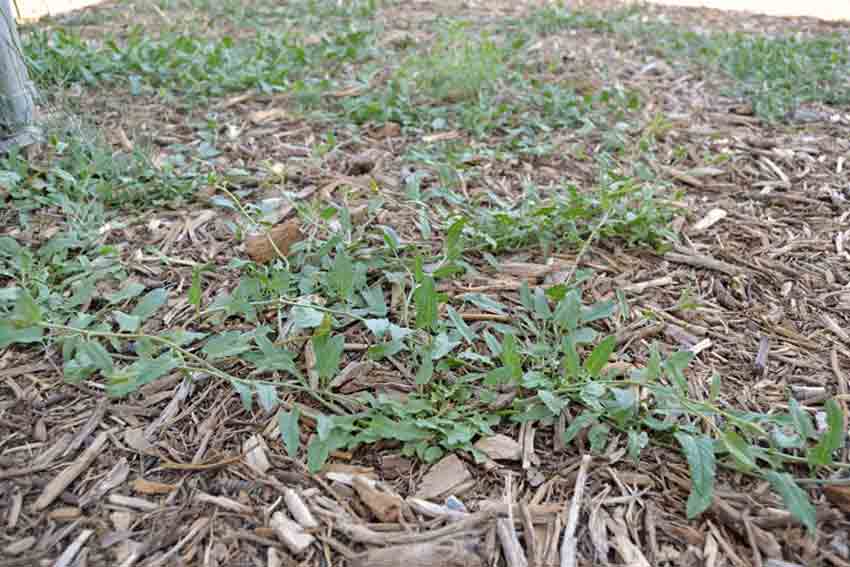
Invading Bindweed
The most common identification is when a gardener realizes there is a mat of green vines that are taking over a section of the garden or yard, or is climbing up the trellis or wall in the case of hedge bindweed. Early in the morning there will be hundreds of small, pretty flowers opened up that will attract a person’s attention.
Early warm weather wakes bindweed up and it grows until the frost or cold stops it in the fall. Extreme heat, drought, and cold will slow down or kill off the top growth, but the underground roots and shoots will go dormant, waiting for enough moisture or better weather to re-emerge. The root systems can spread up to 10 feet per growing season, or by the lateral roots and buds being broken up and re-distributed by tilling. Seed is often spread from irrigation water runoff, birds eating the seeds and depositing them elsewhere, on the feet of gardeners, dogs, and other animals and on the wheels of wheelbarrows, tillers or other machinery and vehicles.
Control Methods
When researching how to control bindweed, the most commonly recommended method is to spray it with a persistent herbicide like glyphosate (Roundup) or worse, but then turn around and caution that care must be used around vegetable or other food crops.
Please understand, we very strongly do not recommendthis approach, as is often creates more problems than it solves.
The second most common prevention recommendation is to make sure to avoid bringing in soil, seed, hay or animal feed that has the seeds, buds or pieces of the lateral roots in them. This is somewhat obvious, but too many times the first sign of having a problem is when the little flowers have bloomed and it is way too late for prevention.
The folly of using persistent, petrochemical herbicides to control most weeds – but especially bindweed – is apparent when looking at the multiple mechanisms it uses for reproduction – seeds, buds, lateral roots and the shoots they send up, as well as the vast amount of seeds that can stay dormant for several decades, just waiting for the right soil conditions. Sure, spraying will knock the above ground growth back, but the next season it will be back from all of the different angles it uses to survive, so more spraying is needed. Meanwhile, the spray is also knocking back the exact plants you want to grow and it isn’t beginning to touch the seed or root reservoirs in the soil!
Another common but misguided approach is to use a mixture of vinegar, Epsom salts, and dish detergent. This doesn’t work any better and may wind up killing more plants that just the weeds. Vinegar – whether household strength or the much stronger agricultural vinegar – is an acid and affects the above ground green growth. It will kill that off, but not touch the underground roots, seeds or shoots. It also changes the pH of the soil, potentially creating conditions for worse weeds to come in. Epsom salts are magnesium sulfate, supplying elemental magnesium for the soil microbes to work with and sulfur, which again lowers pH and is a nutrient building block. Dish detergent is a “spreader/sticker” which coats and covers the surface of the leaves, suffocating them. Unfortunately, it can also suffocate beneficial insects, earthworms and the leaves of nearby plants you want to keep.
It is initially easier and much simpler to just spray the weeds, but that quickly becomes a slippery slope as the weeds you are trying to control grow more abundant and you start to notice other invasive weeds appearing that weren’t there to begin with. If you want to get ahead of the weeds, you must understand how they grow, spread, reproduce and the soil conditions that allow them to flourish.
Compare spraying increasing amounts of herbicides multiple times each season to an initial learning curve, some soil improvements and watching as the unwanted weeds start to retreat year after year, while your garden or farm grows stronger, healthier and produces more food that tastes better. Which road do you want to go down?
In looking at methods of controlling bindweed, we need to step back just a bit to understand more of why this, or any other, weed establishes itself in the first place. Contrary to much of the commonly spread information today, weeds don’t just “happen”; they are in a certain place for a very specific reason – the conditions are “just right” for them to grow there.
Weeds are an indication of what is going on with the soil and its fertility, both right and wrong. They show the progression of the soil, whether thefertility and biological diversity and health are improving; or if it is in decline. Very much as a pond will go through several generations of different species of plants until it is filled in and becomes a meadow; or a grass pasture will gradually fill in with a progression of woody shrubs and eventually trees, weeds will have a progression of species that tell the story of improving or failing health of the soil where they grow.
This information is by no means new, untested or untried. It has simply been swept aside in the race toward industrial agriculture shortly after World War II using leftover nitrogen and phosphorus stockpiles from explosives manufacture. This chemical race also happened to home gardening, unfortunately. Dr. Carey Reams and Dr. William Albrecht were some of the last and greatest researchers into the relationship between healthy soils, healthy plants, and healthy people, which naturally extends to the study of weeds in relation to soil conditions. Much of their work is more than 50 years old at this point and is only becoming more proven as more research and testing is done in soil health. One of the best books that we always recommend to anyone wanting to start gaining a better understanding of how and why weeds work is Weeds – Control Without Poisons by Charles Walters, the founder of Acres USA magazine.
The appearance of weeds doesn’t always mean bad things are going on in the soil. For instance, moderate lambsquarter and pigweed are an indication of good soil structure and fertility is good, crops will thrive and insects will generally stay away. They can be managed with light tilling of the top two inches of the soil within one to two days after the weeds have sprouted.
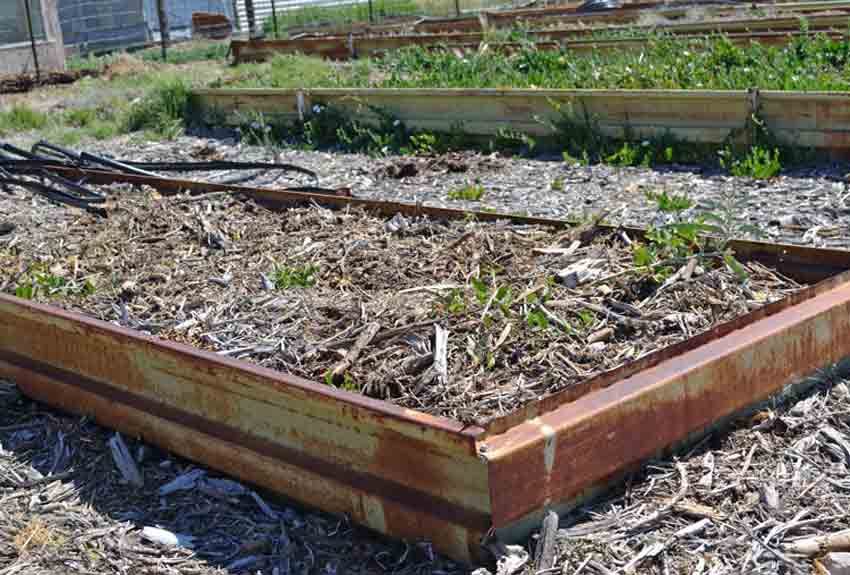
Two Adjacent Raised Garden Beds
What bindweed says about the soil conditions when it appears is that the soil is out of balance, with pH issues and stuck or incomplete decomposition of organic material accompanied by excess heavy soil metals such as magnesium and potassium. There is usually an accumulation of dry and dead plant matter that can’t finish decomposing, creating the right conditions for bindweed to flourish. Most often, the soil is low in humus materials with low available calcium and phosphorus. pH can be either excessively low or high and the soil structure can be clay or sandy.
This is easily seen in the photo above. The near bed was treated with compost and a top dressing of wood chips last fall, while the bed in the background had flowers in it, was not cleaned out for the past couple of years and had little to no compost amended to it. The near bed has a few shoots appearing, but the background bed is over-run and won’t be able to be planted this year.

Bindweed Sneaking In
There are two different, proven methods of stopping and controlling bindweed without using herbicides.
The first method is using weed cloth to block any sunlight from reaching the bindweed plants, much like my article Stopping Bermuda Grass in the Garden.
This method can work if you take care to overlap the shade cloth, avoiding any gaps where the roots will come through. It normally takes about 4 – 5 years to make the roots go dormant, lose their stored energy and then finally rot.
The challenge in trying to shade bindweed out can be seen above, where the bindweed is sneaking in where there is a gap between the weed barrier cloth and the metal raised bed – possibly less than a 1/4 of an inch!
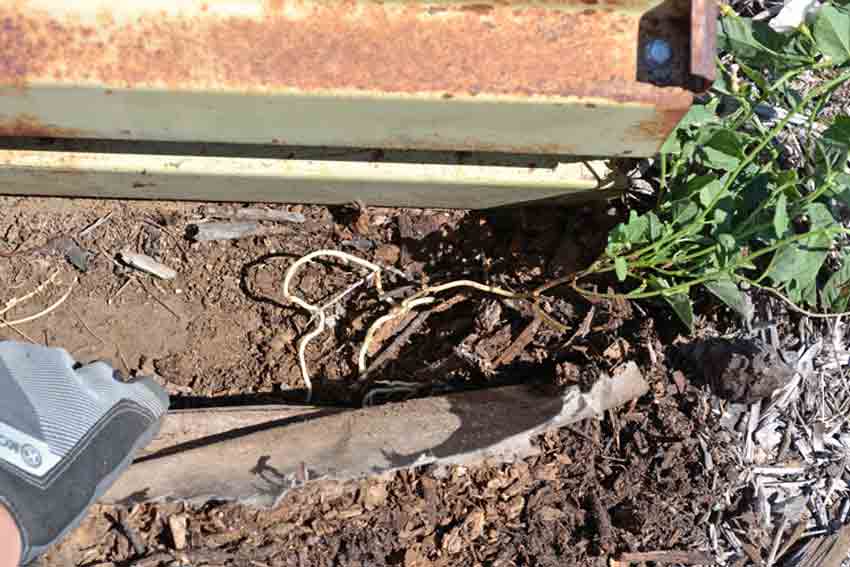
Bindweed Lateral Roots
When the weed barrier is pulled back, it is easy to see the lateral roots running along the bed to where the gap allowed them to put a shoot up and survive.

Bindweed Long Lateral Roots
Moving around to the long side of the raised bed – about in the middle of a 15-foot long bed – we found another shoot poking its head up and pulled the weed barrier fabric back.
This is what we found – a series of lateral roots that had followed the joint of weed barrier fabric and raised bed, poking shoots up wherever it could. These lateral roots went to the shoot in the above two photos.

Handfull of Lateral Roots
Here is what over 10 feet of lateral bindweed roots look like. What we’ve discovered is that when we installed a heavy and fairly non-porous weed barrier fabric several years ago and then put several inches of wood chips on top is that we were creating the perfect environment for bindweed to encroach underneath the weed fabric and pop up in our raised beds.
For most of our beds, this isn’t a serious issue as they are rich and well composted with a fertile and biologically active soil which seriously deters the growth mechanisms of bindweed, so we just see them popping up just inside the raised beds and nowhere else.
The second method involves improving the soil by adding missing or low nutrients, adjusting pH and adding well aged, rich compost to jump-start the decomposition process again.
This short-circuits the growth pattern of bindweed and will soon start to rot the roots and shoots. A complete soil analysis from a professional soil lab is the correct way to determine what nutrients are needed and how to adjust the pH of your soil. There are a number of very good ones, but the two that we know and are familiar with are Crop Services International and Texas Plant and Soil Lab. Either one is excellent and will help you determine what nutrients are needed and in what amounts.
Successfully controlling bindweed depends on several factors that are unique to each garden or farm. Your soil’s pH, mineral levels, clay or sandy based soil and whether you have wet or dry organic matter that is stuck in its decomposition will all determine what nutrients and approach to use. The complete soil analysis from a professional soil lab will provide you the information needed to make the plan to begin reversing the encroachment.
Bear in mind that no single weed species grows independently of all others, they will grow in groups and communities; much like companion plantings of flowers, veggies and herbs do. As you begin to learn more about what different weed species prefer and the conditions that they need for growth, you’ll start to see that groupings of particular weeds mean very specific things related to soil health and fertility. They will indicate exactly what is right or wrong with the soil and what is in excess or lacking. Then you can make the corrections and watch them leave, followed by others that are much less difficult to deal with and indicate a much more fertile soil.
This may seem a bit overwhelming at first, but when you take a step back and realize how much you’ve learned about gardening or farming since you first began, even if it’s only a short time – then you can see how much this knowledge will benefit both your soil and you with fewer weeds, pests and more abundant, healthier plants and veggies, herbs and flowers.
Bermuda grass: love it or hate it – most people fall into one of the two camps; there doesn’t seem to be much in-between. Personally, I think it’s a well-adapted grass for our harsh, dry Western climates. It loves heat, is remarkably wear resistant to foot traffic and is one of the most drought tolerant turf grasses around. It’s great for areas that need turf, for erosion control and for feeding to horses, but it’s an invasive alien weed in the garden. That’s where we have a problem.
We’ve dealt with a slow Bermuda grass invasion over the past few years as it spread from the walkway between our greenhouse and garden into the garden itself. At first it wasn’t such a pain because it colonized the wood chipped walkways and area where the picnic table is. Then it headed toward our smaller raised beds, completely taking over one and entangling the drip system where it entered the raised beds in 3 others.
Bermuda Grass Stolons
We’ve tried a number of approaches to curbing it’s enthusiasm – burning the above ground grass and runners (properly known as stolons) both during and after the growing season, spraying a strong vinegar solution to the green grass phase and digging up the clumps and removing them. Nothing has really worked very well or for very long. Burning is highly satisfying, but did nothing about the rhizomes underground or the seed bank in the soil. After a season of targeted burning, the grass came back just as thick and lush the next spring. The vinegar sprays punched the Bermuda grass in the nose for a while, killing off or wilting the above ground growth but the rhizomes just sprouted up within a few weeks several inches away from where it was sprayed.

Bermuda Grass Seed Head
Persistent petrochemical herbicides such as Roundup are out of the question for a few reasons. One, we are working in our food producing garden and fully realize that whatever is put into the ground will wind up in the vegetables that are eaten. Two, we are a company that works hard to educate about the overuse and over-dependence on what has been called “rescue chemistry”, so it’s just a non-starter.
So what can be done? As is usual with us, we realized that understanding more about this grass than just how to kill it would probably lead us to answers of how to work with it better. After all, as gardeners we are forever working to get the plants we want to grow in a certain area, all the while trying to discourage other plants that we don’t want in the same areas!
It turns out that Bermuda grass isn’t originally from Bermuda; it’s from Africa and was introduced around the mid-1750s. It is thought to have hitched a ride in hay and introduced into the southern states initially. It spread from there and today it is most commonly found in the southern and southwestern United States. Bermuda grass was used almost exclusively as forage for animals for over a hundred years, sometimes becoming a lawn grass by default in places where other grasses could not survive the hot summers well. It wasn’t until the early 1900s that it became recognized as a valuable golf turf grass, starting a second life. Several resources list it growing below 3,000 feet in elevation; our garden in central Arizona is right around 5,000 feet so that doesn’t seem quite correct.

Bermuda Grass Rhizomes
Bermuda grass is sometimes confused with crab grass. Bermuda grass has a deeper root system and crab grass has no stolons or rhizomes to deal with.
In undisturbed soil, Bermuda grass will only drive its roots about 6 inches deep. However, they can go significantly deeper in sandy soil, deeply tilled fields or garden beds, or where the roots meet a solid barrier such as a sidewalk, concrete foundation or walls. This is why driving a solid edging into the soil deeper than about 8 inches has been shown to be effective in stopping the spread of a patch into a garden or surrounding area.
Unfortunately, controlling Bermuda grass with nutrient management or pH management just doesn’t work very well; unlike morning glory or bindweed or a number of other weed species.
The two approaches that have proven to work are drying/desiccating the top 6 inches of the soil to get both the above ground stolons and the underground rhizomes and roots, and excluding light. The one real weakness of Bermuda grass is that it simply won’t grow in the absence of light. Then again, most plants don’t!
There are some folks that have had success with digging or scraping the top layer of soil away, then replacing it with rich topsoil and compost that you are sure has no Bermuda grass seed, stolons or rhizomes. For every success story using this approach, we’ve heard of a dozen others that have seen a re-infestation after some period of time.
The problem with our garden situation is that we don’t have ready access to high quality topsoil that has no Bermuda grass in it. This is part of how we wound up with our current experiment – we brought in topsoil from a neighbor’s property to help fill in and got an unexpected bonus.
Using a thick clear sheet of plastic on top of the ground and excluding any moisture during the growing season has shown to work well, if the area can be isolated with no roots or stolons escaping the area being treated. This approach works especially well if you live in a sunny and warm to hot area during the summer, as a cool and damp summer will do little to stop the grass from growing. If there is escapement, the roots or stolons simply bring in moisture and nutrients and the grass suffers but does not die. Because of the grass intrusion into the garden and under the fence, we can’t use this option.
That leaves us with the shade option, so we are going to do it right. The first step is to take the wood chips out and scrape what we can down to the soil, removing what clumps of grass are possible. We burned the remaining grass, in order to reduce its energy reserves.
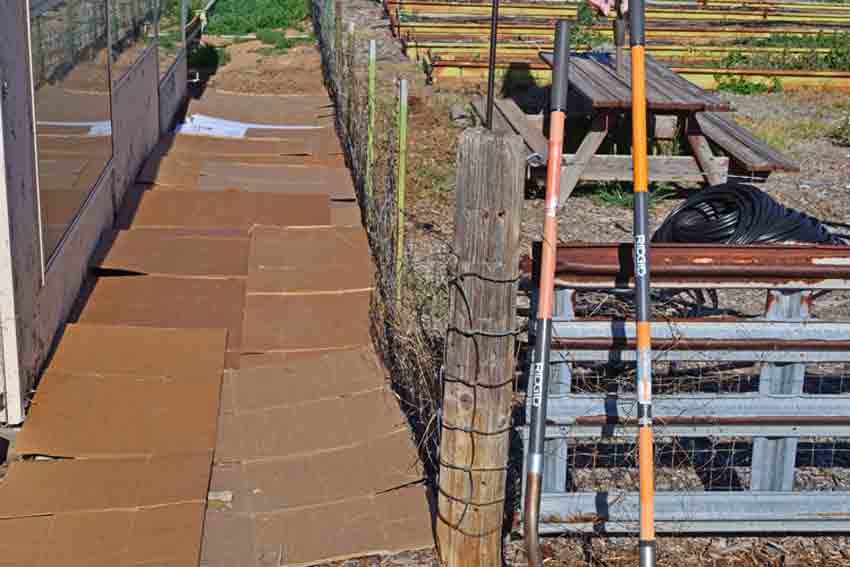
Double Layer of Cardboard
Then we installed a double layer of cardboard for two reasons – it helps to shade the ground and will decompose over time, increasing the chances of rotting the remaining Bermuda grass.

Weed Barrier Cloth
Over that we installed a thick and very dense weed barrier cloth from A.M. Leonard, a horticultural tool and supply company. You don’t need to be a business to order from them and their products are commercial quality. It is 20 mils thick, has a 98.7% opaqueness to light, won’t rot or mildew, will allow water to pass through and has a 5 year warranty, so should last for plenty of time for the Bermuda grass to rot. This photo is with the full, bright afternoon sun behind the cloth, to show just how much light is stopped. I actually had to lighten the photo up a bit!

Aurora Helping
Installation was easy – we simply rolled it out with our resident Dalmatian expert – Aurora – supervising…
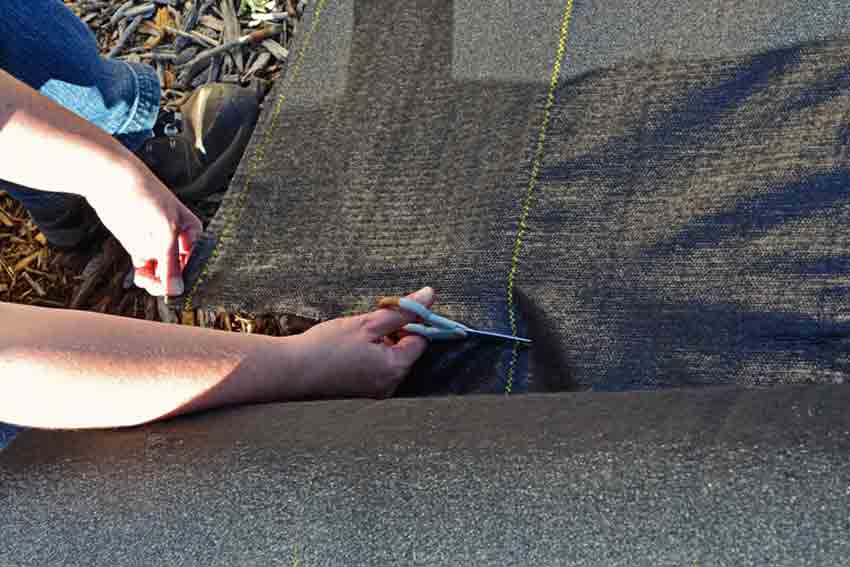
Cindy Trimming Weed Cloth
…then trimmed it to length with scissors.
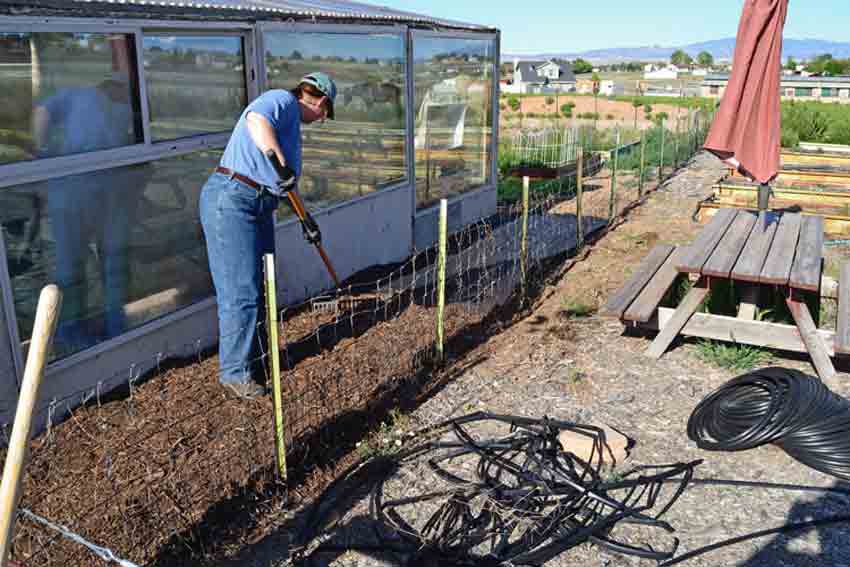
Spreading Wood Chips
To finish things off we put 4 – 5 inches of wood chips on top of the weed barrier to further shade everything and discourage any other weeds from making their homes in the wood chips. With this approach, there should be no way that light will get to the grass or soil and as the cardboard rots it will start a layer of decomposition that will include the remaining grass seeds, stolons, rhizomes and roots. This very well might take a year or more with our moisture levels, but that is why we went to the lengths we did to ensure that light can’t get down to the grass and short circuit our project.

Weed Barrier Installation Finished
Here is the completed view, with the double layer of cardboard, weed barrier cloth and thick layer of wood chips installed.
We will post updates as they happen to this project. In the meantime, we would love to hear of your success or challenges with dealing with Bermuda grass in your own garden!
One of the biggest questions we are often asked is what to do about furry and/or feathered critters that want to snack on our gardens. There are a lot of approaches, and we realized that our customers have more experiences to share that can help more folks, so we put out the question of what has been successful in helping to deter critters from your garden?
We received some great replies that we’ve included here. We’ll start off with perhaps one of the most challenging garden conditions in the US – at the South rim of the Grand Canyon national park. Here elk and other wildlife are protected, and there is a short growing season to contend with.
Deb from AZ writes – “Since we are in Grand Canyon National Park, wildlife is our #1 challenge…we have to have an 8 ft. fence around our garden to keep the elk out. Rodents are also a huge problem here: gophers, mice, voles, and chipmunks/squirrels. I feel like we have become pretty skilled at working around them!
Here’s what we have learned to do:
This sounds like a ton of work, (and it is), but once you make all of these structures it doesn’t take too long to install them, and it really saves your crops from being decimated. Even the smallest critters are creatures of habit, so if you take the time to observe what they are doing you can often work around them or plant more attractive plants in less trafficked areas.
Most importantly, we have learned to be a little more Zen about the whole thing, and now just expect there to be some losses from critters. We always keep enough extra seeds of short-season crops to re-plant areas that are compromised!”
Regina from NC says – “Last year I planted a garden in a different area and found the deer just loved my cabbage, broccoli green beans – all my first plantings were eaten to a nub. I consulted a local expert (94 year old gardener) and was told the following:
Plant a wide row of green edibles outside the perimeter of your garden and then put a border of yellow ribbon tape (the type used at a crime scene) and leave it a little loose so that it moves and twists in the breeze.
I planted oats and clover outside the garden area and put the yellow ribbon around the garden. The deer ate the stuff outside the garden area and left my garden alone.
The expert advice from the seasoned veteran worked like a charm.”
Jim in IL found – “No exaggeration…last spring I would see 50 rabbits running around within a 1/2-mile radius. They were everywhere! Many times I would see 5 or 6 running/playing together. This obviously is a bad thing when you have a veggie garden! I have 8 raised beds (5×20′) which I also cover with row covers. The rabbits would even crawl under the protective covers and nest under my plants. I had to do something fast!
This past fall I put up a 4′ chain-link fence around my garden (approx. 35’x85′) which was really only to serve as a frame for the 1″x1″ (24″ tall) vinyl coated wire mesh fence I installed inside the chain-link. I buried the mesh 6″ deep to hopefully prevent the vermin from digging under. This spring will be the true test for my efforts.
I’m not sure if the chipmunks can squeeze in the 1″ holes, but just in case, I have traps for them. Last season I nailed 35 of them. Aggravating to do all this work only to have the critters get in for a free meal!”
Diane shared – “I wanted to share that after years of the birds and lizards destroying much of our newly-planted raised bed gardens, my husband has built some screen covers over our raised beds. He used 2 inch x 2 inch redwood posts for a frame, and attached wildlife netting to the frames. These are slightly larger than each raised bed’s opening. He placed the screen-covered frames on top of the raised beds, and no more early garden destruction! Our early Spring garden is thriving!”
Mary Lou in IL has learned – “The best trick I have is to put aluminum foil around small plants that I don’t want the chipmunks to dig up. They hate the aluminum foil and won’t dig up my new transplants. It is actually funny to watch their reaction when they try to dig and get the foil instead of dirt.”
Linda in NE shared – “I have found Aztec Marigolds work really, really well at keeping the bunnies away from my strawberries. I usually leave them in the ground till spring, but for some reason I pulled them all at the end of last season and have noticed a huge increase in the bunny population in my yard throughout this past winter. Next year I’ll leave them in till spring.
To keep the neighbors cats away from my “bird garden” I scatter rue seeds amongst the beds. It keeps the cats away, but it makes it hard to get in there to cut flowers for bouquets.
For the never ending wasps I rub a bar of soap around all the areas where they like to hang out. When I see a nest forming I liberally rub the soap all around that area. And I try to destroy all of the nests I find after the first freeze. I know wasps serve a purpose, but if they want a place in my yard it’s going to have to be away from the house and shed.
Chrys in PA shares some wisdom – “My uncle taught me an effective way to keep the crows from “unplanting” your corn as soon as your back is turned. Poke a hole in the ground about 1/2 inch deeper than normal, drop in the corn and cover it with dirt. Then take your digging stick and poke a hole about 1/2 inch deep over the corn. Maybe the birds think that another bird already harvested the seed, but they usually leave it alone.”
Here’s some of the things we’ve learned in our own garden over time:
Gophers – In our area, there are colonies of gophers living in the vacant field next to our house and garden. They will mostly stay on their side of the fence, but occasionally come under and cause havoc to our garden. Our dogs love to dig up their tunnels, but so far haven’t been able to capture one.
When we were constructing our raised beds, we installed hardware cloth in the bottom of the beds before putting the soil in. The hardware cloth is stout enough that it deters the gophers from trying to dig through and has held up for 6 years now. The challenge is that they will still come up in the walkways under the wood chips where there is no barrier! We resort to gopher traps for this – the Gophinator is by far the best and most effective trap of several designs and approaches we’ve tried.
We don’t trap any gophers that don’t get into the garden. If they are on the other side of the fence we leave them alone.
Squirrels – We generally don’t have squirrel problems, but one summer had a rogue agent that was climbing the fence and dining on our garden. The solution was to borrow a live trap from a friend, capture the little bandit and release it into another area that was far from any houses. In this case, we were able to relocate it without harming it.
Do you feed wild birds? You may be bringing in unwanted visitors like squirrels, mice and possibly raccoons as they scavenge the seed dropped from the feeders. There are a couple of solutions to this challenge: stop feeding the birds – this removes the food source and will decrease the visitation of wildlife, or move the bird feeder to a spot that is the furthest possible distance from your garden and use a feeder design that minimizes the amount of seed dropped by hungry birds.
Javalina – These wild relatives of pigs have poor eyesight, but a very keen sense of smell. If you put fresh kitchen scraps onto your compost pile, you might be attracting these large and destructive critters. If you live in javalina country, don’t locate the compost bin or pile next to the garden, use leaves and manure with kitchen scraps aged for a couple of weeks in a bucket instead. This way it isn’t as appealing to them and won’t encourage repeat visits.

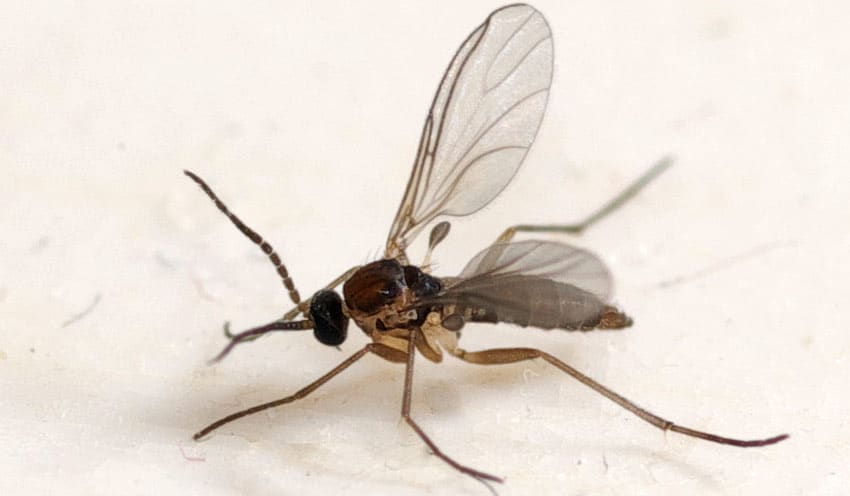
Fungus gnats are more of a nuisance than a real problem to most young plants and seedlings, but they can cause some issues if their population gets high enough. As you start your seedlings for this year’s garden, you will probably notice these tiny white flying insects that seem to infest some of the seedling trays. Sometimes they are everywhere, other times only on certain plants or sections of the seedling flats.
Fungus gnats are tiny mosquito-like insects (actually flies) that are small enough to be able to enter your home or greenhouse through the tiniest openings, but more often they ride in as eggs in soil that has been outside or in damp potting soil that has been exposed to the air for some time. If their population gets high enough, their larvae will cause damage to seedlings as they feed on the young, tender roots.
Fungus gnat life-cycle
 The eggs are laid in tiny cracks in the soil surface, hatching within 6 days into larvae that feed on seedling roots, algae and fungi in the soil. After about 2 weeks of feeding, they pupate and a week later they emerge as adults, starting the cycle all over again. The emerging adults will be mostly females and they can lay between 100 – 300 eggs, so the population can increase rapidly. By the time you see the gnats flying around the seedlings, they’ve been active for at least a couple of weeks. The adults do not feed or bite, their only purpose is to reproduce in their 7 – 10 day lifespan.
There are a couple of approaches that we’ve found to be effective. Closely monitor the amount of water or moisture that is in the flats or cups where the seedlings are. Fungus gnats are highly attracted to moist and over-moist growing media, so they are almost always concentrated where there is a bit more moisture. Over-watering is one of the most common mistakes of all gardeners, new and experienced. This is understandable, as the seeds need a moist and warm environment to soften the seed coat and start the germination process, but afterwards they don’t need nearly as much water. This is where the over-watering condition sets in. It doesn’t take very much excess moisture at all to attract the gnats.
Treatment options
To detect and trap fungus gnat larvae, simply insert a small slice of potato just under the surface of the soil. The larvae will migrate to the potato and start feeding on it within a few days. After 3 – 5 days, remove the potato slice and look on the bottom side for clear to very pale white larvae feeding on the potato. This will tell you whether you’ve got the fungus gnats as larvae and how concentrated the population is. If you’ve got a large population of larvae, put a number of potato slices into the soil to attract more larvae, then remove, inspect and throw the slices away after about a week.
Yellow sticky traps are very effective means of monitoring and capturing the adult gnats. They will show up as black specks on the bright yellow background. This may be all you need to do, but if they persist there are a couple of biological friendly sprays that we’ve had success with. The first is from Safer products, is called “3-in-1″³ and is effective on insects, mites and fungi. We have found that one or two applications are effective. The other is Safer brand “Yard and Garden” spray with plant-derived pyrethrins that are highly effective on insects. Both products are OMRI listed as accepted for organic growers.
Overall, realize that fungus gnats are more of a nuisance than real problem, but serve as an effective notice that your seedling soil is a bit too moist. Decrease the soil moisture slightly, monitor and trap the larvae and adults and you’ll most likely not have any noticeable damage to your seedlings.
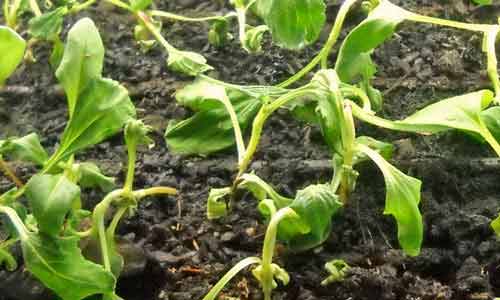
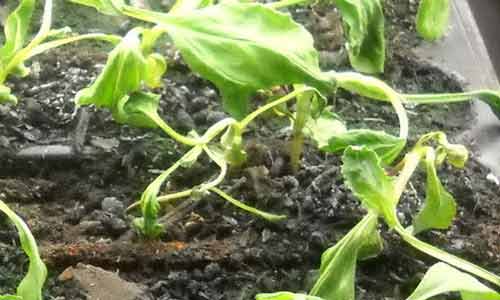
Damping-off is a soil borne disease that can attack almost all young vegetable seedlings. Home gardeners often first notice that something is wrong when the very young seedlings have a constriction around the base of the stem, some of the seedlings have fallen over or there are small flying gnats around the base of the seedlings. Damping off is caused by soil fungi and the right conditions to help them flourish.
If not taken care of, losses can be severe and results in the majority of a flat of carefully planted seedlings dying in 24 to 48 hours. Damping-off can happen before seedlings emerge from the soil. With this type of damping-off, fungi infect seeds as they germinate. As the infection progresses, seeds rot and do not germinate, leading many home gardeners to think that the seed quality is poor. Another result of seedling infected damping-off is poor or weaker seedlings that become apparent days or weeks later.
Even if some of the seedlings survive damping off and are transplanted, they are often stunted and have a twisted, constricted or off-color stem – called ‘wire-stem’ – and have health and production issues.
Not everyone experiences damping off, yet other gardeners in the same area fight with it yearly. Some gardeners buy seed starting mix every year, otherwise they suffer large seedling losses; while others (including ourselves) have mixed our own soil for years and have had very little problems. Just because your neighbor or gardening club friend has trouble with damping off, it doesn’t automatically mean you will also. We’ve created this article as a tool to help you troubleshoot and control how and why damping off happens.
Causes of Damping off
The most common cause of damping off is from soil borne fungi from three groups – Pythium, Rhizoctonia, and Fusarium.
Pythium thrives in cool, over-wet and poorly-drained soils and is often the result of over-watering and not maintaining a warm enough soil temperature for the seeds to germinate. Its symptoms are a damp, odorless rot in the root, causing it to be slimy. It may run up the lower portion of the stem and cause it to be black and slimy. Pythium can survive in soil for several years.
Rhizoctonia is present in all natural soils, coming to life when a soil is over-wet and hot. This is the most common occurrence of damping off, as the seedling will have the classic constriction on the stem right around where it touches the soil.
Fusarium thrives in acidic soils that are poorly fertilized and can remain inactive for long periods of time – years. Fusarium infects the seeds, causing many of them to fail to germinate and creating the ‘wire-stem’ appearance in those that do survive.
There are also seed-borne bacterial and fungal pathogens that can decimate seedlings. These are most often seen in seeds obtained from seed swaps or gardening clubs with poor sanitation and handling techniques in processing and packing seeds. If not recognized and corrected, seed borne pathogens will continue to infect future generations of seed that is saved and distributed.
Controlling Damping Off
Damping off may not be able to be prevented, but there are several easy and highly effective methods to control the outbreaks which will greatly lessen the severity of your seedling losses.
For seeds, the easiest method to control seed borne diseases is to source your seeds from a reputable, knowledgeable and experienced seed company or person. Don’t be afraid to ask questions and listen to the answers. An experienced company, grower or garden club member will be able to easily tell you what measures they take, for what varieties and why. If you are sourcing seeds from a local grower or garden club member, it will be very easy to ask around and determine their reputation.
For soil, the easiest and most proven method is simply starting with fresh, sterilized seed starting mix from established and trusted sources. There are a number of bagged seed starting mixes in gardening centers and big box stores, and often some reputable local sources. Simply buying a fresh bag, bringing it home and dumping it into your old faithful seeding tub is not the answer – you might have just infected the fresh soil! First you absolutely must thoroughly clean and sanitize all of your seed starting tools, otherwise you’ve only infected new material and brought the problem into a new season.
After cleaning and removing all of the soil residue, wash with warm soapy water, rinse well then soak in a weak bleach solution – 2 Tablespoons of bleach in a gallon of water and keep the surface wet for 5 minutes. Soaking hand tools such as trowels, hand hoes and such in a small bucket is the easiest, while spraying the potting bench and sink or mixing container works well. Spray as needed to keep the surfaces wet, then let air dry. After sanitizing, you are ready to open the bag of fresh seed starting mix and let the magic of another season of gardening begin!
A good seed starting mix will not only be sterile, but drain well and ideally have a little nutrition for the young seedlings so they won’t need transplanting right after they sprout. You can mix your own or buy a bagged mix from your local garden center or big box store. If you are interested in mixing your own, Seed Starting Media for the Home Gardener will show you what the different ingredients are and what they do.
Practical Tips
There are a couple of tools a home gardener has in their day to day gardening to minimize the chance of damaging fungi getting a toehold in the seed beds.
The easiest, most overlooked and most important is to avoid over-watering. If you notice, two of the three damping off fungi thrive in damp, over-wet conditions. This one mistake is responsible for most of the gardening woes today, both in the seed starting trays and the garden itself. It is best to bottom water seedlings using a standard seed starting tray and wicking seed starting pots. Paper pots have excellent wicking capacity, are easy to make and give the gardener control of how long the pot will last by how many wraps of paper are used to make the pot. Let the water sit for no longer than 20 – 30 minutes, then drain to avoid an over-wet situation. Water 2 or 3 times a day if needed to keep the soil moist during sprouting.
Over-seeding or overcrowding of seedlings creates a favorable environment for destructive fungi to flourish, so give the seedlings room to grow. If needed, thin the weakest seedlings in a starting pot or seedling tray with snips, not by pulling them out. Pulling the seedlings out disturbs and damages adjacent roots and causes more problems down the road. Planting fewer seeds in a pot or seed tray cell will lessen the amount of thinning greatly.
Air movement can significantly reduce the activity of the fungi, as a fan moving air helps to slightly dry the surface of the soil/seedling interface, making it harder for the fungi to get established. This works best in combination with carefully monitoring the soil moisture.
Daily observation is another easy to do, yet often overlooked tool. Catching the fungi in action early gives you a better chance to take corrective action and save more seedlings from an early death. Get in the habit of spending a few minutes just looking at the seedling trays, looking at all of the minute details and getting very familiar with what “normal” looks like. Then compare that each successive day to see if something looks out of place or not right.
Treatment of Damping Off
Now that you’ve got the knowledge and tools to minimize the chance of damping off happening, let’s look at some treatment options if and when it does show its ugly head.
Chamomile is one of the oldest treatments and is one of the gentlest to try first. It is high in sulfur and is a mild fungicide. Make a strong tea with 3 tea bags steeped for at least 20 minutes, then mist on the seedlings once cool.
Cinnamon is a potent natural fungicide that should only be used once. Lightly sprinkle infected soil with finely ground fresh cinnamon if the chamomile doesn’t work in the first day.
Canadian gardening guru Doug Green has found that homemade garlic spray is also very effective against damping off, as garlic is a potent anti-fungal. To make, crush or blend several garlic cloves into a quart of water, then simmer over low heat until the garlic is softened and the essential oils are released. Cool and strain, then spray on the seedlings, making sure to get the stems. If using as a soil drench, straining isn’t as needed.
Now that you’ve got the knowledge to be pro-active in controlling damping off, as well as some tips and tools to treat it when it shows up, you should have a great start to a prolific garden this year!
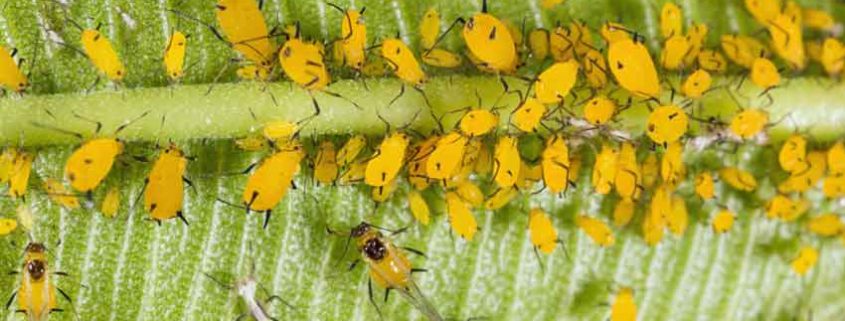
Aphids are one of the perennial pests that gardeners deal with, often with very mixed results. What works one year seems to fall flat on its face the next, with the reverse also being true. Aphids are tiny, soft bodied insects that have piercing, sucking mouthparts to feed on plant saps. They live in colonies, most often the underside of leaves and where the tender young growth is on a plant.
By themselves, aphids rarely outright kill a plant but they can inflict serious damage to both its flowers and fruit. It only takes a few aphids sucking on a young flower or fruit to weaken it or damage it beyond being edible. The sap they extract weakens the plant, stunting its growth and food production. The aphids can also be carriers or vectors of diseases or viruses, which they infect the plant with as they pierce the cell walls and extract the plant sap. Just a few seconds is all it takes for a virus to transfer from the mouth of an aphid to the plant.
Aphids will often arrive in a garden or on a plant by flying in. A small number will arrive and leave their wingless young who feed on the plant and immediately lay eggs, increasing the population quickly. The adults will then fly off and repeat this several times. This is why gardeners will often complain that the aphids overwhelmed the garden “overnight”. Each adult aphid can produce up to 80 offspring every week!
So what can be done about these insects? There are several methods of dealing with them, broken down into two main approaches – prevention and treatment. The prevention phase happens in the fall and early winter with soil testing and amendments that set the stage for success the next growing season. Treatment is just that – what to do when those pesky insects show up uninvited in your garden!
Let’s start at the beginning, shall we? Nitrogen is a big, big player in the aphid dance. Aphids love nitrogen, plain and simple. They are attracted to the soft growing parts of a plant that are high in nitrogen, as it is a major factor in plant growth. Aphids are also really attracted to young seedlings, since everything on a seedling is growing and there is lots of nitrogen to be had.
Nitrogen plays a very important part in a plants growth as well as the content of its sap. Soils with excessively high nitrogen create very fast growing plants. This leads to rapid cell wall growth, which are elongated, thinner and much easier for the piercing mouth-parts of an aphid to penetrate than normal. The plant sap will also be high in nitrogen and will be especially attractive for the aphid. It is very important to understand that high nitrogen sap will be lower in overall sugar content – also known as brix – because nitrogen forms amino acids and proteins – such as chlorophyll – but specifically needs magnesium, phosphorus and carbon to form sugars. This can’t happen if there is excess nitrogen, as there aren’t enough of the other elements to form those sugars. Once the soil is amended with the correct nutrients, the plant will increase the brix/sugar levels and the aphids will die from sucking high sugar content plant sap as it is deadly – aphids can’t digest the sugars with no pancreas and thus die.
What all this means is that using high doses of chemical fertilizers will encourage aphids to call your garden home! Almost all commercial fertilizers are high in nitrogen and release their nutrients much faster than compost or other soil amendments, making aphid pressures much worse than they would normally be. They also contribute to lots of flowers with little fruit production or stunted and smaller than normal sized fruit.
It is interesting to note with soybean studies at Penn State University naturally occurring nitrogen-fixing bacteria – called rhizobia – provided a better form of naturally occurring nitrogen than the laboratory bred inoculated strains did. Plants growing in the naturally occurring rhizobia soils had markedly fewer aphids and stress than the inoculated ones. The amount of nitrogen provided by the lab developed rhizobia and the naturally occurring strains were the same, with the natural rhizobia having much lower aphid populations on the plants. They are continuing the study to see why this happens.
There is a concept at work here that we need to briefly discuss so that you can understand where we are going from here. The “Law of the Minimum” shows how interrelated many nutrients and elements are to healthy plants, not just the N,P and K that are listed on fertilizer bags.
The Law of the Minimum states,
“Plant growth is determined by the scarcest, “limiting” nutrient; if even one of the many required nutrients is deficient, the plant will not grow and produce at its optimum.”
The preventative method is to have a complete, comprehensive soil analysis done by a professional lab. I’ve mentioned these before, but they bear another – Crop Services International and Texas Plant and Soil Lab are great labs. They are thorough, friendly and will give you the info you need at a reasonable price. From this analysis, you will know exactly what soil nutrients, amendments and trace minerals are needed to eliminate a high nitrogen condition in your soil and plants, and by extension reducing the population and attraction of aphids.
Another, very simple method is to stop using commercially available chemical fertilizers! Without naming names, these come in a bag and sometimes have the word “miracle” attached to them. There are a number of brands that can be bought at any garden center or big box store in their garden section. Well-aged and decomposed compost – especially if you’ve worked with it how we discuss in our articles on compost – will give you a continuous supply of “soil food” to apply to your garden twice a year, in the early spring and again in the late fall. This compost with the amendments will slowly release the nutrients that the garden needs, along with attracting the biological elements in the soil that do the real work – earthworms, pillbugs, beneficial nematodes, fungi and all sorts of other hard-working critters that seriously improve the soil on a continuous basis.
Another aspect of prevention is cultural control, or removing the suitable environments where aphids can overwinter or establish an initial population to then swarm your garden. Standing weeds can be harbors of aphids, so remove them and remove dead plants from the garden in the fall. Don’t wait until the springtime to clean up the garden, as this can provide the perfect habitat for aphid eggs to be sheltered under. Inspect trees and bushes for aphid eggs in the fall, remove them by hand, vacuum or with a strong blast of water.
Now that you’ve got the prevention and preparation covered, what can be done if and when the nasty aphids arrive? This is where the treatment portion comes in, and it would be wise to prepare for this as well. Early detection is very important for successful treatment, as if the aphids get a toe-hold, it will be much more difficult to rid your plants of several sizable populations instead of just one or two small ones. The incoming flights of adult aphids are random, so consistent inspection is best. This is very easy, just flip over the top, youngest leaves of several plants and look for the clusters of small aphids on the underside. Look around bud areas as well. If you see any aphids, they will be in small clusters or colonies and can be easily dealt with at this stage. Crush them by hand or prune the leaves or buds to remove them. Once you see the first small populations, go back and be very thorough with the rest of your plants, taking the time to examine them well. Trust me on this, the time spent now will save you much heartache, back ache, time and frustration in the very near future!
Aphids will excrete “honeydew” – a sweet, sticky substance – and is sometimes fed on by ants. This isn’t always the case; but in your inspections look for travel pathways of ants up and down the plant where the aphid colonies are. Sometimes the ants will lead you to the aphids that you would have otherwise missed.
Anytime you see any aphids, it is a good practice to set out yellow sticky traps. Aphids are highly attracted to the color yellow, which lures these little monsters into the traps. They are available at most garden centers and will be in squares or strips. Place several of them in the area where you find the aphids, and put out a few more than you might think. They are good inexpensive insurance.
If the aphids have colonized more than about 5% of the bud and young leaves of a plant, or are on more than that amount of your total garden plants, then it’s time for the next round of action.
Beyond physically removing the aphids, there are two approaches to treatment – biological and chemical controls. Biological controls use biology – predatory insects – to eat and control the aphids. Chemical controls are just what they sound like – using sprays of varying toxicity to reduce the aphids’ population.
Using the biological approach first combined with a non-toxic soapy spray is often the knockout punch needed for smaller aphid infestations. Releasing parasitic wasps that lay their eggs inside the aphids, ladybugs, lacewings, soldier beetles and the syrphid fly larvae are all highly effective if done in time, before the aphids’ population explodes. One of the best resources for biological controls is Arbico Organics. They will help you decide what species will work best for your garden situation, how many to release and how many times. Keep in mind that the goal is not to completely eliminate every single aphid, as then the beneficial and predatory insects won’t have a food source. The goal is to keep the aphids controlled, where they aren’t damaging the plants.
Remember, weather can be on your side when dealing with aphids. Heat and high humidity can really knock them back as they are fairly fragile and die off in droves when temperatures are over 90°F.
Soap sprays work by smothering the aphids by coating their skins. Start with a completely harmless soapy water spray like Dr. Bronner’s – using a tablespoon per half gallon in a hand sprayer. Make sure to apply the spray when beneficial insects aren’t around, as they will also be affected. From there, work up to an insecticidal soap like Safer Brand or horticultural oil such as neem oil. With both of these approaches, make sure to cover the underside of the infested leaves well for the smothering effect to work. These are contact controls, and depend on contact with the aphids to work, so they will need to be re-applied as often as needed until you’ve gotten control of the situation. This could mean once a day for a few days, then twice a week for a week or so, then tapering down to once a week. It might well take 2 – 3 weeks to really get a handle on persistent outbreaks, so be patient but persistent!
Moving up the toxicity ladder, multi part sprays such as our Home Garden Bug Solution work very well, but need to be used carefully as they do have a high level of insect toxicity even though they are made with no petrochemical ingredients. If you do need to bring out these big guns, test in a small area to see the effects before spraying your entire garden!
Hopefully you now see that there are a number of ways to reduce and control the pesky aphids in your garden. It all starts with prevention and preparation with improving the soil and balancing the nutrients it needs. From there you now have several new tools in your “pest control” toolbox to help you manage aphids in your garden next growing season.
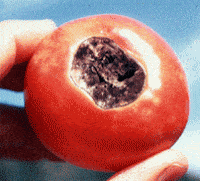
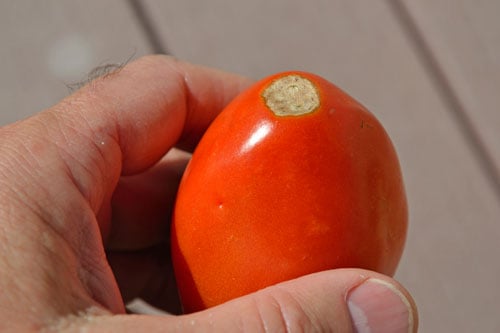
Blossom end rot affects mainly tomatoes and peppers, but can affect other fruiting crops such as eggplant, watermelon and summer squash. This is a perennial problem, meaning that as a gardener, you will deal with this yearly in your garden. There are two approaches to working with blossom end rot – prevention and reaction, or a primary and secondary solution. Unfortunately, most gardeners only realize they have a problem when the fruit are showing black spots on the end. This is the acute phase – once there are problems – and immediate action is needed to prevent further damage to fruit that is just beginning to set.
We will look at the underlying causes of blossom end rot, along with what happens and what can be done about it in the prevention as well as the acute phase.
As mentioned, blossom end rot will affect more than just tomatoes and peppers, but we will focus mainly on those as this is what most gardeners’ experience. Just tuck the other varieties into the back of your mind, and you’ll have a jump start if you see it strike them. In reality, the prevention will most likely have a beneficial effect for everything as you will be creating an environment that won’t support the cause of the problem!
Blossom end rot is caused by a lack of enough available calcium in the fruit at the blossom end. What most often alerts us is a black spot or patch at the blossom end of the tomato or chile, opposite of the stem. This black spot is a secondary issue caused by a fungus attacking the weakened fruit. Contrary to what many think, we aren’t aiming for the eradication of the fungus and resulting black patch, but fixing and preventing the cause of the problem. Correcting the underlying issues that lead to the weakened fruit will automatically prevent the fungus from being able to attack.
Let’s start with the problem and work backwards, to better understand what is needed for both an acute fix and a preventative approach for blossom end rot. Calcium is a very important part of the growth process for plants and the proper development of high quality, tasty fruit as it contributes to healthy cell wall growth, insect resistance and helps to regulate many cell processes. Calcium is non-mobile in the plant once it is imported, meaning the plant can’t move it from one part of itself into the fruit, or from one part of the fruit to another. Thus, the tomato or chile plant needs a continuous supply of calcium as it grows, flowers and produce fruit all through the season.
Blossom end rot usually occurs early in the season with the first or second flush of fruit. It happens just when the plant is at maximum growth and is putting on the first fruit, with a second set of flowers on the way. It is in high gear and needs all of its nutrients available to be healthy, resist pests and disease, as well as grow lots of delicious tomatoes and peppers. The key to preventing blossom end rot is to supply a sufficient, steady amount of calcium to the plant so it can be transported into the fruit continuously. Problem solved!
Not so fast, just how can we make sure that the plant has a steady supply of calcium?
Early Blossom End Rot
Here is where we branch off into the two approaches – the primary and the secondary. The primary, preventative approach is to have enough calcium in the soil that feeds the roots and is transported to the fruit throughout the growing season. That calcium in the soil must be ‘available’ meaning that the roots can actually absorb it and transport it where it is needed. Available means that it isn’t tied up by another mineral or a pH level that won’t ‘let go’ of it. There is more to the story than just adding a calcium amendment to the garden bed!
A very good example of this is where we live in central AZ, there is a decent amount of calcium in the soil that plates out on faucets and glassware as a calcium deposit. Conventional wisdom says not to worry about calcium because it is everywhere. That’s true, but the challenge we have is the pH of the soil is fairly alkaline at 8+ on the pH scale, so the calcium is ‘tied up’, or not available to the plants. This is proven by the weed populations we typically see that only grow in calcium deficient soils.
So what can be done? A comprehensive soil test is one of the best, first steps to take. This is much more than the simple NPK type of test done by university extension offices or the do-it-yourself test kits bought at the local garden center. A complete soil analysis is one that is collected and sent off to a recognized, professional lab that sends back a report on every mineral found along with recommendations on what direction to go and what nutrients to add in what form. They will usually cost from $25 to $75 range, depending on what analysis and information you need. There are several of these labs in the US; the two that we’ve worked with and are familiar with are Crop Services International and Texas Plant and Soil Lab. From this, you will have a very good indication of where to go next.
Fall is a great time to get your soil tested and amended in preparation for next spring’s season for a few reasons – the soil testing labs are generally not as busy, so results are quicker; and soil amendments will need some time to become integrated and available into the soil nutrients, so fall gives you the needed time, and it is easily incorporated into the traditional fall garden cleanup and prep.
Calcium is closely tied with magnesium, and this will be indicated on the soil analysis. More acidic soils, such as those generally found in the eastern states, will benefit from lime or calcium carbonate, while the more alkaline soils in the western states will need gypsum or calcium sulfate. Lime tends to raise the pH, while gypsum tends to lower it.
Water plays an often overlooked, but equally important, role in the blossom end rot saga. Inconsistent levels and rates of water will greatly vary the amount of calcium and other nutrients available to the plant, increasing the chance of diseases attacking the fruit like blossom end rot. This is one of the reasons we talk a lot about a drip system on a timer – it really helps even out the moisture levels in the soil and greatly reduces the stress on the entire garden, with the happy result of lowered amounts of nutrient and stress related problems. Of course, the weather can also play havoc with all of our carefully laid plans, as heavy and sudden rainfall can cause blossom end rot and splitting of tomatoes, along with a noticeable ‘wash-out’ of flavor and taste.
This is where the acute or secondary approach is needed. Calcium carbonate tablets, or anti-acid tablets (Tums or the equivalent) work great when a couple of them are inserted at the base of a tomato or chile plant, where they will dissolve and make the calcium available to the plant in just a few hours, saving this flush of fruit if done right after the rains, or the next set if done when blossom end rot is first noticed.
Another approach is to feed calcium directly to the roots through the drip system as a liquid fertilizer, usually with calcium chloride or calcium nitrate. This approach works very well in offsetting one of the most overlooked causes of blossom end rot – great weather. That’s right – excellent weather with moderate temperatures and lots of sunshine put the plants into overdrive, and their rapid growth can often simply outstrip the amount of available calcium in the soil, even if you have been proactive last fall. The calcium just cannot be taken up out of the soil fast enough, so feeding through the drip system can be a big bonus during these times. The secondary approach will always be needed, even if you’ve done your homework and amended the soil the previous fall.
Calcium isn’t absorbed very well by the leaves of a plant, especially older leaves. The roots are much better at absorption, plus they can transport the calcium faster than through a foliar approach. For these reasons, stay away from trying a foliar spray to supply calcium to your tomatoes.
Blossom end rot won’t ever quite go away, because of the reasons you’ve seen here. With some knowledge and practice, you can easily create a much better environment in the soil that supports the plants much more fully and then use the supplemental approach to keeping the calcium levels high enough to minimize blossom end rot and keep more of your hard work for your dining table instead of as scraps for the chickens or compost pile!

“Can raw milk make grass grow? More specifically, can one application of three gallons of raw milk on an acre of land produce a large amount of grass?”
David Wetzel is the person possibly most responsible for bringing the ancient practice of applying milk to the soil in order to improve the health, disease resistance, and productivity of the soil. As part of a 10-year study in collaboration with the University of Nebraska soil specialists and weed specialists as well as insect specialists have proven the effectiveness of milk as a soil improver.
It started with David having excess skim milk that he didn’t want to waste, so he started applying it to a pasture on his farm and noticed several oddities about that particular pasture. When his dairy herd was turned out on it, the butterfat content of the milk increased by 3-4% within 2-3 days of being in that pasture, every time. Not only that, but the herd needed fewer vet visits, maintained their weight better and the pasture recovered faster and produced more hay than other pastures. David contacted his next-door neighbor, Terry Gompert, an extension agent for the University of Nebraska about the phenomenon, and a multiple-year study was born. One of the additional benefits of spraying the milk has been a drastic reduction in grasshopper populations in the pastures, as the milk sugars are toxic to soft-bodied insects. One theory is that grasshoppers will leave healthy plants alone, as the milk feeds the plant as well as the soil.
The following article is from Ralph Voss, a student of David’s methods, followed by David’s own observations on what is working on his farm.
Mon, 2010-03-08
“This article appeared in the March 10, 2010, issue of theUnterrified Democrat, a weekly newspaper published in Linn, Mo., since 1866. In addition to writing for the paper, Voss raises registered South Poll cattle on pathetically poor grass that he is trying desperately to improve.”
Nebraska dairyman applies raw milk to pastures and watches the grass grow
An Illinois steel-company executive turned Nebraska dairyman has stumbled onto an amazingly low-cost way to grow high-quality grass – and probably even crops – on depleted soil.
Can raw milk make grass grow? More specifically, can one application of three gallons of raw milk on an acre of land produce a large amount of grass?
The answer to both questions is yes.
Call it the Nebraska Plan or call it the raw milk strategy or call it downright amazing, but the fact is Nebraska dairyman David Wetzel is producing high-quality grass by applying raw milk to his fields and a Nebraska Extension agent has confirmed the dairyman’s accomplishments.
David Wetzel is not your ordinary dairyman, nor is Terry Gompert your ordinary Extension agent. Ten years ago Wetzel was winding up a five-year stint as the vice president of an Illinois steel company and felt the need to get out of the corporate rat race. At first he and his wife thought they would purchase a resort, but he then decided on a farm because he liked to work with his hands. The Wetzels bought a 320 acre farm in Page, Neb., in the northeast part of the state, and moved to the farm on New Year’s Day in 2000.
“We had to figure out what to do with the farm,” Wetzel said, “so we took a class from Terry Gompert.” They were advised to start a grass-based dairy and that’s what they did. “There’s no money in farming unless you’re huge,” Wetzel said, or unless the farmer develops specialty products, which is what they did.
In their business, the Wetzels used the fats in the milk and the skim milk was a waste product. “We had a lot of extra skim milk and we started dumping it on our fields,” Wetzel said. “At first we had a tank and drove it up and down the fields with the spout open. Later we borrowed a neighbor’s sprayer.”
Sometime in the winter of 2002 they had arranged to have some soil samples taken by a fertilizer company and on the day company employees arrived to do the sampling, it was 15 below zero. To their astonishment they discovered the probe went right into the soil in the fields where raw milk had been applied. In other fields the probe would not penetrate at all.
“I didn’t realize what we had,” Wetzel said. “I had an inkling something was going on and I thought it was probably the right thing to do.” For a number of years he continued to apply the milk the same way he had been doing, but in recent years he has had a local fertilizer company spray a mixture that includes liquid molasses and liquid fish, as well as raw milk. In addition he spreads 100 to 200 pounds of lime each year.
Gompert, the extension agent that suggested Wetzel start a grass-based dairy, had always been nearby – literally. The two are neighbors and talk frequently. It was in 2005 that Gompert, with the help of university soils specialist Charles Shapiro and weed specialist Stevan Kenzevic, conducted a test to determine the effectiveness of what Wetzel had been doing.
That the raw milk had a big impact on the pasture was never in doubt, according to Gompert. “You could see by both the color and the volume of the grass that there was a big increase in production.” In the test the raw milk was sprayed on at four different rates – 3, 5, 10 and 20 gallons per acre – on four separate tracts of land. At the 3-gallon rate 17 gallons of water were mixed with the milk, while the 20-gallon rate was straight milk. Surprisingly the test showed no difference between the 3-, 5-, 10- and 20-gallon rates.
The test began with the spraying of the milk in mid-May, with mid-April being a reasonable target date here in central Missouri. Forty-five days later the 16 plots were clipped and an extra 1200 pounds of grass on a dry matter basis were shown to have been grown on the treated versus non-treated land. That’s phenomenal, but possibly even more amazing is the fact the porosity of the soil – that is, the ability to absorb water and air – was found to have doubled.
So what’s going on? Gompert and Wetzel are both convinced what we have here is microbial action. “When raw milk is applied to land that has been abused, it feeds what is left of the microbes, plus it introduces microbes to the soil,” Wetzel explained, adding that “In my calculations it is much more profitable (to put milk on his pastures) than to sell to any co-op for the price they are paying.”
Wetzel’s Observations
Wetzel has been applying raw milk to his fields for 10 years, and during that time has made the following observations:
* Raw milk can be sprayed on the ground or the grass; either will work.
* Spraying milk on land causes grasshoppers to disappear. The theory is that insects do not bother healthy plants,which are defined by how much sugar is in the plants. Insects (including grasshoppers) do not have a pancreas so they cannot process sugar. Milk is a wonderful source of sugar and the grasshoppers cannot handle the sugar. They die or leave as fast as their little hoppers can take them.
* Theory why milk works. The air is 78% nitrogen. God did not put this in the air for us but rather the plants. Raw milk feeds microbes/bugs in the soil. What do microbes need for growth? Protein, sugar, water, heat. Raw milk has one of the most complete amino acid (protein) structures known in a food. Raw milk has one of the best sugar complexes known in a food, including the natural enzyme structure to utilize these sugars. For explosive microbe growth the microbes utilize vitamin B and enzymes. What do you give a cow when the cow’s rumen is not functioning on all cylinders (the microbes are not working)? Many will give a vitamin B shot (natural farmers will give a mouthful of raw milk yogurt). Vitamin B is a super duper microbe stimulant. There is not a food that is more potent in the complete vitamin B complex than raw milk (this complex is destroyed with pasteurization). Raw milk is one of the best sources for enzymes, which break down food into more usable forms for both plants and microbes. (Again, pasteurization destroys enzyme systems.)
* Sodium in the soilis reduced by half. I assume this reflects damage from chemicals is broken down/cleaned up by the microbes and or enzymes.
* If you choose to buy raw milk from a neighbor to spread on your land, consider offering the farmer double or triple what he is paid to sell to the local dairy plant. Reward the dairy farmer as this will start a conversation and stir the pot. The cost for the milk, even at double or triple the price of conventional marketing, is still a very cheap soil enhancer.
* Encourage all to use their imagination to grow the potential applications of raw milk in agriculture, horticulture andthe like – even industrial uses –possibly waste water treatment.
Microbes
The purpose of this story is to convince farmers and livestock producers in this area to look into the possibility of using raw milk, compost tea, earthworm castings tea,liquid fishor sea minerals or some combination thereof to boost production at an affordable cost. It’s my experience that people in the Midwest are to a great extent unaware of the benefits of microbes. If the first part of this story has caught your attention and you intend to consider the use of raw milk or any of the other methods, you need to learn about microbes and the best way I have discovered is a book co-authored by Jeff Lowenfels and Wayne Lewis,Teaming with Microbes.
In this story I cannot go into detail about microbes, the miniscule little critters that exist in abundance in good soil. There are four principal types of microbes – bacteria, fungi, protozoa and nematodes. To get an example of their size, consider that there are a billion bacteria in one teaspoon of good soil. The role of microbes is to consume carbon, along with other minerals and nutrients, and these are stored in their cells until their ultimate release for use by plants. Microbes also store water, which make them drought-fighters as well.
I realize this is an inadequate description, but you need to read the book.
Brix
Brix is another concept that is not widely understood in the middle of the country. Brix is the measure of the sugar content of a plant (that’s an oversimplification but good enough for this article) and is measured by a device called a refractometer. If your grass has a brix of 1, that’s cause for nightmares. Our grass is routinely a 1. Clover and johnsongrass might on occasion measure 4 or 5 in the middle of the afternoon on a bright, sunny day. That’s deplorable for plants that should be double or triple that figure.
It’s not just our farm that has grass that’s not fit to feed livestock. I communicate frequently with three young cattlemen from this area – Jeremia Markway, Bruce Shanks and Chris Boeckmann – and they have the same problem. Last summer we were singing the blues over lunch and decided our refractometers must be broken. Someone came up with the idea of measuring sugar water. We tried it. Boom. The refractometer measured 26. Our equipment wasn’t broken, only our grass.
About three months ago Markway discovered a short article on what Wetzel and Gompert had been doing in Nebraska with raw milk. He emailed the article to me and that’s what got me to do this story. An interesting thing is what Markway discovered about the impact of raw milk on brix levels. He has a milk cow and took some of her milk, mixed with water and sprayed on his pastures with a small hand sprayer. Where he sprayed, the brix level of the grass was raised to a level of 10. That’s a great start and was good news to Wetzel and Gompert, who had not been measuring the brix levels of Wetzel’s grass.
Compost Tea
Raw milk is not the only thing that will improve soil. Compost tea is a liquid made by running compost through a “brewer,” a device somewhat akin to a fish tank, in that oxygen is added to the water containing the compost and this action flushes the microbes out of the compost into the water. The resulting liquid is a “tea” that can be sprayed on pastures and crops, to their great benefit.
Two men that make extensive use of compost tea are Mark Sturges and David Herringshaw. These two have never met and until recently had not even heard of each other.
Sturges lives in western Oregon near the coast and for 10 years has had a business spraying compost tea on vineyards, cranberry bogs, fruit and nut trees and pastures. Sturges adds malt extract, kelp and seas minerals to his tea, and if he is spraying pastures, he adds molasses to build the bacteria content.
Herringshaw lives in the near-desert southeast part of Oregon at an elevation of 4,100 feet. He uses compost tea on his own land and has the brix level of his pasture and hay ground up to 22. That’s tantamount to feeding corn. Herringshaw attributes the high brix to the compost tea and also sea minerals, which he applies at the same time. He uses nothing else.
I have seen the compost Sturges produces. It is so alive it literally moves. I have not seen the compost Herringshaw makes at the other end of the state. I can only imagine how good it might be. He fortifies it with raw milk.
Think for a second what Wetzel said about using your imagination to grow the applications for raw milk. Herringshaw has already used his imagination.
Earthworm Castings Tea
This tea is identical to compost tea except that worm poop is substituted for compost. Almost everyone thinks tea from earthworm castings is great stuff, and some even think this tea is superior to compost tea. Earthworm castings are known to suppress certain diseases of grass and some people think the use of castings might suppress harmful bacteria such as staph and E. coli.
There is a story going around that a university was having problems with athletes getting staph infections from burns sustained on grass practice fields and the university stopped applying chemicals to the grass and instead turned to worm castings and solved the problem. I spent two weeks trying to track down this story and at this point I don’t believe it is true. Maybe someone will prove me wrong.
I did, however, come across an interesting situation in St. Louis County, Mo., where the Parkway school district turned to earthworm castings in lieu of commercial fertilizer. The groundskeeper there is Matt Jenne, who prior to coming to St. Louis was a golf course superintendent in Florida. While working in Florida he noticed earthworms had built up their castings on the greens. They picked up the castings as part of cutting the grass, and then piled the grass-castings mixture and let it compost, after which they used it with great success on new grass and bare spots. To feed the life they had in the soil, they applied molasses once a month with their irrigation system.
When he got to St. Louis Jenne decided to go with worm castings on two football fields, applying between half a ton and a ton per field. The castings are applied dry and work best when the field has been aerated.
Jenne may have an explanation for the staph infection story. He says that artificial turf causes staph and the only way this can be controlled is to disinfect the artificial turf.
Here in Osage County earthworm castings are available at Eisterhold Brothers on U.S. 63 between Westphalia and Freeburg. Unfortunately they have decided to close their business when their current supply runs out.
Fish
Liquid fish or fish fertilizer is another product that has been successfully applied to pastures. Teddy Gentry, the founder of South Poll cattle, has been using a fish product for years and is pleased with the results. It seems especially beneficial in fighting the effects of a drought. Gentry mixes the fish with liquid calcium and is thinking about adding sea minerals to his mixture.
Sea Minerals
Sea minerals might be the best way to improve poor or depleted soils. We all know that a large deer in Iowa will weigh 100 pounds more than a large deer from that part of Missouri south of the Missouri River. Many people ascribe the difference to the mineral level of the soils. It’s difficult – if not impossible – to produce high-quality grass on soil that is no properly mineralized. It took Herringshaw years to get his grass to the 22 brix level and he is convinced he would not have gotten there without the seal minerals. Herringshaw prefers Redmond salt, while Sturges uses Sea-90. Sturges applies his sea minerals as a spray, along with compost tea. Herringshaw makes both dry and spray applications. He estimates he has broadcast approximately 85 pounds of Redmond salt per acre since he started using that product. This is in addition to what he has sprayed on. For both Sturges and Herringshaw a foliar application is one pound or less per acre.
Another individual that makes extensive use of sea minerals is Doug Gunnink of Gaylord, Minn. Gunnink produces high-brix grass for his grass-fed beef operation by the foliar application of liquid fish and sea minerals. He also tests his grass and adds those minerals that are in short supply in his pastures, whether boron, sulfur, copper or some other mineral.
Fish hydrolysate, Gunnink explained, is the entire fish ground up and then preserved with phosphoric or sulfuric acid. If the preservative is phosphoric acid, the phosphorus “bumps up the Brix,” he said, adding that “phosphorus gives grass power.” High-brix grass produces more organic matter, which in turn holds more water, Gunnink explained, stating that a 1% increase in organic matter will hold an additional 53,000 gallons of water per acre. “Organic matter is the sponge that holds water for dry spells.”
The organic matter also holds the nutrients that plants need.
Conventional Fertilizers
This story is not meant to be a war on conventional fertilizers. The late Dr. Maynard Murray, the pioneer that first advocated use of sea minerals, said there is a place for conventional N, P and K. We do, however, need to come up with better ways to use them. Bill Totemeier, a friend in southeast Iowa that is a commercial hay producer, uses ammonium sulfate rather than ammonium nitrate because the former is much more earthworm-friendly. He applies fertilizer two or three times per year in smaller amounts rather one large application in the spring. This reduces the shock to the microbes.
Houston-area rancher Tom McGrady spread ammonium sulfate on his ryegrass pasture in early March. In his area ammonium nitrate is no longer available. That may be a good thing.
For Row Crop Farmers
Row crop farmers can also benefit greatly from some of these practices. Lowenfels, who co-authored the book on microbes, urges anyone who uses herbicides or insecticides to soon thereafter apply compost tea to increase the microbe population that was probably greatly reduced by the chemical spray. Fish would also work in this situation.
For the busy grain guy, there are companies that make products ready to go into the sprayer. One such firm is AgriEnergy Resources. Mike Wyatt, an independent consultant that workswithAgriEnergy, has helped me gain some insight into world of microbes.
Hunters
If you want bigger deer like you read about in Iowa and Illinois, the methods set out in this article should be used on your hunting land, especially the food plots. Animals are clearly attracted to plants that have been treated with sea salt. And they also choose high-brix plants over those with low brix levels.
My Experience
I know Terry Gompert personally. He’s the real deal. In 2007 he organized a high-stock-density grazing seminar in as remote an area of northeast Nebraska as you can find and attracted over 200 people. Included among that crew were Jeremia Markway and me. Based on my knowledge of and respect for Gompert and the results Markway experiences just down the road from us, why wouldn’t I be willing to try this? To me it’s a no-brainer. I’ve made arrangements to buy milk from Alfred Brandt, who lives just south of Linn, and Chamois MFA has agreed to spray 50 or 100 acres in mid-April. A 1,000 gallon tank containing 150 gallons of raw milk and 850 gallons of water will provide the perfect ratio of three gallons of milk and 17 gallons of water, which applied at the rate of 20 gallons per acre will cover 50 acres. I hope to get over at least 100 acres. Whether we include something with the milk – such as fish, molasses or earthworm casting tea – is a decision we haven’t made at this time.
We are also going to broadcast one ton of sea salt at a rate of 20 pounds per acre.
Conclusion
For years I’ve been a dung beetle fanatic, thinking that I needed dung beetles to build my soil. I’ve probably been wrong in this regard. I now think I need to build my soil and the dung beetles will come. Dr. James Nardi, in his classic workLife in the Soil, describes dung beetles as picky eaters. That may seem strange, but my experience convinces me his assessment is totally accurate. I hope – and I do believe this will happen – dung beetles will choose to come to our farm because we have upgraded the food supply.

Here it is the beginning of June and bugs are making their appearances in our garden. We wanted to share a recipe we’ve found that has been recommended to us by other gardeners and has proven to be effective in dealing with unwanted insects and other bugs in the garden.
This is a different approach than our Squash bug solution. You can read that article here – Squash Bugs and Ways to Deal with Them. That approach works well for more than just Squash bugs, so give this recipe and that one a try to see what works for your garden! You might also like some of our solutions detailed in Heirloom Tomato Growing Tips that shows several methods of deflecting insects, nematodes and blight, mildew and other assorted fungi that love our tomatoes.
It needs to be mentioned that spending time in your garden and getting to know who lives there is extremely valuable, as then you’ll know when some shady character moves in. You might still be taken by surprise when you discover a colony of insects chomping on your squash, tomatillo or tomato plants; but you’ll know with certainty that they weren’t there last night or the morning before. This knowledge is valuable, as this helps in choosing which methods to use and how aggressive to apply them.
Here is another recipe for a broad-based insect repellent for your garden. This is a very concentrated recipe, as the garlic and onion oils are extracted into the mineral oil, so test spray a small area before soaking the whole garden. The extraction is based on English research used to test the effectiveness of garlic and onion oils as natural antibiotics and anti-fungal agents.
Start by testing it on a small area at a 20:1 dilution – 20 parts water to 1 part bug solution. You can always dilute it with more water if you find it is too aggressive for your plants. If it is effective, increase the dilution ratio 10:1 at a time until the solution is still effective, but not immediate. You don’t want to nuclear carpet bomb the problem, just kill off the bad bugs. Remember, this kills all bugs, not just the bad ones, so go easy and be careful! Garlic oil is very effective, but if used in large doses it will be deadly to bugs and soil micro-organisms as well. It must be said that homegrown or locally and organically grown garlic and onions are the best, as they will have much stronger oils than commodity ones from the grocery store.
It is best to make this fresh as needed, as the oils will work best on the bugs when they are at their peak. Another approach is to use garlic essential oil that has been distilled and is many times more potent than the home-grown extract. If using the essential oil, start with 5 - 10 drops of oil in place of the extract. Look for garlic essential oil in your local health foods store or apothecary.
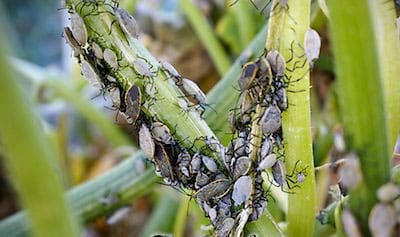
We’ve talked about how the squash bugs were wreaking havoc on our squash, zucchini and pumpkin plants in several of our Newsletters and asked our readers to talk to us and let us know their ideas and experiences in dealing with this critter that destroys otherwise healthy and productive plants overnight.
We found out that these bugs are a serious threat all across the US and Canada as well, so no area is more vulnerable or immune to them. Several people shared their experiences with companion planting, with mixed results. Some had good results, some had no change and some had differing results depending on the year. Many of you have said this is the most difficult garden pest to deal with, as it doesn’t seem to respond universally to anything or any approach. The bugs will overwinter under almost any debris, woodchips or other small shelter and re-engage their destructive behavior in the Spring, making their control a multi-year program.
The two most successful methods were spraying of Neem oil, either by itself or mixed with water, or Guinea hens in the garden. The Guinea hens seems like the most reliable method of controlling the bugs, if you’re able to get and keep the hens. They also seem to be the favorite bug controlling critter, regardless of what bugs you have. The Neem oil not only smothers the bugs, but slows their feeding and greatly reduces their reproduction if they ingest it. Several resources mentioned Neem oil as one of the foundational treatments for the squash bugs.
We were hoping for a somewhat universal approach, and one of our readers, Joann from Michigan sent us this recipe, and she says it will kill the bugs, not just drive them away! This looks to be a promising approach that will not only help with the immediate problems but speed up the decrease in population for next years program.
Daily hand-picking seems to be very effective as well. Some of our readers use a battery powered vacuum to help with this chore!
Add concentrate to a gallon of water and spray liberally. Repeat as often as needed to drive off or kill the squash bugs.
We will be trying this recipe to see how it works for us. Please let us know your experiences, or if you have a different approach that has proven to be effective, please let us know so we can share it!
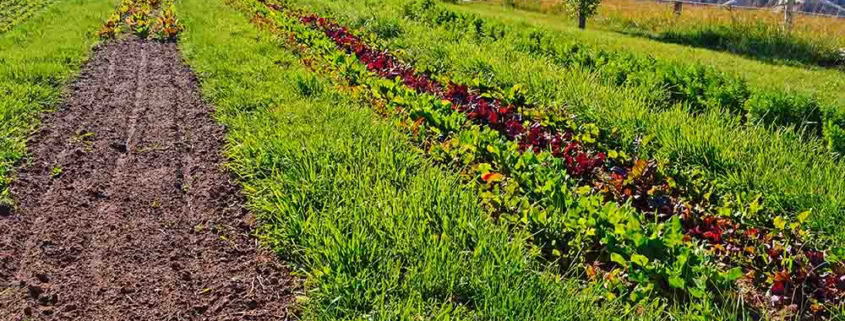 © 2024 Terroir Seeds | Underwood Gardens
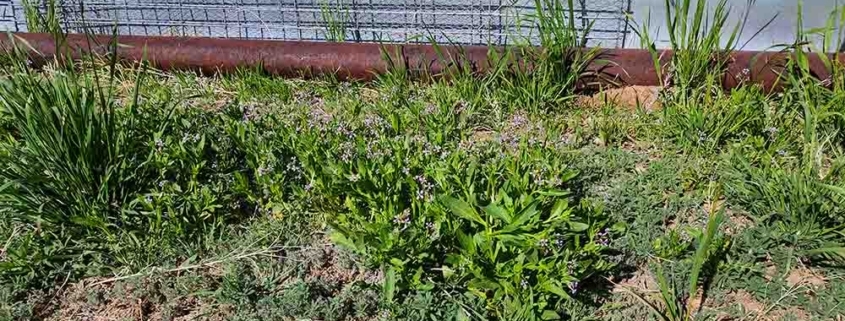 © 2024 Terroir Seeds | Underwood Gardens