Tag Archive for: Corn

Blue & Yellow Polenta

Making polenta takes a bit of time, care, attention and love but the results are delicious and will become highly valued by friends and family. It is a peasant dish, a close relative to cornmeal mush that has been refined and is no longer just a starvation staple of poor subsistence farmers. Polenta is featured in highbrow restaurants with exotic ingredients anchored to the cornmeal base. Done the traditional way, polenta takes work – about an hour straight of constant stirring – but there is another method that is simply delicious without all of the work. There is still some stirring and a good timer is needed, but you won’t be chained to the stove the entire time.

Northern Italy is where polenta is a staple, made from corn brought over from the New World and grown ever since the mid-1500s. As with many Italian dishes, there are many regional variances from a light Venetian recipe to the Lombardy buckwheat and corn tradition that is mixed with garlic and aged cheese.

Being invited to a home in Northern Italy and having polenta is an honor, a sign that you are not simply a guest but are considered as one of the family as polenta is home cooking and not for “company”. Part of it is the work involved to make it in the traditional way; the other is that until recently polenta was looked down upon as food for the poor and not to be served to honored guests. Now that those same Northern Italian areas have achieved wealth and status, polenta is eaten for enjoyment, to remember and as a comfort food.

I’ve been a fan of Marcella Hazan for years. It was in one of her earlier cookbooks that I learned the simple method of successfully making homemade noodles. It isn’t difficult, but I found out that I was rushing the process and not allowing the noodles to relax between rolling them out. After reading her process where she walks through the process and explains why things need to be done in a certain way and at a certain time, I made the most delicious fresh noodles and became a fan of her writing. I was never able to take one of her cooking classes, but her books have always had that way of explaining why things are done the way they are, helping me to be a better cook and capture the essence of those flavors.

Marcella has developed an easier method of making polenta that tastes like the traditional way. It still takes about an hour to make, but you can walk away from the stove for sections of time, going back to stir and monitor the process. You will see the cornmeal mixture turn silky and soft from coarse and grainy about half way through!

In the spirit of cooking with more locally sourced ingredients, we’ve changed this recipe from corn and buckwheat flour to yellow and blue cornmeal with homemade smoked chicken broth instead of just water. Growing your own corn just for polenta will make complete sense during the very first bite! The flavors cannot be compared to any cornmeal that is store-bought. They will be richer, bolder, earthy and sweet with a substantial feeling after tasting. Making extra takes no more work and will give you extras for the next few days to use as an appetizer, side dish, breakfast foundation or snack.

Here’s what you could grow in your garden for this recipe –

Blue and Yellow Polenta
Our Southwest adaptation of Marcella Hazan's Polenta Taragna - Buckwheat and Cornmeal Polenta.
Servings: 6
Author: Marcella Hazan
Ingredients
  • 10 cups of liquid - 1 - 2 quarts of homemade chicken broth 4 - 8 cups supplemented by water to make the total
  • 1 3/4 cups coarse ground yellow cornmeal
  • 1 3/4 cups blue cornmeal - will usually be finer ground
  • 2 yellow or white onions - diced
  • 3 cloves garlic - diced
  • 1 1/2 tablespoons salt - preferably sea salt or RealSalt
  • 1 cup dry white wine
  • 1 tablespoon extra virgin olive oil
  • 1 cup aged Italian grating cheese
Instructions
  1. Add the water and broth to a large heavy pot that has at least 3 - 4 inches of room above the liquid and bring to a boil over medium high heat.
  2. While water is heating, mix both colors of cornmeal in a bowl.
  3. When the liquid is boiling slowly, slowly add the cornmeal to the water while stirring with a wire whisk. It is important to add the cornmeal in a thin trickle to avoid clumping. You can add it a fistful at a time or use a 1/2 cup measuring cup, just make sure to add it slowly, being able to see the grains as they trickle in. This step may take several minutes, just be patient.
  4. Once all of the cornmeal has been added, stir well for a couple of minutes with a strong long-handled spoon. Add onions and garlic and stir in. After stirring well, cover with a tight-fitting lid and adjust heat to a low steady simmer.
  5. Set the timer for 10 minutes. After 10 minutes, uncover and stir for at least 1 minute, preferably 2. Make sure to mix the mixture well and from different directions.
  6. Add wine and olive oil at the 20 minute mark
  7. Repeat timer 3 times, stirring well for 1 - 2 minutes each time. You will feel the mixture firm up each time. If needed reduce the heat slightly.
  8. After 40 minutes you should see the mixture lose it's grainy, course texture and become silky, soft and creamy. If you are stirring at the time you will see it happen. It will also begin to pull away from the sides of the pot into a single mass.
  9. When it becomes soft and creamy, add cheese and stir vigorously for 1 minute, cover it, turn the heat off and let sit for 3 - 5 minutes to firm up.
  10. Serve hot with a rich roast, sausages, or roasted chicken.
  11. Allow extra to firm up either in the pot or scoop out onto a moistened board or counter top for use with other meals.
Recipe Notes

Polenta is extremely versatile - grilled, pan-fried, with eggs for breakfast or warmed and drizzled with olive oil and Balsamic vinegar for an appetizer.

Adapted from Marcella Cucina

 Blue-&-Yellow-Polenta-Ingredients

Amazing flavors come from such simple ingredients! A closer look at the main ingredients.

Adding the Cornmeal

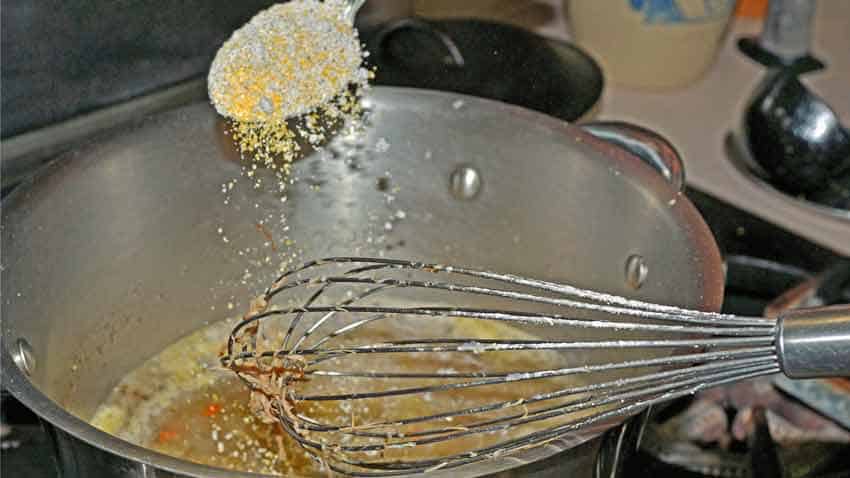
This is how you should add the cornmeal – trickle it in slowly enough to see the individual grains of cornmeal.

Stirring the Polenta

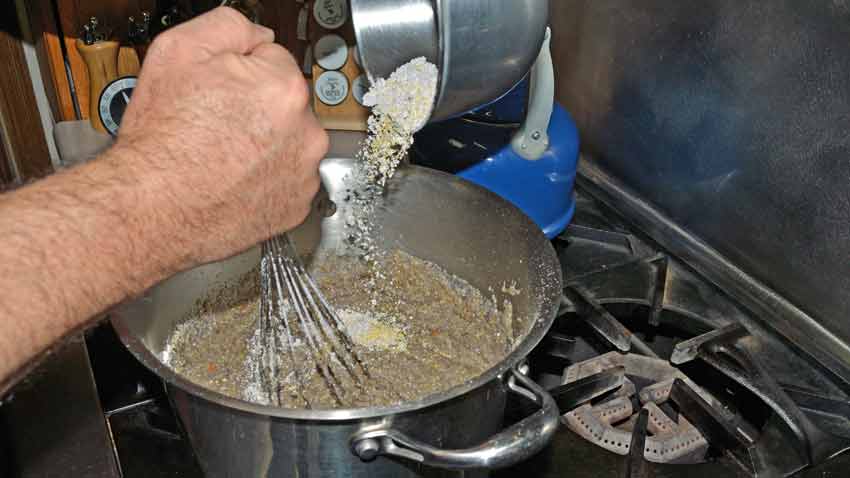
The mixture will begin to get thicker at the end of adding the cornmeal, so you might have to change your grip on the whisk! I changed to the long spoon just after adding the rest of the cornmeal to make it easier to stir.

Adding Cheese to the Polenta

This was at about 40 – 45 minutes. I added the cheese and gave it a good stir for about a minute. You may or may not be able to see that it has turned silky and creamy at this point. I turned off the heat, covered it and let it sit for about 5 minutes after stirring the cheese in.

Blue & Yellow Polenta

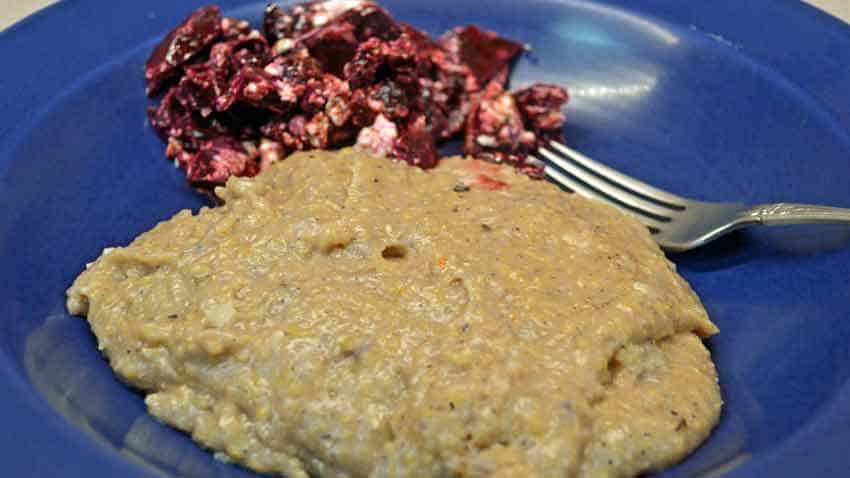
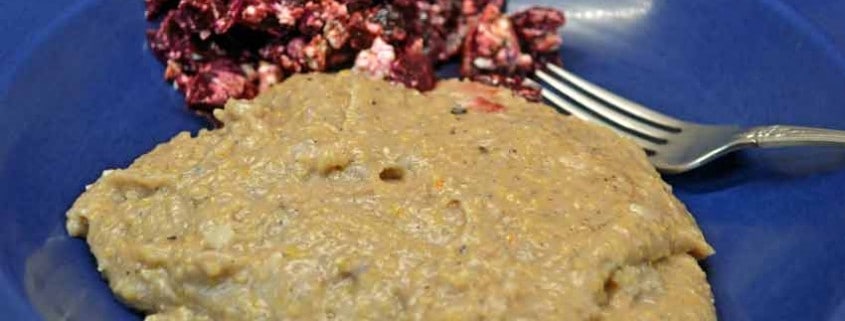
The finished result, accompanied by roasted beet and feta cheese salad dressed with olive oil and Balsamic vinegar.

When we were looking for a classic sweet cornbread recipe to make in our Kamado, or ceramic charcoal-fired barbeque, we came across this one that is perfect for homegrown heirloom corn and White Sonora wheat and uses honey for the sweetener, instead of sugar.

This recipe comes from Alice Berner, who farms wheat in northern Montana without chemical fertilizers or pesticides. Alice developed this recipe using their local honey and the wheat that they farm. Even without white flour, this cornbread is light, moist and very flavorful with a sweetness that is warm and inviting. It is great with a roasted chicken like our Herb and Vegetable Roasted Chicken!

The Farmhouse Cookbook by Susan Herrmann Loomis supplies this recipe and is a treasure of simple, honest, delicious and yet surprisingly sophisticated recipes from farms all across America.

Recipe notes: We adapted this to our cast-iron cooking by preheating a round cast-iron deep frying pan in the oven before starting the recipe. Let the batter sit for a few minutes to thicken and mix a final time before pouring into the hot cast iron. You will get a wonderful crispy crust that just isn’t possible with standard baking pans.

Alice Berner's CornbreadAlice Berner’s Cornbread

Ingredients

  • 1 1/2 cups yellow cornmeal (heirloom cornmeal is best)
  • 2 cups whole-wheat flour (White Sonora wheat works very well here)
  • 4 tsp. baking powder
  • 1 1/4 tsp salt
  • 4 large eggs
  • 3/4 cup honey
  • 1/4 cup mild oil, such as safflower
  • 1 1/3 cup milk

Directions

  1. Preheat oven to 425F and oil a 9 x 13 inch baking pan.
  2. Combine the dry ingredients and mix well.
  3. In a small bowl, mix eggs, honey, oil and milk until thoroughly combined.
  4. If using a Kitchen Aid or similar mixer, slowly add the liquid ingredients to the dry and mix well. If mixing by hand, make a well in the center of the dry ingredients and gradually stir in the liquid, working quickly and gently.
  5. Pour batter into baking pan, or cast iron as per our recipe notes above and bake until the cornbread is golden and springs back when lightly touched, about 20 – 30 minutes. Check at the 15 minute mark to see how it is progressing. It will cook from the outside in, so watch the middle to see when it is finished baking.

Makes 8 – 10 servings.

How Local Food Keeps a Small, Remote Restaurant Growing

Hell’s Backbone Grill- Boulder, UT. Located in south-central Utah in one of the last remaining remote places in the lower 48 states, Hell’s Backbone takes it’s name from a narrow wooden bridge over Box Death Hollow that allowed auto traffic for the first time in 1933.  In a town of 180, more or less, that received it’s first electricity in 1947, and stopped getting it’s mail by mule in 1942, having a flourishing restaurant is an achievement in itself. The challenges are considerable- the closest bank and grocery store are 45 minutes south in Escalante, which is another fairly remote, small town. Planning becomes critical, cooperation and community building is not just a good idea, but is the only way to stay in business.

Despite these challenges, Hell’s Backbone Grill and The Boulder Mountain Lodge, where the Grill is located have had lots of great press from far and wide. Success hasn’t gone to their head, as they are down to earth folks. They partner with local ranchers and community members for food supplies, as well as growing a huge garden to feed the restaurant. All of the food is grown and raised with care, love and tremendous respect, whether by the restaurant or by the community. This comes through in the flavors, which are indescribably delicious. There is a deep, rich fullness to the food that is readily apparent.

Here is a recipe for Blue Corn Flapjacks from their cookbook- “With A Measure Of Grace”. The Prickly Pear syrup is our own homemade syrup.


Blue Corn Flapjacks

3 Cups flour

1 Cup sugar

1 Tbs baking powder

1 Tsp salt

1 Cup blue cornmeal

4 Eggs

3 Cups milk

1/2 Cup oil

1 Tsp Vanilla extract

Oil for griddle


In a large mixing bowl combine flour, sugar, baking powder, salt and cornmeal.

In another bowl lightly beat eggs with milk, oil, and vanilla extract.

Add wet to dry and combine well.

Preheat griddle to medium-hot. A cast iron griddle works best. A drop of water will dance over the griddle when it’s ready. Add 2 Tbs oil to griddle, spread with folded paper towel. Keep towel to grease griddle for next batch of cakes.

Pour from a pitcher or use a ladle to make standard round cakes, or get wacky and make a portrait pancake for each breakfast companion. Turn cake when adges are set and small bubbles form and pop on the surface.

The batter will keep in the fridge for two days.

These are substantial flapjacks, very satisfying and filling. Enjoy them!

Here is another great recipe that takes advantage of the abundance of fresh vegetables out there now. This is an easy, foundational salsa recipe that is extremely tasty just as it is, but also lends itself very well to experimentation with whatever fresh vegetables you have available. Everything is roasted to bring out the fullness of the flavors, and to help them mingle better. I’ve been able to do an acceptable substitute in the winter with fresh frozen chiles from our garden, and canned Italian plum tomatoes!

This is one of those salsas that just grabs you by the taste buds and gets your attention. No matter if it is mild or hot, you keep coming back for “one more bite”, because it just tastes so good. When having guests over, a batch rarely lasts through the evening, when it’s at the height of its warm, rich goodness. Best cooked outside, this lends itself beautifully to doing fresh quesadillas, queso fundido, burgers or all three in succession on the grill, along with plenty of cold beer and good friends. Watching the late summer sun going down after a hot day and enjoying the salsa along with other great food is one of the memories that will be brought up many times.

I like using several kinds of chiles, some mild, medium and hot to bring more depth of flavor to my salsas. I will start picking the mild ones,  fewer of the medium, and less still of the hotter ones. This builds a base of flavor first, then heat. Don’t worry if it looks like you’re making tomato soup when you start roasting the tomatoes, everything will turn out just fine…

Roasted Fresh Garden Salsa

2 Lbs fresh tomatoes-diced.  Plum tomatoes are best, but use what is fresh- a couple of different kinds will give more depth of flavor! Dicing will help remove some of the excess juice.

3-4 Ripe red bell peppers– diced

10-15 Various Chiles to taste for heat- de-seeded, de-veined and diced

3-4 Ears fresh sweet or roasting corn– cut from the cob. About 1-2 Cups

5-6 Cloves garlic- sliced in 1/8 inch slices

1-2 Cups cooked Black beans (optional)

1 Tsp whole Cumin

1/2 Tsp whole Coriander

1/4 Cup Extra Virgin Olive Oil

1 Tsp salt

1/2 Tsp fresh ground black pepper

Splash of Balsamic Vinegar

You’ll need a couple of large, heavy, shallow pans for roasting- preferable cast iron, as it retains the heat well and is easy to keep at the best temperature for roasting vegetables. The grill or outdoor stove is the best place to do the cooking, as the heat stays outside, and you get to enjoy the late afternoon! A couple of large bowls to hold the roasted vegetables and a large food processor or blender will be needed after everything is roasted.

Heat the pans to a medium heat, add the tomatoes to one pan, the bell peppers and corn  to another, and if you have a third pan- the Chiles to that one. Let them roast until their skins start to turn dark. The skins should be a little black in spots and starting to loosen from the fruit. This can take up to a half hour depending on the heat of your grill or stovetop. Stir and turn with a wooden spatula occasionally. You will see some sticking, especially with the tomatoes- this is ok. When the Chile skins are starting to turn dark, add the garlic to that pan. Remove the veggies when they are fully roasted and have dark skins with a few black spots on them. The corn should have a dark yellow color to it. Put them all together into a large bowl and cover.

Toast the cumin and coriander in a small heavy pan over medium heat for 2-5 minutes, until they release their aromas. You will see the seeds start to darken and release their aromas- move the pan off of the heat for a second or two, then return to the heat. Continue this until the rich toasted aroma tells you they’re ready. Grind in a mortar and pestle or spice grinder to a coarse ground consistency.

Add the vegetables to the food processor in batches if needed and process with a chopping blade until a chunky consistency is reached. Do not over process to a smooth or fine consistency- you will lose flavor. Repeat until all the vegetables are processed, and return to a large serving bowl. Add ground spices, Olive Oil, salt and ground black pepper. Add splash of Balsamic Vinegar and mix well. Taste and adjust salt and pepper if needed.

Serve warm with chips, or in and on top of fresh hot quesedillas or accompanying queso fundido with chips.

Chicken Maque Choux is one of the most wonderful, rich and flavorful chicken dishes there is. This has been one of our favorites for years, and is absolutely best cooked at the end of summer, when the corn is rich and ripe with plenty of other fresh vegetables available to round out the chicken and sausage. Fresh vegetables are essential for the complementary flavors, but you can do this with frozen and canned ingredients in the winter. This is one of the reasons to freeze and can your own produce, to be able to capture the taste of late summer in the middle of winter…

“Maque choux” is a Cajun word meaning a dish smothered with fresh corn and tomatoes. This is a stew dish in consistency and needs some liquid in the bottom of the bowls. Provide soup spoons and plenty of fresh bread, as the liquid in the bowls is delicious!

This is the traditional recipe, using the entire chicken, but one can use breasts or thighs if needed. We use Olive oil to cook in, and cast iron as it holds the heat better and adds more flavor, I believe. This is one recipe where the freshest ingredients will really shine. Fresh, local chicken will make this a dish that everyone will remember.

The sausage is optional, as it does add to the richness of the dish. For a lighter dish, use just the chicken. Who cooks Cajun in a lighter way though? Seriously, though, the chicken by itself is very memorable!

Chicken and Sausage Maque Choux

1/4 Cup Vegetable oil or Olive Oil

2 Small fryers, cut up (Can cut into bite sized pieces if desired)

1/2 Pound hot Cajun or Italian sausage links, cut into 1/2-inch slices (Optional)

4 Cups fresh corn cut off the cob, with cob liquid reserved (substitute 16 Oz frozen sweet corn if needed)

2 Tbs fresh heavy cream

3 Cups chopped onion

1 Cup chopped green pepper

2 large Beefsteak tomatoes, coarsely chopped (substitute Italian canned plum tomatoes if needed)

1/4 Tsp dried Thyme

1/4 Tsp dried Basil (or 1/4 cup chopped fresh basil)

1 Tbs finely minced fresh Parsley

2 fresh Thyme sprigs

1/2 Tsp cayenne, or to taste

3 Tsp salt

1 Tsp freshly ground Black Pepper

2-3 Tbs milk, if needed

Heat oil in a heavy 8-10 Qt pot or kettle over medium heat. Season chicken with salt and pepper and brown in hot oil, turning often to brown evenly. When chicken is just starting to brown, add sausage if using, turning often. Reduce heat to low once sausage has started to cook and chicken is almost browned. Add onion and cook for about 15-20 minutes. Add corn, corn liquid and cream, mixing thoroughly.  Add green pepper, tomatoes, herbs, salt and pepper. Lower heat until mixture is just barely simmering, cook for 30-45 minutes. Check progress about every 15 minutes. Chicken and sausage should be very tender, chicken will be almost falling off bones. If dish is too soupy, uncover pot for last 15 minutes. If it is becoming a little too dry, add milk as needed.

Serve hot with fresh bread in soup or gumbo bowls. Make a full recipe, as everyone will go back for more, and it gets better the next day.

This is a great dinner for family or friends, and it doesn’t have to be Sunday. A whole roast chicken makes for an impressive tableside presentation followed by a delicious meal and the tender, tasty leftovers can be used for several other dishes, if there are any left!

For faster, more even roasting, cut the backbone out of the chicken with poultry shears or heavy duty kitchen shears. This allows the bird to lay flat in the roasting pan. Keep the backs in a freezer ziplock until you have several, then make chicken stock with the giblets, diced onions and celery, aromatic herbs such as savory, rosemary, thyme, salt and pepper and a bay leaf in a couple quarts of water. Bring to a boil, then simmer for a minimum of two hours, longer is better.

Pair this with some fresh homemade biscuits and you’ve got a proven winner! We found a great restaurant in the little town of Boulder, Utah called Hell’s Backbone Grill that makes the absolutely best biscuits that we’ve ever tasted! They are easy and quick to make and are positively addictive. We always make a double batch if we want any for the next couple of days. You can use the hot oven for both roasting the chicken and baking the biscuits.

Make sure to include plenty of vegetables, as they roast up well and balance out the rich roasted chicken flavors.

Herb and Vegetable Roasted Chicken

3-4 Lb chicken

1 lemon, halved

Fresh rosemary

Fresh thyme

8 cloves garlic, peeled and crushed

2 Tbsp butter, softened

Salt and fresh ground black pepper

4 small red onions, halved

8 small potatoes, halved

4-6 medium carrots

4 medium parsnips, peeled

Extra virgin olive oil

Heat oven to 450F. Rinse chicken, pat dry with paper towels. Place chicken in a large roasting pan or skillet. Cast iron is best.  Squeeze lemon juice to cover chicken then put lemon halves, rosemary, thyme and 4 cloves of garlic into cavity. Rub chicken with butter, sprinkle with salt and pepper. Arrange remaining vegetables around chicken and brush with olive oil, season lightly with salt and pepper.

When oven is hot, roast for 15-20 minutes, then bast chicken with pan juices. Reduce heat to 375F and continue to roast for about 45 minutes more, basting every 15-20 minutes until skin is crisp and golden. Remove from oven, cover with lid or foil for 10-15 minutes (while biscuits are cooking) and let rest before carving. When removing chicken, reheat oven to 450F. By the time you are ready to bake the biscuits, the oven will be at temperature.

Black Powder Buttermilk Biscuits

This is our all time favorite biscuit recipe! You must have two things to be successful here- a hot oven and cold dough. These are made and bake quickly, so get everything ready before you start.

3 Tbs cornmeal

2 1/2 Cups flour

1 1/2 Tsp salt

1/2 Tsp baking soda

1 Tsp baking powder

1/2 tsp course black pepper

1 Tsp sugar

1 stick (1/4 Lb) butter- cold- cut into 1/2″ chunks

1 Cup buttermilk or substitute 1 cup milk with 2 tsp lemon juice

Adjust rack to middle position of oven, lightly oil cookie sheet or use a nonstick spray. Sprinkle 2 Tbsp over surface.

It’s best to use a food processor for the next two steps, then lightly knead the dough by hand or in a stand mixer. It makes for better biscuits!

Add flour, salt, baking soda, baking powder, pepper and sugar in food processor bowl, pulse 5-7 times with cutting blade to mix. Next, add butter chunks and run until mixture resembles coarse crumbs. This can be done with 2 knives and some patience. Transfer to stand mixer bowl.

Using low speed, fold mixture in while slowly pouring buttermilk over top. Mix well until dough is sticky and moistened through, with no dry patches. Turn dough onto lightly floured worktop, using floured hands to prevent dough from sticking. Using knife or bench scraper, cut dough in half and stack one piece on top of the other. Flatten with rolling pin, but don’t over do it. Repeat cut, flatten and stack for 3 more times. Add small amounts of flour necessary to keep everything from sticking. Dough will be very moist- as it should be.

Transfer dough to cookie sheet. Roll to about 1 inch thick, then cut into squares about 2×2″. Sprinkle with remaining 1 Tbsp cornmeal. Bake until golden brown, about 12-15 minutes.

Serve with the roasted chicken and enjoy!

This is a wonderful winter chowder, warming and hearty to chase away the cold winter blues. It uses readily available winter ingredients- potatoes, onions, garlic and carrots, along with some frozen corn. Homegrown frozen sweet corn will be the best, but a good quality frozen sweet corn will work.

I use this as a starting base for experimentation and new directions. This is perfectly delicious, however, just as it is! Lobster, crab or shrimp makes this an excellent seafood chowder. Fresh sausage gives a completely new flavor, especially if it is spicy or smoked. Smoked pork works magic as well. Use your imagination and unique, local ingredients to shape this into a new regional specialty in your area!

Corn and Potato Chowder

Sea Salt, to taste

1 Stalk celery, chopped coarsley

1 Medium carrot, chopped coarsley

1 Sprig fresh parsley, can use dried

1 Bay leaf

5 Black peppercorns

1/4 Lb. salt pork, or smoked pork

3 Medium yellow onions, peeled and diced

3 Cloves garlic, peeled and minced

1 1/2 Lbs. unpeeled red potatoes, cut into 1/2″ cubes.

4 Cups corn kernels- (about 6 ears worth)

3 Cups half and half

Cayenne pepper

Freshly ground black pepper

1 Tbsp.  Chicken base- Better Than Bouillon is a great brand

10 Cups water

In a  large, heavy stockpot (preferably cast iron) heat the water and mix chicken base. Once simmering, add celery, carrots, parsley, bay leaf and peppercorns. Cover and simmer over low heat for 1 1/2 hours, then increase heat to medium until stock is reduced to about 6 cups, about 10-15 minutes. If using seafood, cook in stock base now, only til just tender and remove for later.

Cook salt pork or sausage in separate heavy pan over medium low heat until crisp, about 20 minutes. Remove, drain and slice. Add to stockpot. In same pan, saute onions and garlic until soft and browned.

Add to stockpot along with potatoes and corn. Simmer on medium heat until potatoes are tender, about 10 minutes. Stir in half and half, cayenne and return to simmer. If using seafood, add now and heat through, about 5 minutes. Season to taste with salt and pepper. Ladle into bowls and serve hot.

Please let us know how you like it, and what adaptations you make!