Tag Archive for: Marjoram

Chile Coloradito Sauce


This is an incredibly versatile chile sauce with loads of flavor and just a touch of heat. It is my adaptation of the incomparable Mole Coloradito Oaxaqueno from Susanna Trilling in her “Seasons of My Heart” cookbook that we’ve featured before. (Mole is pronounced “Mole-lay”!)

This makes a sauce that is 95% of her Mole, but I prefer to make a very large batch as it is a project to do and doubling of the recipe doesn’t take much more time to make. Then you have this cache of amazing flavor that spices up any dish with no extra time but lets all of the flavor and work shine through. It is a wonderful basis for enchiladas, nachos, stews, soups, sloppy Joe’s, burritos or even spooned over eggs in the morning. I like to add about half tomato sauce by volume to make a great sauce that is smooth and mellow with the taste of the chiles but none of the bite.

Colorado means “red” in Spanish, usually referring to a deep brick type of red, so coloradito is “little red”. We’ll give you the recipe first, then walk you though the preparation in photos so you can see the stages and progression. These chiles can easily be grown in your garden for most of North America, or at a well-stocked Mexican grocer. For the Mexican chocolate, Ibarra is a well-known brand that is available almost everywhere. If you really want to take the flavor to the next level, look at Taza Chocolate. It is stone ground in the traditional Mexican village tradition and has a flavor that is absolutely to die for, not to mention being fair trade and traceable to the source. You can see all about how your batch was made by entering the batch number into their website!

Homemade Chile Coloradito Sauce

  • 18 Ancho chiles
  • 21 Guajillo chiles
  • 25 Pasilla Bajio/Chilaca chiles
  • 10 Concho chiles
  • 1 Chipotle chile en adobo
  • 5 Black peppercorns, whole
  • 2 Cloves, whole
  • 1 Star anise, whole
  • 1 Allspice, whole
  • 1 Piece Mexican cinnamon, about 1 inch long
  • 1/2 Tsp Cumin, whole
  • 1/4 Tsp Coriander, whole
  • 1 Head garlic, cloves separated
  • 1 Medium onion
  • 1 Lb ripe tomatoes, quartered
  • 1/2 Tsp Mexican oregano, dried (Can substitute Marjoram if needed)
  • 1 Plantain, ripe
  • 1 Tbs raisins
  • 5 Almonds, whole and unpeeled
  • 1/2 Cup sesame seeds
  • 2 Bars Mexican chocolate – 6 oz total
  • 3 Tbs Coconut oil or sunflower oil
  • 1 1/2 Qt homemade chicken stock
  • Salt to taste

There are 3 steps to this recipe: processing the chiles, processing the spices and processing the tomatoes, onions, plantains and seasonings.

Some cooks will stem and seed the chiles while still dry, toasting the pieces. Others will toast the chiles whole, then soak them to soften the skins and remove the stems and seeds.

  1. Bring 2 quarts of water to a boil. Meanwhile, heat a dry comal, griddle or a cast-iron frying pan over low heat and toast the chiles on both sides for about 5 minutes. Toast the Anchos a bit slower and on a lower heat because of their thicker skins. Toasting them blisters and loosens the skins and gives off a rich chile aroma. It may be best to toast them in smaller batches so the pan or comal is not crowded. You need room to move and turn the chiles in the pan.
  2. Remove the chiles, place them in a large bowl with the hot water. Cover or weight the bowl with a plate to keep the chiles submerged. Soak for about 20 minutes to fully soften the dried skins. If chiles have been stemmed and seeded, puree in a blender using as little of the chile water as possible to make a thick paste, usually about a cup. If chiles have not been stemmed and seeded, do this first, then puree in blender. It is best to do this in small batches to not overload and overheat the blender, as the chile puree is quite thick. Depending on your blender, you may have a smooth paste at this point, or you may have some small pieces of skin. If skin pieces are present, pass the puree through a food mill or sieve to remove the skin pieces. Set aside.
  3. After processing the chiles, heat the dry comal, griddle or cast-iron frying pan over medium heat and toast the peppercorns, cloves, allspice, cinnamon stick, cumin and coriander until they release their aroma. Stir the spices constantly to prevent burning and to monitor the toasting process. Set the spices aside.
  4. Grill the garlic and onion on the dry frying pan, turning often until they become translucent. They may stick a bit, but keep turning. Puree the spices, onion and garlic with 1/2 cup of the chicken stock. Set aside.
  5. Heat the cast-iron frying pan to medium and cook the tomatoes and oregano with no oil until the condense, usually about 10 – 15 minutes. They will give off their juices, then start to condense as the juices evaporate. Once condensed, set aside.
  6. Heat 2 Tbs of the oil over a medium heat in a cast-iron frypan and fry the plantain until brown, about 10 – 12 minutes. Remove from the pan, add raisins and fry until plump, about 3 minutes. Remove and set aside with plantain. Fry the almonds until light brown, about 4 minutes. If needed add a little additional oil, but the amount should decrease with each ingredient until the almonds are almost being dry-fried.
  7. Puree the plantain, raisins and almonds in a blender with 1 1/2 cups chicken stock until smooth.
  8. Heat frying pan over low heat, add 1 Tsp of oil and gently fry the sesame seeds until just turning brown, about 6 – 8 minutes, stirring constantly. Remove, cool and grind in a spice grinder or food processor.
  9. In a heavy stockpot, at least 6 quart capacity, heat 1 Tsp of oil until almost smoking on medium-high heat. Add chile puree and cook, stirring constantly. It will splatter, but keep stirring until heated through. Once heated, lower heat to medium-low and cook for about 20 minutes, stirring frequently. When chile puree starts to thicken add tomato mixture, lower heat to low and cook another 15 minutes, stirring to keep from sticking or burning. Then add onion and spice mixture and stir well. Add pureed plantain and sesame mixture and stir well. Cook a further 10 minutes, stirring constantly to keep from sticking.
  10. If you are making a larger batch and freezing some, add 2 cups of chicken stock, stir in well then add the chocolate and stir constantly. Once the chocolate has dissolved, add the salt, stir in well. Reduce heat to a slow simmer and let cook for 10 – 15 minutes, stirring frequently to avoid sticking. It will be a thick sauce, ready for freezing in jars. Let cool, then ladle into mason jars leaving an inch gap at the top. Will keep in the freezer for up to a year.
  11. If you are making the batch to use fresh, add 5 cups of chicken stock to thin the sauce, then add the chocolate, stirring constantly. Once the chocolate has dissolved, add the salt. Lower the heat to a slow simmer and let it cook down for at least 30 minutes, stirring occasionally. It should coat the back of a spoon, but not be much thicker when done.

Makes about 8 servings.

Recipe Tip! It doesn’t take much longer to make double the recipe and freeze for an easy, delicious dish later!

This may sound complicated or a lot of work, so we will walk you through the process and show you what each step looks like. It is a good day’s worth of work, but it can be broken up into a couple of days if you don’t have the time to make it all in one day. Once you taste the results, you will immediately see why it is worth the effort to make a large batch!

In the first photo, we are toasting two of the different chiles and dry frying the onion and garlic in another pan. We have learned to save a lot of time by combining a couple of steps at once. The Ancho chiles are in the back with the Pasilla Bajio or Chilacas in front.

A plant growing in the dirt on a sunny day.

Roasting Chiles and Frying Onions

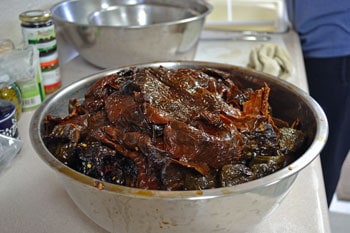
These are the chiles after toasting, soaking and being stemmed and seeded. Most of the work happens right here, to get to this stage. After this everything is roasting and toasting, then using a blender to puree everything into a sauce. To give a sense of scale, this bowl is over 18 inches across!

A plant growing in the dirt on a sunny day.

Into the blender with the chiles! We have a Vita-Mix blender that is a real blessing with big projects like this. It stands up to the thick sauce without overheating, but we still need to process all of the chiles in batches. We usually fill the blender about 1/3 full with chiles and add just enough soaking water to make a thick paste. Please notice the gloves, I use them when working with chiles for extended periods of time to keep me from itching my eyes with a chile-infused finger!

A plant growing in the dirt on a sunny day.

It is easy to see why the name of “colorado” is applied to this sauce – look at that beautiful rich brick red color! My mouth was watering for most of the time after we pureed the chiles as the kitchen was filled with their aroma.

A plant growing in the dirt on a sunny day.

There is not too much volume lost from the soaking stage to the pureed stage. This is the same bowl after we’ve finished pureeing all of the chiles.

A plant growing in the dirt on a sunny day.

Next up is toasting and grinding the spices and seasonings. We used a smaller cast-iron pan to toast the spices and release their aromas.

A plant growing in the dirt on a sunny day.

A molcajete is what we use simply because we have one. It is great for grinding spices and really working them to release their flavors and aromas. A food processor or blender can do much the same with less effort.

A plant growing in the dirt on a sunny day.

A few minutes later, here is what the ground spices look like, ready to be mixed into the chile mixture. At this point we’ve also pureed the onion and garlic and mixed it into the chile sauce.

A plant growing in the dirt on a sunny day.

Now it’s time to mix it all together! This photo helps to show the scale of everything, as the whisk is almost a foot long and I’ve got my hand completely wrapped around it to work all of the purees and spices together.

A plant growing in the dirt on a sunny day.

After everything is mixed together and cooked at a slow simmer, we put it up in jars to freeze for later. We use pints, as this gives a generous amount of sauce without being too much after a couple of days. We leave about an inch or little more of space at the top to allow for expansion in the freezer.

A plant growing in the dirt on a sunny day.

All done except the clean-up! This particular batch made 17 pints of scrumptious chile sauce, with just a bit left over for the next morning’s eggs. This will give us almost a year’s worth of chile sauce.

A plant growing in the dirt on a sunny day.

A close-up of the color and texture of the finished product. Well worth the work!

A plant growing in the dirt on a sunny day.

Herbed Dried Tomatoes


Here’s a recipe that will take a little preparation, but you will be thanking me for it later! Make a lot more of these dried tomatoes than you think that you will ever need, as once folks catch on to just how incredibly tasty these little jewels are, you will run out. You might want to hide some just for yourself!

These make beautifully presented, incredibly thoughtful gifts for the chef or serious home cook in your life. You cannot buy the flavor of these herbed tomatoes, anywhere, at any price. These will take a bit of time, but doesn’t require much hands-on time to make.

First, the tomatoes. Only heirloom tomatoes can really be considered, as the flavor is what you are after. The beauty of this process is that almost any tomato can be used, as the drying intensifies the flavors already present. Obviously, a paste tomato will give you a more substantial result. Good ones to look for are the plum and pear sizes with meaty walls, few seeds and a ton of flavor. If you don’t have these already growing in your garden, plan to plant some next year and look at your local farmer’s market. You will need a lot of fresh tomatoes, as they lose a lot of weight during drying. Plan on about 3 times the fresh volume as what you will get dried.

Drying them is the easy part. Wash them, slice and place on cookie sheets to dry. The oven is a great choice, as most gas fired ovens with a pilot light stay at around 90F or so. A consistently warm, sunny location is also good. If drying outside, cover with cheesecloth to prevent flies from snacking on your treats. Let them dry to a leather-like stage, then collect and start the marinating.

There are several different directions you can go with the herbs. A traditional approach is to use basil, oregano and garlic. A French approach would include lavender buds, Herbes de Provence with garlic. The strong punch of Mexican oregano accompanied by some smoked Jalapeno chiles, cumin and marjoram would be out of this world as well. Be creative, look at some herb combinations you enjoy and do some experimenting. The results will most likely be quite tasty!

We will start with the most basic recipe and then give you some alternatives to try. Use as you would sun-dried tomatoes – in soups, sauces, stews, bruschetta, pizza, spreads, salads or anywhere else the flavors would work well.

Herb Marinated Dried Tomatoes

  • 1 1/2 Cups dried tomatoes
  • 1 Tbs fresh basil leaves, chopped
  • 2 Tsp fresh oregano, chopped
  • 1/4 Tsp pickling salt
  • 2 Large garlic cloves, thinly sliced
  • 6 Tbs red wine vinegar
  • 2 Tbs Extra virgin olive oil
  1. If tomatoes are crispy dry, put into 2 cups boiling water for 5 minutes to soften, then drain. If tomatoes are leather dry and still slightly pliable, you don’t need to soften them.
  2. Add herbs, salt and vinegar to bowl and mix or toss well. You want to have all of the herbs well mixed before adding the tomatoes.
  3. Pack tomatoes and herb mixture into a 12 ounce to 1 pint jar, being sure to coat the tomatoes well with the herb mixture. Leave a small space at top of jar. Add olive oil to top and cap jar.
  4. Store in a cool, dry, dark place. Once opened and for longer storage, keep in refrigerator.

Use these following recipes as the herb ingredients for the basic recipe above.

Herbes de Provence Marinated Dried Tomatoes

  • 2 – 3 Tbs Herbes de Provence
  • 3 Large cloves garlic, thinly sliced
  • 1 Tsp freshly ground black pepper

Mexican Herbed Marinated Dried Tomatoes

  • 1 Tbs Mexican oregano, dried
  • 1 Tsp Sweet marjoram, dried
  • 1 Tsp Chipotle chile, finely chopped
  • 1 Tbs Whole cumin seed, toasted and ground
  • 1 Tsp Whole coriander seed, toasted and ground
  • 3 – 4 Large garlic cloves, thinly sliced

Italian Herbed Marinated Dried Tomatoes

  • 2 Tsp Fresh Greek oregano
  • 1 Tsp Sweet marjoram
  • 1 Tsp Summer Savory
  • 1 Tbs Fresh Marseilles basil, chopped
  • 2 Large garlic cloves, thinly sliced

Recipe Tip! Pickling salt is -simply put- fine, pure granulated salt. Grocery stores label it “canning and pickling salt”, health food stores call it “sea salt”. It is not table salt, which contains iodine and several other stabilizers and anti-caking agents that can ruin your pickles appearance.

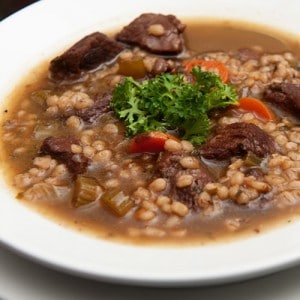
Beef, Barley and Root Vegetable Soup


When Fall arrives, I look forward to thick and hearty soups. Even if the weather isn’t cold and blustery quite yet, a hot bowl of broth-based soup is somehow nourishing for both the body and soul. Serve with fresh cornbread, biscuits or home-baked whole wheat bread and butter, and you’ll understand how family traditions are started. For this soup, I used a beef broth that I’d made earlier this summer with bones from the butcher. We are fortunate to have a real, old-fashioned butcher in our town that understands when I ask for broth bones. Pan roasted with some root vegetables, then slowly simmered for a day and a half- this is a rich, silky broth that has a depth of flavor just not found outside of the home. Well worth the time to make in large batches and frozen until needed!

Using beef, barley and what root vegetables were on hand was the ancient beginning of this soup. You can use any root vegetable that you have, in any combination that you like, and a little or a lot of beef for flavor. Slow simmering for several hours will give the best, richest flavor. Plan on making extra, as this is very popular once people get a taste of it. Great to make on a weekend to have for lunches at the start of the week. This can be a thick or thinner soup, or stew depending on how much liquid you leave at the end of the cooking. Maintain the liquid level for more soup like consistency, or let the barley soak up the liquid for a stew. Feel free to add onion, green beans, peas, beets, celery or any vegetable that will add a hearty flavor to this soup.


Beef, Barley and Root Vegetable Soup

6-8 oz Beef, cubed- Roast is best for flavor in slow cooking

1 Qt Beef stock

1/2 Tsp Thyme

1/2Tsp Marjoram

1/2 Tsp Savory

1/2 Tsp Rosemary, fresh picked and chopped

1/2 Tsp Black pepper, best if freshly ground

2 Bay leaves

1/4 Tsp Salt (to taste)

4-6 cloves Garlic, diced

1/2 to 1 Lb Carrots, thickly sliced

1/4 Lb Potatoes, reds, purples or any waxy types

16 oz or 1 can crushed Tomatoes

1 1/2 Cups Barley

Add beef, broth and thyme, marjoram, savory, rosemary, black pepper, bay leaves and 1/2 of the salt to a heavy pot or stockpot and bring to a slow simmer. Once beef is tender- about 30-45 min for 8 oz- add garlic, carrots and potatoes and taste. Adjust salt if needed and add water to keep covered. Continue simmering for 1 hr or until carrots are tender. Add tomatoes and barley, check liquid level and add water if needed, simmer for 45 min to 1 hr until barley is tender but not soft or mushy. It will have a slight crunchy, toothy texture to it.

An alternative method is to brown the beef in 2-3 Tbs Olive oil or butter on medium heat until well browned and deglaze with 1/2 cup red wine. Lower the heat, then add the broth and spices and continue from that point. This will add a richness from the brown/deglazing, along with the wine. Experiment and you’ll soon learn which is your favorite method and ingredients!


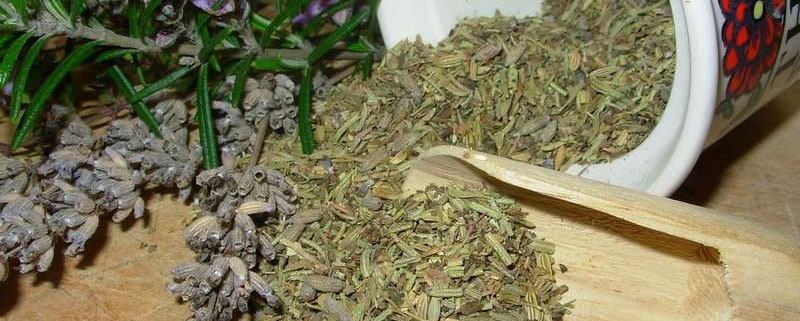
We are back from the Red Rock Lavender Festival, having met some wonderful people and loving the lavender scents for 4 days. While we were there, we picked up some Herbes de Provence and Herbes de Concho that are made at Red Rock Ranch. The high altitude, sparse soil and dry Mediterranean climate play a major part in the intensity of the scent and flavor of the lavender in their Herbes mix.

The amazing thing about Herbes de Provence is the adaptability of the mixture in so many culinary applications- from grilled, roasted or baked meats, to stews, soups and grilled or roasted vegetables, Herbes de Provence adds a depth of flavor and aroma that is unique and heady. Another interesting thing is the broad spectrum of ingredients that make up the Herbes mixture. The basic and classic mixture is equal parts dried Oregano, Thyme, Summer Savory and Lavender buds, mixed well. From this basis several other recipes have evolved, with both individual and regional preferences showing up. Many of the mixtures involve classical, foundation spices that are used in French and classical European cuisines. Some will argue that the essential ingredient is Lavender, while others will say that it’s exclusion does not lessen the mixture, and even enhances it in certain dishes. I’m not going to get into that argument, but will say that the Provence region is world famous for its Lavender, thus its inclusion into the Herbes de Provence.

This is the time of year to start selecting, harvesting and drying your garden herbs for the coming year. Rosemary has starting blooming and is incredibly fragrant now, as is Sage, Oregano, Basil, Thyme and almost all of the culinary herbs.  Selecting the best leaves from the herbs and drying them in small batches starting now gives you plenty of time to accumulate the volume of dried herbs needed to not only have enough for general cooking, but will give you enough to make some mixtures that use foundational herbs without depleting your stocks. Starting now also gives you the time to do smaller batches, being more selective in quality instead of having to just pick what is available to do a large, rushed batch later in the Fall as the weather starts shutting the garden down. Ask me how I know… Plus it’s wonderful to improvise tonights dinner from the herbs and vegetables picked today from your garden!

The following recipes should be considered a starting point, not the definitive, final recipe. Use your tastes and flavor combination preferences as a guide, and adjust amount and types of herbs accordingly. How else do you think that so many variations on the theme evolved?

I will share several other recipes for the mixture below, as well as some ideas for using them. Dried herbs are important, as fresh herbs will lose their flavor in about 20 minutes of cooking.

Classic Herbes de Provence

Equal parts of the following dried herbs:

Oregano

Thyme

Summer Savory

Lavender buds

Mix well and store in an air tight container. Keeps for 3-6 months, depending on humidity and temperature.

Variations on Herbes de Provence

1 tsp thyme
1 tsp summer savory
1/2 tsp lavender buds
1/4 tsp rosemary
1/2 tsp oregano or basil (or both)
1/4 tsp sage

1 tsp marjoram
1 tsp basil
2 tsp thyme
1 tsp summer savory
1/2 tsp lavender buds
1 tsp rosemary
1/2 tsp fennel
1 tsp oregano


2 tsp thyme
1 tsp basil
1 tsp marjoram
1 tsp French tarragon
1 tsp rosemary
2 tsp summer savory
1 tsp fennel seeds
1 tsp lavender buds


1 tbs thyme
1 tbs chervil
1 tbs rosemary
1 tbs summer savory
1 tsp lavender buds
1 tsp tarragon
1 tsp marjoram
1/2 tsp oregano
1/2 tsp mint
2 powdered or chopped bay leaves


You can crush the mix prior to adding it to olive oil for a marinade or dressing. Add in crushed dried red chiles for a new taste dimension. Mix with homemade mayonnaise for a real taste treat.

Herbes de Provence/ Bleu Cheese Burgers

Mix lean hamburger meat with high quality Bleu cheese at a ratio of 3/4 meat to 1/4 cheese. Form into patties, dust liberally with Herbes de Provence mixture that has  been crushed with fresh ground black pepper and salt, let sit for 20 minutes and grill till done.  Make sure to make extras!

Marinated Herbes de Provence Steaks

The flavors will really be enhanced if you use grass fed beef.

1/2 cup extra virgin olive oil

1/4 cup Herbes de Provence

1 tsp fresh ground black pepper

1/2 tsp salt

Mix ingredients well, coat both sides of steaks, let sit covered for 30 minutes to 1 hour. Grill to taste. Optional- make 1/2 recipe extra to top steaks when served. Can add sprinkle of Gorgonzola cheese to top of hot steak as well.

Herbes de Provence Garlic Bread

1/4 cup Herbes de Provence

1/2 cup softened butter

3-6 large cloves freshly minced garlic

Fresh sourdough bread

Mix Herbes with butter and garlic. For more garlic flavor- use more cloves. Optional- roast the peeled garlic cloves prior to mincing for a richer, mellower flavor. Lightly spread butter on both sides of thickly sliced bread, bake in 400F oven for 3-5 minutes or until just turning golden brown.

Hopefully you can start to see the versatility of the magical Herbes de Provence. You are only limited by your tastes and creativity!