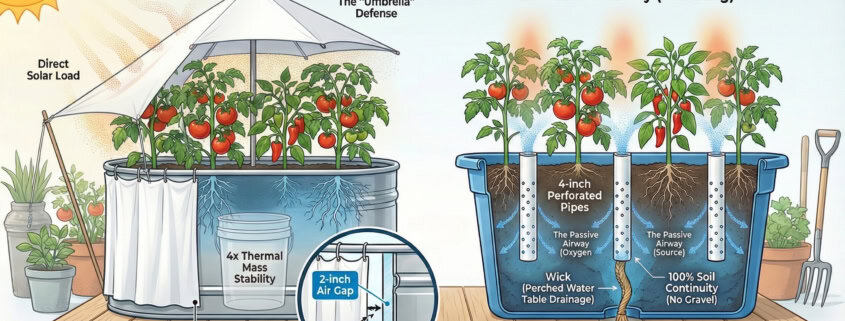
Why do most pots fail in August? It’s not water; it’s physics. Discover the 5 engineering principles of regenerative container gardening—from “Thermal Jackets” to “Wicking Beds”—and learn how to build a living soil system that thrives in the heat.

Why do most pots fail in August? It’s not water; it’s physics. Discover the 5 engineering principles of regenerative container gardening—from “Thermal Jackets” to “Wicking Beds”—and learn how to build a living soil system that thrives in the heat.
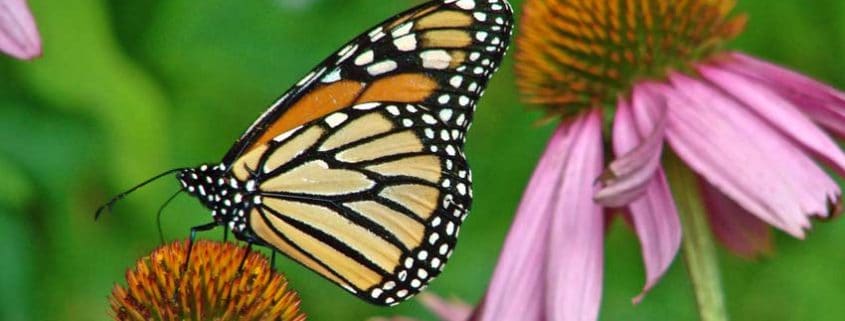
Enhance your garden’s beauty and productivity with pollinator-attracting plants. Learn how attracting bees, butterflies, and hummingbirds can create a thriving and colorful garden.
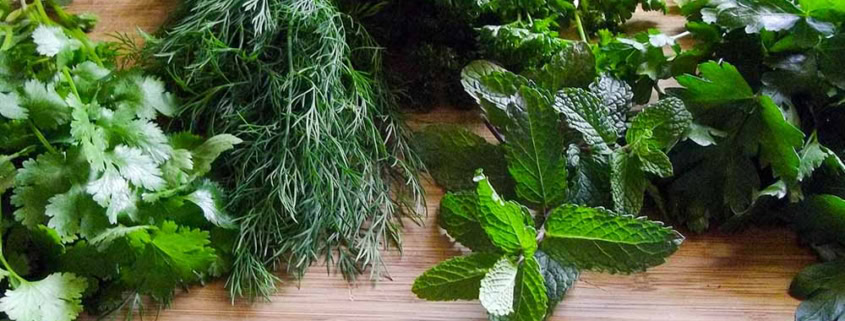
Bring the flavors and scents of fresh herbs into your home with an indoor herb garden. Learn how to easily cultivate herbs indoors.
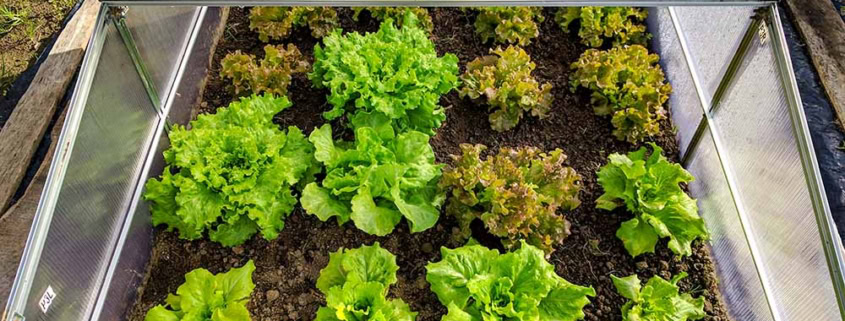
Maximize your gardening season with season extension techniques. Learn how to stretch your harvest and grow a variety of crops earlier and later in the year.
Unlock the potential of cool-season gardening. Learn how to grow flavorful crops like kale, carrots, and broccoli during fall and winter.
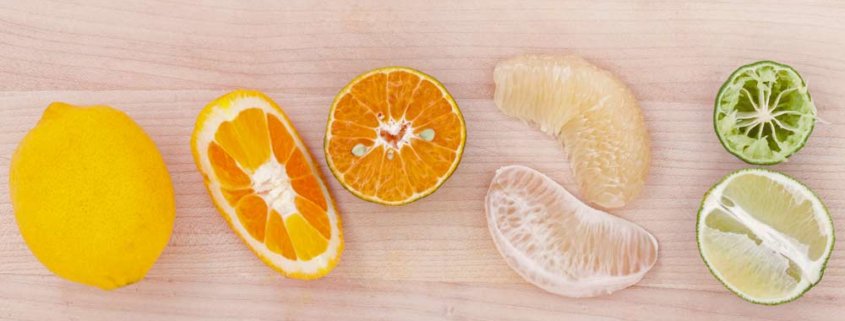
Fresh, bright and invigorating, the scent and flavor of citrus is most enjoyable for many gardeners, especially where citrus trees are not a possibility. Several different herbs and flowers have a pleasing citrusy scent or flavor – either lemon, lime or orange – either as the main fragrance or as a delicate note that brightens the scent.
Popular for teas, sachets, aromatherapy, and recipes, they bring a bright, cheerful flavor to dishes like pasta, fish, and chicken.
If you are looking to add a lovely citrusy aroma to your garden, here are several herbs to consider!
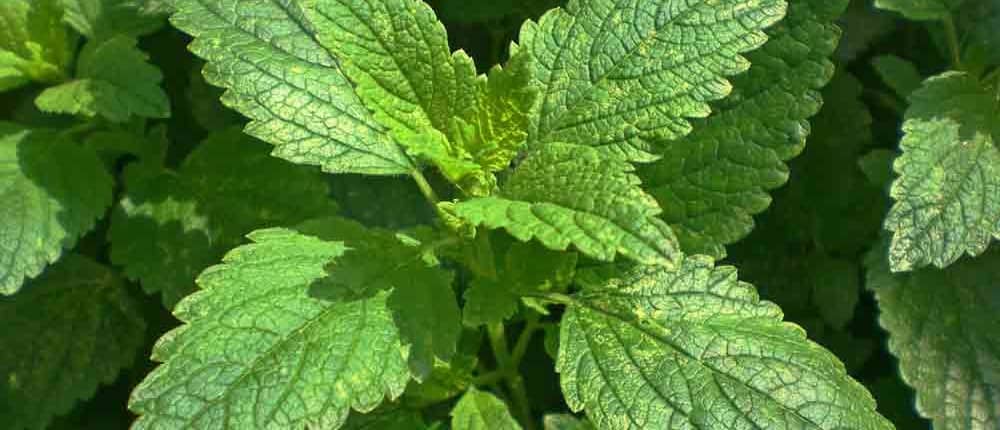
A proud member of the mint family, lemon balm (Melissa officinalis) is native to Europe and the Mediterranean and, if allowed, will spread into unwanted areas of your garden. It’s easy enough to contain in a planter or large container, or simply give it an area that it can fill in and be happy. Hardy to USDA Zone 5, it grows to about 2′ tall with abundant crinkled leaves and tiny white or pale blue flowers that attract a surprising amount of pollinators, given how petite the flowers are.
Rubbing the leaves brings out the lemon scent, and walking by the plant on a warm day repels biting insects. The scent is crisp, clean, and forward – you immediately get the heady fresh lemon-rind aroma that is very refreshing. Grow in part shade with moist soil or sunnier spots in cooler areas.
Harvest the leaves like basil with several cuttings during the season, and dry them to preserve that summer flavor into the winter, or chop the leaves and freeze in ice cubes for a lemony punch in iced teas or other drinks.
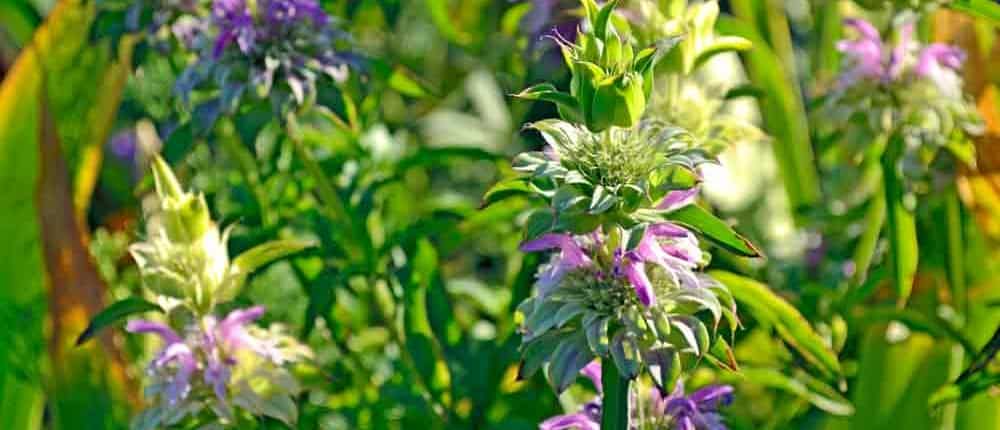
Completely different than the above two balms, lemon bee balm (Monarda citriodora) is both the perfect name and description of this highly fragrant plant. Being downwind of a thick stand will make you think you’ve come across a hidden lemon grove, then multitudes of hummingbirds and butterflies draw your eye to hundreds of minuscule compound flowers, stacked one on top of the other, marching up the stem. As you draw closer, the bees appear, covering the flowers in an intricate dance from flower to flower.
Both the leaves and flowers are used; making refreshing, calming lemon-scented teas and potpourri. The stalks make excellent additions to flower arrangements, both fresh and dried.
This annual native is fairly cold hardy, rarely killed by winter cold, surviving by underground rhizomes. They can spread in moderate climates, so use planters or pots to keep them contained, or give them an area of their own.
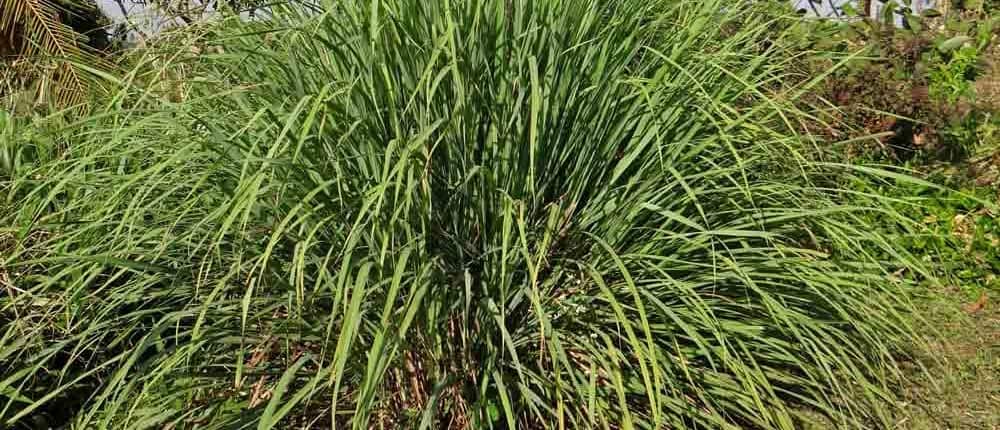
A favorite in Asian cooking, lemongrass (Cymbopogon flexuosus) looks similar to bunchgrass but with a pleasantly strong lemon scent and flavor. It has the same volatile oils as lemon rind, with the same fresh, clean, citrus flavor and scent. Easy to grow in pots and containers for cooler climates, lemongrass loves the heat thanks to its tropical origins.
Harvest by cutting a stalk at the outside of the clump near the base, leaving the rest to continue growing. Lemongrass is best used fresh, as it loses some of its lemony pungency when dried or frozen. This is why many gardeners will grow a pot of lemongrass for fresh use, moving it outside in the spring and summer, then bringing it inside for the fall and winter.
We love to ferment fresh lemongrass with chiles and garlic to make a delicious paste for Asian cooking.
Insect repellent booster –
Plant lemongrass and lemon balm together to double their individual insect-repellent powers!
Just standing in arms reach should be enough to fend off the worst of the biting bugs – consider planting a large pot to place near your summer barbeques.
They’re effective against mosquitos, gnats, and wasps, and you can break off a couple of leaves to rub on your skin or clothing to take the protection with you.
All of the flavor that makes basil such a beloved herb with a lemony punch gives lemon basil (Ocimum americanum) an exciting flavor to explore in the kitchen. Lemon and basil go well together, and this combines the best of both.
Heat-loving and repellant to biting insects, it makes a wonderfully different pesto and adds a boost of flavor to soups and stocks. As with other basil varieties, the flavor is at its peak when fresh-picked, but drying will retain some of the citrus aromas. Once it starts flowering, let some of the stalks go to seed to use as a spice and flavoring in salads, on sandwiches, and in summer iced tea.
This is another great candidate for growing in pots or containers that can be brought inside in cold weather to brighten up a winter dish.
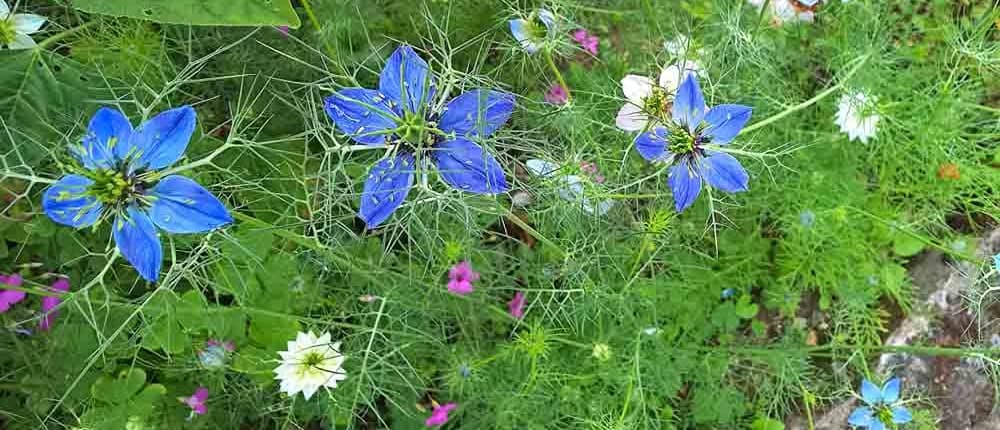
Rightfully called “The cure for everything but death”, nutmeg flower (Nigella sativa) shows off with blankets of gorgeous tiny blue-tinted flowers that produce the seeds that made them famous. The seeds are used as a spice for flavorings and medicinally for ailments. Also called Four Spice for its lemon-carrot scent followed by strawberry-pepper taste, it has flavored curries, breads, and cakes since ancient times.
Nutmeg flower prefers well-drained soil in full sun, and can often be found growing wild in rocky ground, fallow fields and scrubland. Because of its hardiness, it’s easy to grow and is often recommended for beginning gardeners, children, and low maintenance gardens.
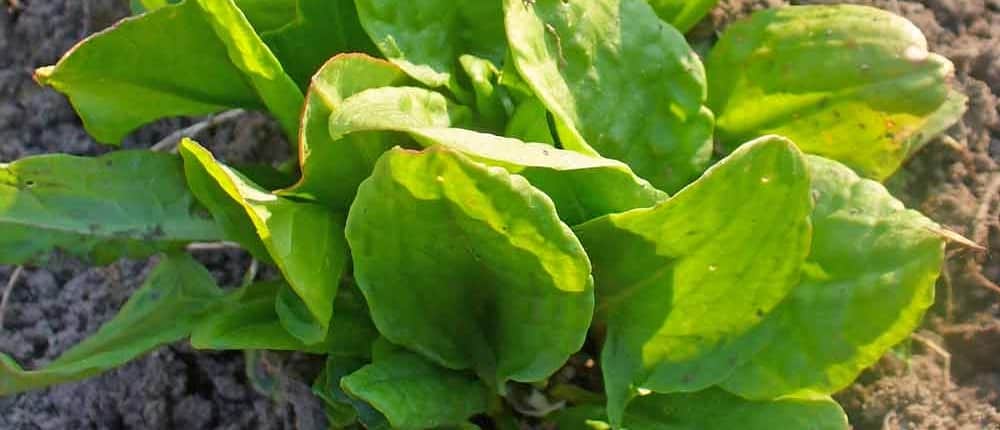
Known to many Europeans as the lemonade leaf, Large Leaf Sorrel (Rumex acetosa) is prized by chefs and is indispensable in French cuisine. The sour-citrus taste has been prized throughout the world for thousands of years as a wake-up call for taste buds dulled by bland winter foods.
Very hardy and early growing, sorrel was often one of the first fresh greens people ate each spring in the days before refrigeration. It is still a popular ingredient in spring tonics, and ancient Greeks and Romans used the herb to promote digestion.
Each one of these herbs is easy to grow in a container or pot, so no matter where you live the bright, refreshing flavors of citrus can be yours with little work and lots of rewards!
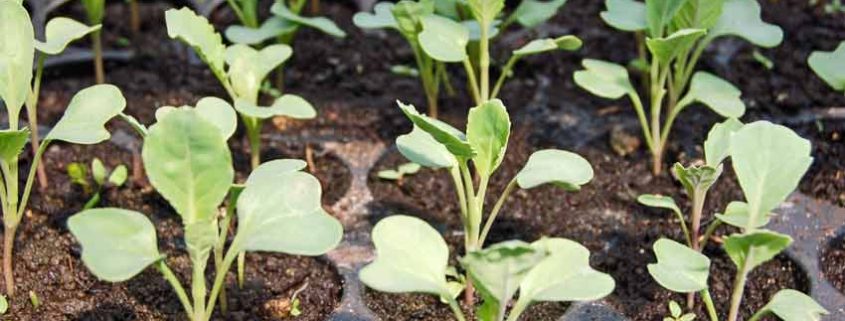
One of the best ways to grow a bigger or better garden is to start with robust, healthy seedlings and transplants. Starting them yourself allows you to select and control the conditions, which often means needing a seed starting station. Gardeners and growers looking to improve their seed germination rates and have stronger, healthier transplants that produce earlier and longer need this tool!
A seed starting station can be almost any size—from a single seedling tray to a full commercial table system. Most gardeners use a moveable wire restaurant rack as the frame, but there are many other ways to set one up.
A major advantage is that placement is not limited to a sunny and warm location because the light and heat are on the station itself. This gives you flexibility in placing it in your house, workshop, or garage—anywhere that remains above 50°F at night.
We’re sharing what we’ve learned from building and using our seed starting station for almost 25 years – what works, what doesn’t, and how to save some money!
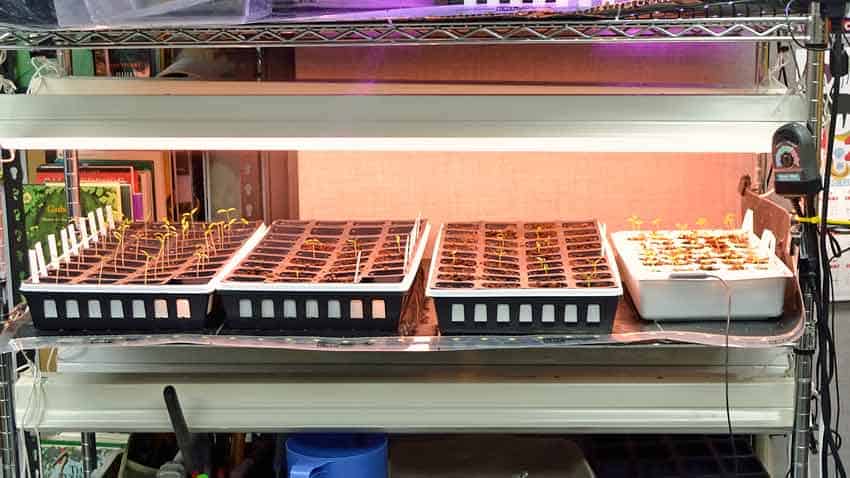
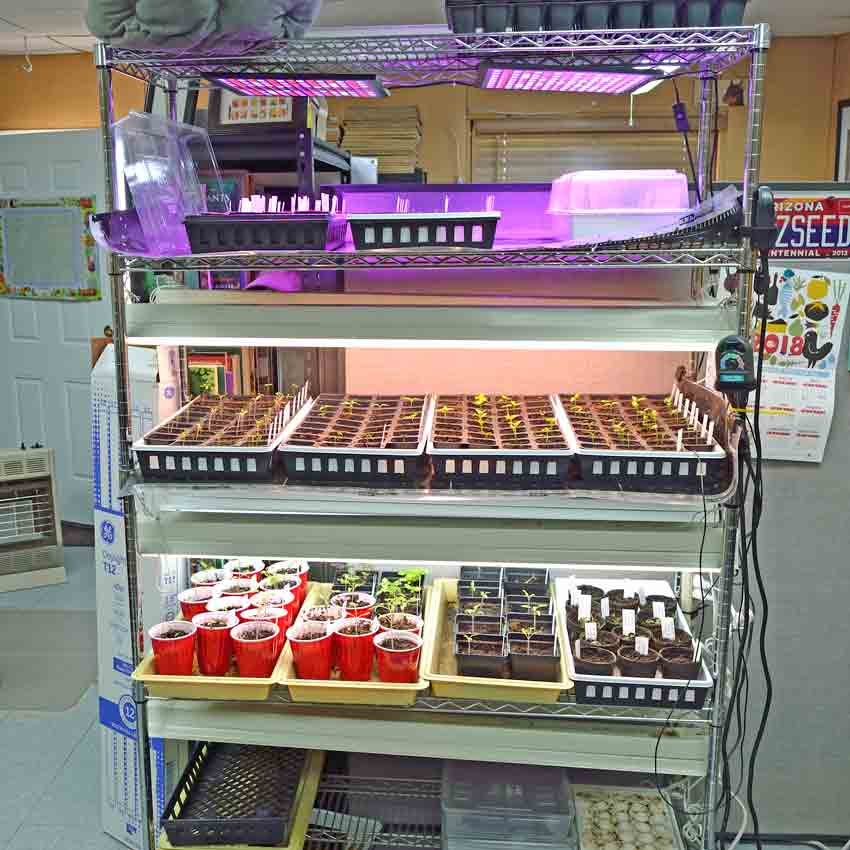
Seed starting station with seedling trays on top of heat mats with lights and thermostat.
A dedicated seed-starting platform isn’t required for a great garden, but it helps! A good seed starting station is self-contained, creates the perfect conditions for seed germination, and adjusts those conditions as the seedlings grow and develop. You easily control the warmth, moisture, and light in just the right amounts.
We invested in our initial seed rack almost 25 years ago; it still has most of its original parts, and we use it every season. A few parts have been replaced or upgraded as needed, but the money spent two decades ago is still paying out – every season – and will for the next couple of decades. That is money well spent!
Here are three more reasons to seriously consider your system –
1- Get a head-start on your season
Starting seeds like tomatoes, peppers, and eggplant earlier gives you bigger and stronger transplants than with a seed flat in the window. Instead of having a 4 – 6-inch tall seedling, you can have a 10-inch tall transplant, as you see at the garden center, which is robust and more resilient to weather fluctuations. An added benefit is earlier harvests as they go to work sooner than smaller seedlings – as much as a month earlier! In very short-season climates, a seed starting station is almost required to have vegetables like tomatoes, peppers, and squash that need longer to mature.
A seed starting station has adjustable lighting, so seedlings grow stronger and more compact instead of spindly and weak ones that struggle toward the light in a window. The protected environment keeps your young, tender, and delicious seedlings from becoming snacks for critters and insects looking for an easy meal outdoors.
The station works for spring, fall, or winter gardening—we start our spring seeds in mid-to-late February and the fall crops in August for transplanting in early September.
2- Dramatically improve your seed germination rates
The seed starting station has light and heat, and you provide moisture using germination trays with lids, adjusting as needed. Dial in heat and add moisture after planting your seeds, then add light when they sprout while reducing the moisture and heat to grow stronger, more robust seedlings than ever before.
Starting seeds becomes so easy that you can start transplants for your friends and neighbors with almost no additional effort, becoming the local garden hero.
3- Grow salad greens or microgreens indoors year-round
Lettuce, spinach, baby Swiss chard, and mustard are greens that grow well in little soil and cooler temperatures – making your seed rack the perfect location. Just dial the heat down – or turn it off in warmer climates – and keep the lights on with sufficient moisture. You’ll have fresh salads in January, even in Alaska.
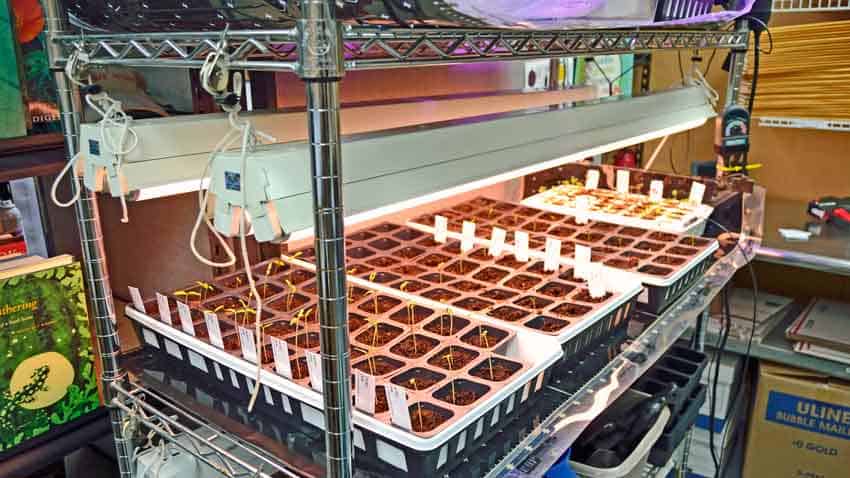
Another view of the grow rack with seedling trays, heat mats, thermostat, and adjustable lighting.
A growing station, grow rack, or seed starting station is any setup that provides light, heat, and moisture in a controlled environment and can be easily changed as needed.
Often made from commercially available wire racks on wheels, they can be as simple as a couple of hoops made from PVC tubing supporting lights over seed starting trays with lids and a heat mat or heating pad underneath.
They are usually very space efficient, only needing a couple to a few square feet, and can be tucked away in little-used areas because they provide their own light and heat. A spare room, unfinished basement, or even a garage will work to start your seeds, as long as the minimum nightly temperature is above 50°F.
A growing station – simply stated -helps you start seeds better and grow stronger transplants.
It really is that simple.
Anyone starting their own seeds gains an immediate advantage using a grow station. You have complete control over the specific conditions that seeds need to germinate – light, water, and heat. This means you provide the perfect environment at the perfect time for faster seed germination, then decrease the moisture and heat while increasing the light to grow stronger seedlings than ever before.
The foundation of any seed-starting system is the support structure that holds the lights above the seed trays, allowing them to move up and down over the young seedlings as they grow. Larger stations support the seed trays and heating mats, while simpler systems suspend the lights over any level surface.
If you have space, investing in a restaurant-style wire rack on wheels gives you a lifetime of use—and possibly more! Our rack is almost 25 years old and is still functioning just as well as the first day we assembled it. We’ve moved its location about 8 – 10 times and reconfigured the lighting system a few times as we tried different ways to hang and adjust the lights over the seed trays.
We easily see another 25 years of use from it because there isn’t much stress on the rack. We’ve removed two original shelves to give us more vertical space for growing seedlings and provide light above each shelf.
The five-shelf system that we use (74-in Tallx 48-in Wide x 18-in Deep) is ideal if you’re growing a larger garden or want to start and transplant several dozen seedlings indoors simultaneously. Depending on your needs, you have the flexibility in how many shelves are in use at once – from one to all of them. Here’s a materials list with sample pricing from Home Depot:
TOTAL COST: $355.04with Plant and Aquarium bulbs from Home Depot
OR
TOTAL COST: $295.26 with Daylight bulbs
Once you see the cost of a professional seedling cart (without heat mats), you’ll see what a difference building it yourself makes!
The consumables—items that are reasonably expected to wear out—are the power strips and bulbs. The power strips should last 3 – 5 years, possibly more, while the bulbs have an average lifespan of 20,000 hours. Using them 14 hours per day gives almost four years of continual use, but normal use is about four months for both spring and fall transplants, giving a potential 12 years. In our experience, we usually see about 8 – 10 years of use.
The pricing example above is for purchasing brand-new equipment simultaneously, but it doesn’t have to be built this way. Your local Craiglist is an excellent option, and you can set alerts for keywords—”wire shelving,” for example—to avoid having to search every day. Yard or garage sales, used equipment, or restaurant supply companies in your area are other choices. If you get creative, you’ll find several ways to save money over buying new.
Even if you buy new, you can build a shelf or two at a time as needed – nothing says you have to build it all at once!
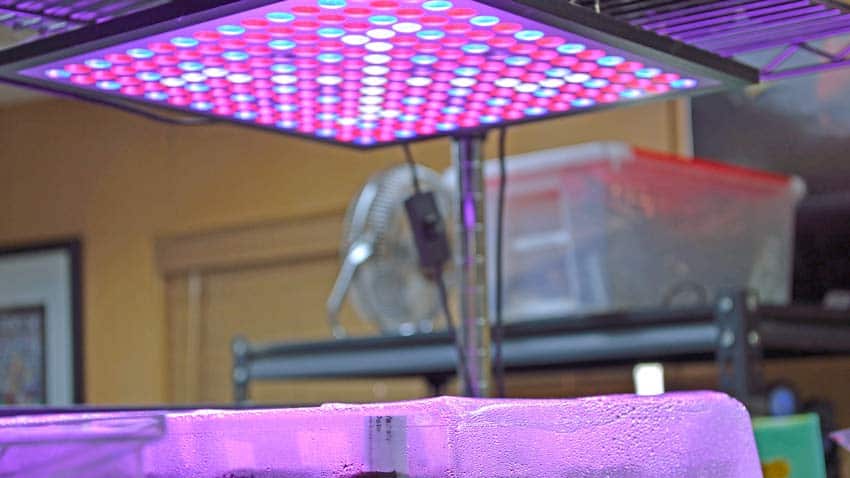
Spectrum-tuned LED grow light – good idea, but it doesn’t last long enough for the price.
You’ll see two different choices in bulbs in the materials list – Plant and Aquarium bulbs vs. Daylight bulbs. Both are fluorescent and will last 20,000 hours, but they emit a different spectrum of light. Red and blue are the two most important colors that plants use, as most of the photosynthetic activity of chlorophyll is in the blue and red frequencies. In simple terms, blue wavelengths encourage vegetative growth, while red is best for flowering and fruiting.
The Plant and Aquarium bulbs are tuned toward the red end of the spectrum, while the Daylight bulbs are more blue. If you are using the grow station exclusively to start seedlings for transplanting, then use the Daylight bulbs. For those using the grow rack for growing greens for harvesting, choose one of each type of bulb for each fixture, giving you better coverage of the spectrum.
LED lights are available, and we are testing some, but we aren’t ready to recommend any particular brands yet. The advertised advantages are a longer-lasting light that uses less power than fluorescent bulbs. The disadvantages are usually higher initial costs and less than optimum real-world lifespan. For example, one light we tested cost $30—which is good—but started to fail in the second year of use, which is bad.
Commercial LED lighting is extremely expensive and has not – yet – lived up to all of its claims. Research is ongoing, and we expect to see a large shift to more affordable and better LEDs soon.
Most vegetable seeds don’t require light to germinate, but some herbs and flowers do. When we start vegetable seedlings, we don’t turn the lights on until they have popped up and opened their cotyledon leaves. This is when they switch from living off the stored food and energy in the seed to making their own through photosynthesis. 10 – 12 hours of light is good to start. The lights are lowered to about 3 – 6 inches above the seedlings or moisture domes to give them the strongest light possible.
Monitor the soil moisture levels, as the warmth from the lights can sometimes dry out the soil.
You can’t hurt the seedlings with too much light – they will not use what they don’t need. In photosynthesis, there are two cycles – a “light” and a “dark” cycle. The light cycle depends on light to function because it’s based on photosynthesis, but the dark cycle doesn’t require light. That doesn’t mean it needs to be dark for the “dark” cycle to function – it happens after a certain amount of energy is built up from photosynthesis during the light cycle, which then switches to the dark cycle to store that energy. This switching happens continuously, so don’t worry about giving your plants too much light!
Providing lots of light builds strong plants because they have lots of light energy to capture and store for future growth.
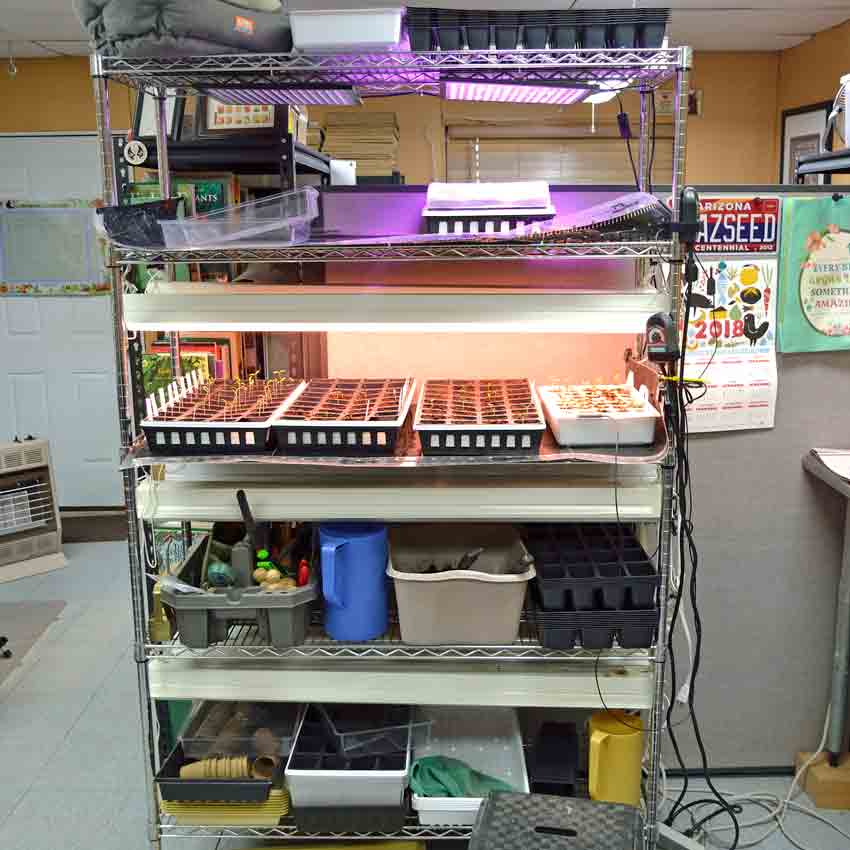
Early season view of our grow rack with two shelves for starting seeds.
Now that you know what you need, let’s walk through how to set it up and start your first batch of seeds!
Start with the wire rack – this is the foundation for everything else. Use the instructions and carefully assemble the rack, installing the rollers on the bottom. Moving the rack to install or adjust heating or lighting makes it much easier.
We allow about 18 inches between each shelf, installing the top at the very top and the bottom at the bottom to give us the most room possible. The top rack is used for storage and to support the top level of lights. This gives room to move the light, keeping it 3 – 5 inches above the seedlings.
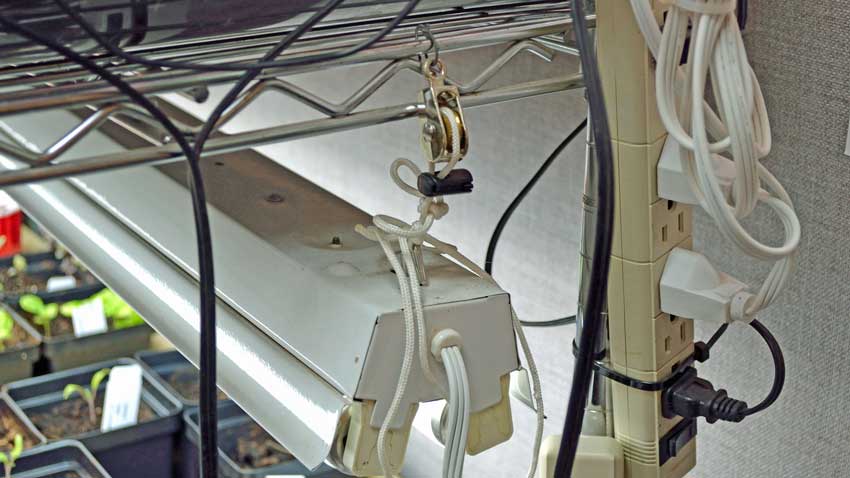
Lighting and electrical connections, showing pulley and cord on the light fixture.
Using the Zip ties, fasten the power strips to one of the wire shelves within easy reach. We use one set for the lights and another set for the heating mats—this way, we can turn all of the lights on with the flip of one switch.
Cut two pieces of the nylon cord into 24-inch sections and securely tie one end onto the provided hooks for the shop light housing. Then, install the hooks into the housing. Zip-tie the small pulleys onto the end of the shelves to support the shop lights, run the cord through the pulleys, and tie them off. If you aren’t confident with your knots, the optional cord locks might come in handy. Finally, install the bulbs into the fixtures and plug the cord into the appropriate power strip.

Heat mat and thermostat with temperature probe.
We use commercial heat mats on two wire shelves, setting the seedling trays directly on top to keep the soil warm. Thermostats with temperature probes keep the soil at a pre-set temperature range and are adjustable according to the needs of the seed or seedling. Both are commercial quality and last many years, but they are an investment as they are somewhat costly. We set them at 80-85°F after sowing, then reduced them to 75°F once the seedlings were up and lowered them to 70°F as they matured. Providing heat to the roots keeps the plants healthier and allows them to tolerate air temperatures as low as 50°F overnight with no adverse effects.
Gardeners in warmer climates may not need heat mats, as the fluorescent bulbs provide heat to the shelf above. If you are in a milder climate, experiment with this before investing in heat mats and thermometers!
Mid-season growing station configuration with larger seedlings on non-heated shelves (click to see larger photo).
Once the seedlings are transplanted into larger cups, they are moved off the heating mats onto lower shelves, allowing them to grow in cooler conditions closer to those they will experience in the garden. We only have two shelves with heat mats for this exact reason.
Even if you have little (or no) extra space, you can get creative in setting up your seed starting station. A longtime friend lives in an apartment with little extra space and gardens in a community garden, so she has come up with a remarkably inventive method to start her transplants.

Starting seedlings under a table.
She uses the underside of a table to support the lights for her seed-starting station! Her apartment is naturally warm, so combined with the warmth of the lights, there is enough heat for the seedlings to thrive.

Larger seedlings mature before being transplanted. The heat mat is turned off.
We’ve provided you with lots of information and details on building your own seed starting station. Use this article as a checklist, and you’ll soon see the strongest and healthiest seedlings ready for transplanting into your garden!
As you progress, we’d love to see photos of your creativity and how you solved particular challenges with your climate or situation. We will share them with everyone to help others overcome similar issues!
Stephen was invited to provide an article on seed quality for Acres USA’s January 2017 issue that focuses on seeds. This is the article that was published in that issue.
Everyone wants higher quality seed – from the seed company, seed grower, breeder and home gardener to the production grower. Even people who do not garden or grow anything want better seed, though they may not realize it.
Education and quality seed is the focus of our company – Terroir Seeds. We make constant efforts to continue learning and educating our customers about how seeds get from the packet to their garden. We recently had the opportunity to visit several cutting-edge seed testing laboratories and the USDA National Center for Genetic Resources Preservation to learn even more about seed testing and preservation. We want to share an insider’s look into a side of the seed world that the average person may not know exists.
Let’s look at this need for higher quality seed from a different perspective.
Everyone is a participant in what can be called the “seed economy”. Everyone, that is, who eats or wears clothes!
Anyone who eats depends on seed of some sort for their daily food – from fruits and vegetables to grains, beans, rice and grasses for dairy and meat production. Seed is intimately tied into all these foods and their continued production. Without a continued, dedicated supply of consistently high quality seed there would be catastrophic consequences to our food supply.
Cotton, cotton blends, wool, linen, hemp and silk fabrics all come from seed. Cotton comes from a cotton seed, wool from a sheep eating grass and forage from seed, linen from plant stalks grown from seed, hemp from seed and silk from silkworms eating leaves that originated as a seed.
Even those who grow and cook nothing need better seed! They still eat and wear clothes.

Chile de Agua for sale at market
The Chile de Agua pepper from Oaxaca, Mexico is a prime example of how seed preservation works. A well-known chef specializing in the unique Mexican cuisine of Oaxaca needed this particular chile for several new dishes. This chile wasn’t available in the US, so we were contacted through friends to work on sourcing the seed.
We found two sources in the US of supposedly authentic Chile de Agua seed and another in Oaxaca, Mexico. After the Oaxacan seed arrived, and those from Seed Saver’s Exchange network and the USDA GRIN station in Griffin, GA we sent them to our grower for trials and observation. All three seed varieties were planted in isolation to prevent cross pollination.
Authentic Chile de Agua has unique visual characteristics, the most obvious being it grows upright or erect on the plants, not hanging down or pendant. Both seed samples from the US were pendant with an incorrect shape. Only the Oaxacan seed from Mexico was correct. We then pulled all the incorrect plants, keeping only the seed from the correct and proper chiles.
The next 3 seasons were spent replanting all the harvested seed from the year prior to build up our seed stock and grow a commercial amount sufficient to sell. This process took a total of four years to complete.
There are two major approaches to improving seed quality – seed testing and seed preservation. One verifies the current condition of the seed, while the other works to preserve previous generations for future study and use.
There are several different methods of seed testing, from genetic verification and identifying DNA variations to diseases to the more traditional germination and vigor testing.
Likewise, approaches to preserving the genetic resources of seed are varied – from a simple cool room to climate and humidity controls for extended storage to cryogenic freezing with liquid nitrogen.
At its most basic, testing of seed simply verifies the seed’s characteristics right now. Whether testing for germination, vigor, disease screening, genetic markers or seed health, the results show what is present or absent today. Changing trends in important characteristics are identified by comparing with previous results.

Seed germination testing
This trend analysis is a perfect example of seed testing and preservation working together, as previous generations of seed can be pulled for further testing or grown out and bred to restore lost traits.
Modern seed testing labs perform a staggering array of tests and verifications on seed samples.
Germination, vigor and physical purity are the standard seed tests for agricultural crops, flowers, herbs and grasses.
These three tests are critical for determining a seed’s performance in the field, and satisfy the US seed labeling law showing germination, physical purity and noxious weed percentages.
Seed health testing screens for seed-borne pathogens like bacteria, fungi, viruses and destructive nematodes. Seed for commercial agriculture and home gardens are often grown in foreign countries and shipped into the US, and vice versa. Seed health testing verifies the incoming or outgoing seed is free of pathogens that could wreak havoc.

Seed vigor test
Plant breeders use the healthiest seed stock possible that is free of any pathogens which would compromise breeding efforts. Agricultural researchers use tested pathogen-free seed to avoid skewing results or giving false indications from unforeseen disease interactions.
Hybrid seeds need to be tested for genetic purity, confirming their trueness to type and that the hybrid crossing is present in the majority of the seed sample. Traditional open pollinated breeders will use genetic purity testing to confirm there is no inadvertent mixing of genetic variations, verifying the purity of the parental lines.
It is common to test heirloom corn for GMO contamination – called adventitious presence testing. This test identifies any unwanted biotech traits in seed or grain lots. This is an extremely sensitive DNA based test, capable of detecting very low levels of unwanted traits in a sample – down to hundredths of a percent. This relatively expensive test demonstrates the absence of GMO contamination, an important quality aspect in the heirloom seed market.
Genetic fingerprinting, also called genotyping, identifies the genetic make-up of the seed genome, or full DNA sequence. Testing with two unique types of DNA markers gives more precision and information about the genetic diversity, relatedness and variability of the seed stock.

Computer graph of DNA testing
Fingerprinting verifies the seed variety and quality, while identifying desirable traits for seed breeders. This testing identifies 95% of the recurrent parent genetic makeup in only two generations of growing instead of five to seven with classic breeding, saving time and effort in grow-outs to verify the seed breeding. Genotyping also accelerates the discovery of superior traits by their unique markers in potential parent breeding seed stock.
Using established open pollinated seed breeding techniques, genetically fingerprinted parents help produce the desirable traits faster and with less guessing.
To be clear, these are not genetically modified organisms – GMOs – they are traditionally bred by transferring pollen from one parent to the flower of another, just as breeders have done for centuries. No foreign DNA is introduced – a tomato is bred to another tomato, or a pepper to another pepper.
The difference is how the breeding is verified, both before and after the exchange of pollen from one plant to another. The genetic markers identify positive traits that can be crossed and stabilized, and those markers show up after the cross and initial grow-outs to verify if the cross was successful. If it was successful, the grow-outs continue to stabilize and further refine the desired characteristics through selection and further testing. If it wasn’t successful, the seed breeder can try again without spending several years in grow-outs before being able to determine the breeding didn’t work like expected.
There are several different types of seed preservation, just as with seed testing. The foundational level is the home gardener, grower or gardening club selecting the best performing, best tasting open pollinated varieties to save seed from. Replanting these carefully selected seeds year upon year results in hyper-local adaptations to the micro-climates of soil, fertility, water, pH and multiple other conditions.
Seed preservation work also happens with online gardening or seed exchange forums, regional and national level seed exchanges such as Seed Saver’s Exchange and governmental efforts with the USDA.
Many countries around the world have their own dedicated seed and genetic material preservation networks, such as Russia’s N.I.Vavilov Research Institute of Plant Industry. It is named for Nikolai Vavilov, a prominent Russian botanist and geneticist credited with identifying the genetic centers of origin for many of our cultivated food plants.
The Millennium Seed Bank Partnership is coordinated by the Kew Royal Botanic Garden near London, England and is the largest seed bank in the world, storing billions of seed samples and conduct research on different species. Australia has the PlantBank, a seed bank and research institute in Mount Annan, New South Wales, Australia.
The Svalbard Global Seed Vault on the Norwegian island of Spitzbergen is a non-governmental approach with donations from several countries and organizations. AVRDC – the World Vegetable Center in Taiwan has almost 60,000 seed samples from over 150 countries and focuses on food production throughout Asia, Africa and Central America. The International Center for Tropical Agriculture (ICIAT) in Colombia focuses on improving agriculture for small farmers, with 65,000 crop samples. Navdanya in Northern India has about 5,000 crop varieties of staples like rice, wheat, millet, kidney beans and medicinal plants native to India. They have established 111 seed banks in 17 Indian states.
It has been estimated there are about 6 million seed samples stored in about 1,300 seed banks throughout the world.
Seed banks aren’t the only ways to preserve a seed. Botanical gardens could be called “living seed banks” where live plants and seeds are planted, studied, documented and preserved for future enjoyment and knowledge. Botanical gardens range from established and well-supported large city gardens to specialized and smaller scale efforts to preserve a single species or group of plants.
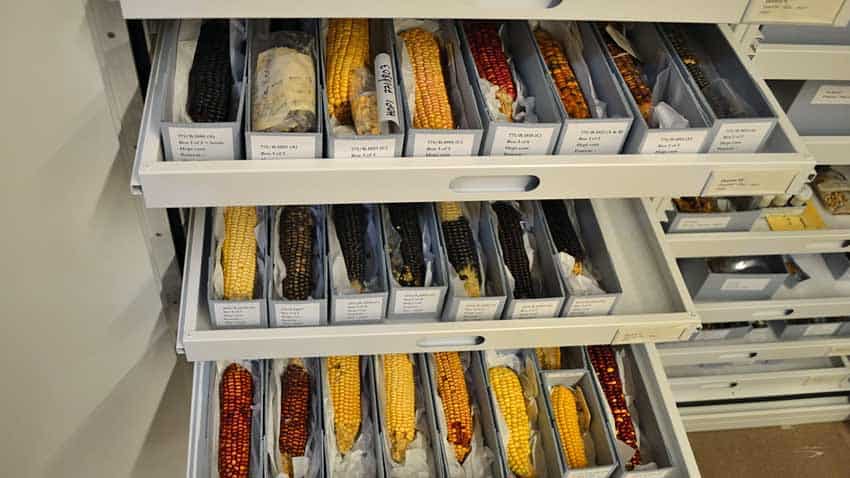
100 year old Native American corn in herbarium
An herbarium is another form of seed bank with a single purpose of documenting how a plant looked at a specific location at a specific time. Herbaria are like plant and seed archeological libraries with collections of dried, pressed and carefully preserved plant specimens mounted and systematically cataloged for future reference.
An herbarium can show what corn grown by the Hopi tribe a century ago looked like, or how large the seeds and leaves of amaranth were 50 years ago. Different herbaria focus on certain aspects such as regional native plants or traditional foods grown by native peoples during a specific time.
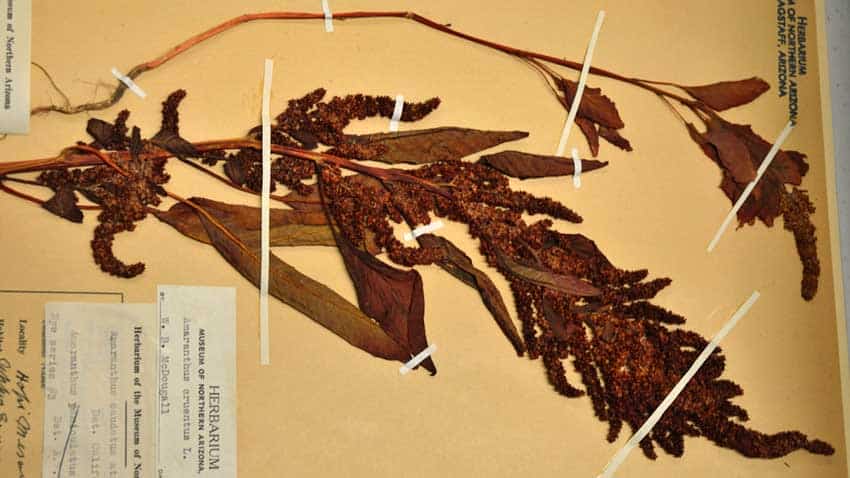
50 year old Amaranth in herbarium
The USDA plays two important roles in seed preservation that is little understood outside those in the seed industry.
The first is the Germplasm Resources Information Network or GRIN for short. It is also known as the National Plant Germplasm System. This collaborative system works to safeguard the genetic diversity of agriculturally important plants. Congress funds the program but it partners with both public and private participants. Many of the seed banks are on state university campuses with private sector breeders and researchers using the available seed resources.
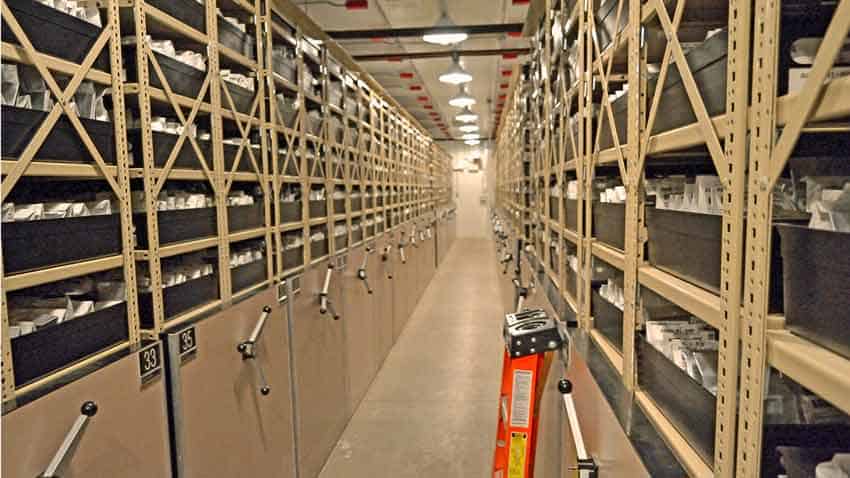
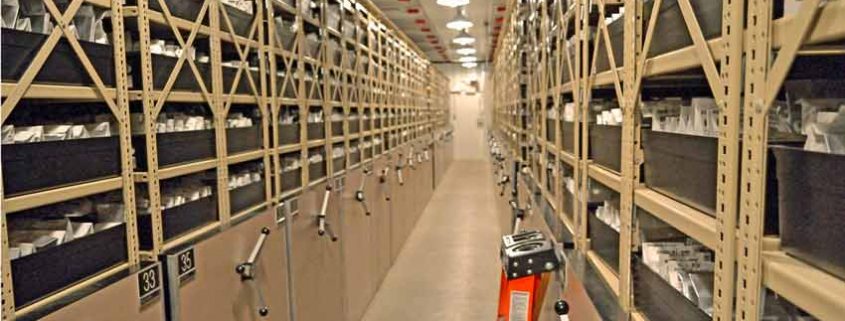
USDA National Center for Genetic Resources Preservation cold vault
There are 30 collection sites that maintain specific seed stock and conduct research on them. Some are dedicated to a single crop like the Maize Genetic Stock center in Urbana, IL which collects, maintains, distributes and studies the genetics of corn. Potatoes are maintained and studied in Sturgeon Bay, WI and rice is kept in Stuttgart, AR. Others maintain regional varieties like the UC Davis location that focuses on tree fruit and nut crops along with grapes that are agriculturally important in the central valley of California.
The second role is the USDA National Center for Genetic Resources Preservation (NCGRP) in Fort Collins, CO. This is the “back-stop” for the GRIN system as well as other private, public institutions and government programs around the world. They store the foundational collections of all the GRIN locations while also working with organizations such as the International Maize and Wheat Improvement Center in Mexico, the International Rice Research Institute in the Philippines and the International Plant Genetic Resources Institute in Rome.
Founded in 1958, the NCGRP maintains, monitors and distributes seed and genetic material samples from their long-term backup storage. After receiving seed samples, they test, clean and condition the seed for the proper long-term storage environment.
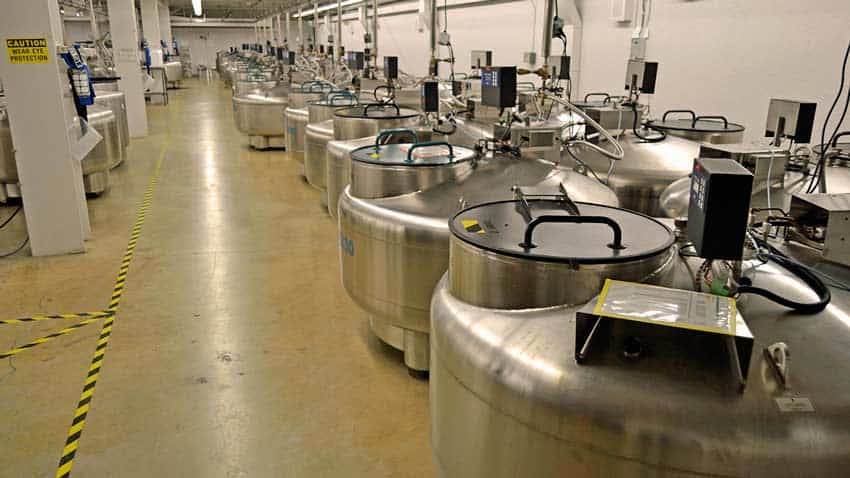
USDA NCGRP’s liquid nitrogen vault
Two long-term storage methods are used. One is a traditional low temperature/low humidity storage and the other is liquid nitrogen storage. The traditional storage is kept at 0°F and 23% relative humidity. Seeds are kept in heat sealed, moisture proof foil laminated bags.
Before seeds are stored in liquid nitrogen a sample is given a liquid nitrogen test to ensure the extreme cold won’t damage the seeds. The sample is exposed to liquid nitrogen for 24 hours, then germinated after coming back to room temperature and evaluated for any germination issues.
If the test results are normal the seeds are stored in clear polyolefin plastic tubes that are barcoded and sealed. The filled tubes are arranged in metal boxes, labeled and stored in liquid nitrogen tanks.
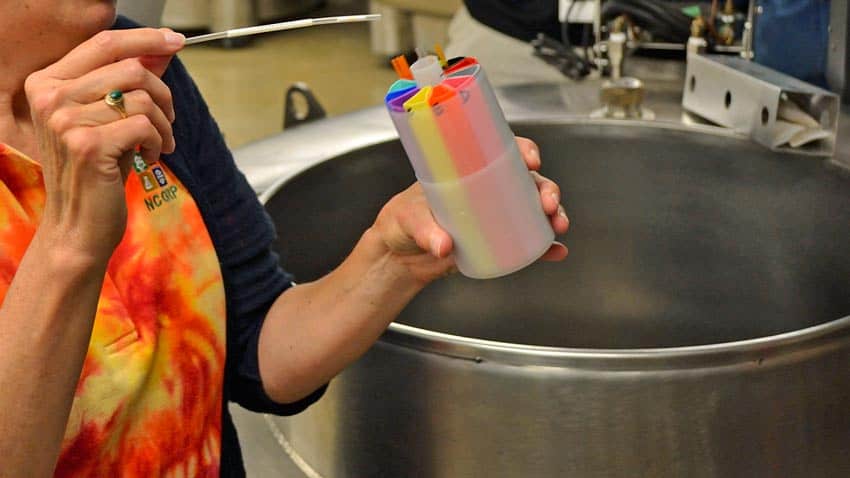
USDA NCGRP’s liquid nitrogen vault sample straw
The vault housing both storage areas is completely self-contained and separate from the adjoining buildings. It has its own backup generator, can withstand up to 16 feet of flooding, tornadoes and the impact of a 2,500-pound object moving at 125 miles per hour. It also has a full suite of electronic security.
If these approaches and techniques seem extravagant, it is with good reason. Our food availability and security increasingly relies on intensive production of fewer variety of crops that are very similar genetically. Along with increased production is increased vulnerability on a larger scale to pests, diseases and other stresses.
By collecting, preserving, testing, studying and distributing seeds and genetic materials immediate food system challenges can be met along with solutions and adaptations for future needs. Changes in growing conditions due to population growth, weather variability, transitions in land use and economic development all make the need for quality seed more important.
All the players in the seed economy support and advance the knowledge and quality of our seed used today. Just as the home gardeners and garden clubs preserve local seed varieties, seed companies are a “back-stop” for them. Seed banks and research facilities back up the seed companies and provide material for seed research.

Basil is most often thought of as an herb for Italian pasta sauce and pesto, but it has so much more to offer. From holy uses and sacred traditions to medicinal, herbal and culinary uses, along with healing tea from its leaves and repelling biting insects, basil has a lot going for it. Add in that it’s extremely easy to grow, and there’s no wonder basil is at the top of the list for must-have herbs for the home gardener and kitchen chef.
Basil is a Mint?
Basil is a member of the mint family, which helps to explain its exuberant and sometimes aggressive growth habit. Combine this with its prolific seed production and ability to easily re-seed itself and you should never be short of basil in your garden.
By some estimates, there are over 150 different species, or cultivars of basil worldwide. The basil plant is characterized by square, branching stems with leaves growing opposite each other from the stem and brown or black seeds in groups of four in pods or nutlets at the top of the plant where the flower spike first blooms.
Ancient Roots
Basil is one of the older herbs cultivated and valued for its aromatic, medicinal and culinary properties. It is commonly thought to have been brought to ancient Greece from Asia by Alexander the Great. From there it spread through seed trade and consumption to India, then on to England by the 1500s, arriving in America by the early 1600s.
Many American gardeners know the herb for its culinary uses and are most familiar with the Italian varieties Sweet and Genovese basil, but there is much more to basil than only these two famous cultivars.
A Few Varieties to Try
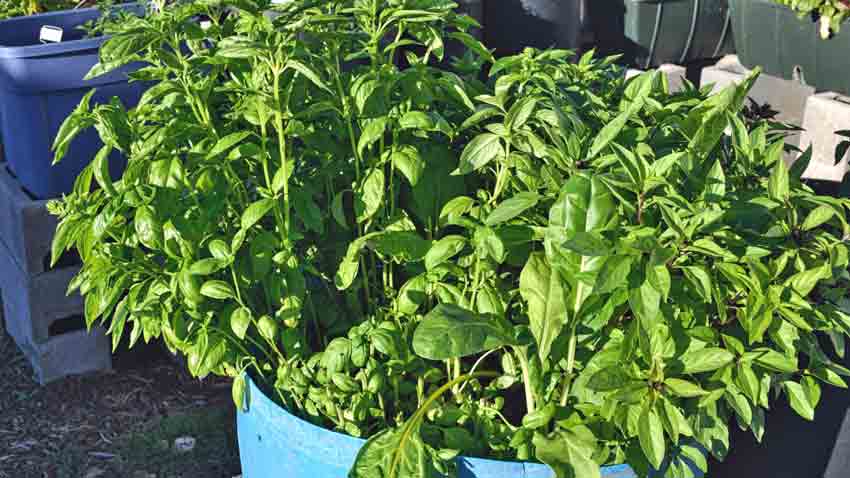
Thai Basil
For instance, Thai basil has a similar leaf shape as sweet basil, but packs a more aromatic punch along with a very pleasant and unique anise-like flavor. They are initially a bit sweeter than their Italian cousins before the anise flavor appears, and they hold up to cooking a bit better due to their stronger flavors.

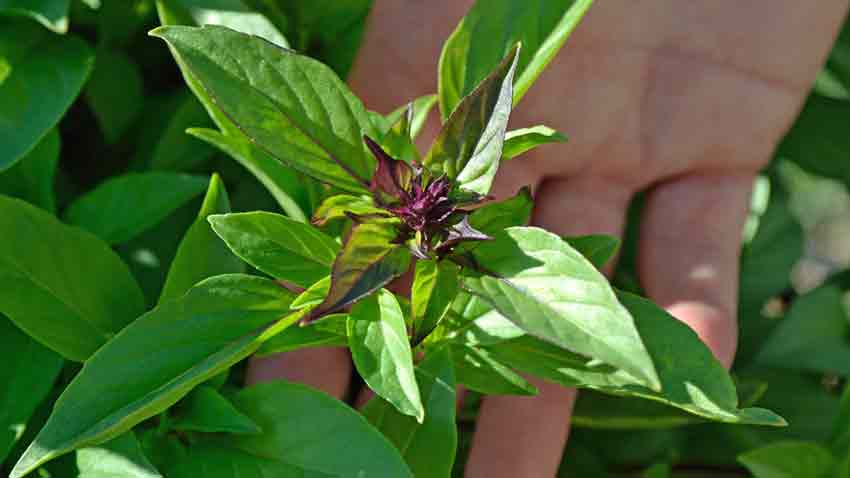
Holy Basil
Holy basil or Tulsi originated in India, where it is considered to be one of the most sacred plants in the Hindu religion. In Hindu mythology the plant is an incarnation of the goddess Tulsi. It is used as a medicinal plant for its essential oils and as an herbal tea. It is considered to be an elixir of life, considered to be beneficial for the mind, body and spirit. There are two main types grown in India, a green leafed and a purple leafed cultivar.
Genovese Basil on left and Lemon Basil on right
Some basil varieties have a strong citrus aroma and flavor, such as the lemon and lime cultivars. Although they both have a citrus scent, they are completely different species. The lemon basil has a high essential oil content, boosting its aromatic properties while the lime cultivar is a bit more subdued in both scent and flavor.
More Benefits of Basil
Besides using the leaves in cuisine and as a tea, basil has other traits which make it very valuable for the home gardener.
Due to the aromatic nature, most basils are very effective at warding off biting and annoying insects. Having a planter on the back deck or porch, as well as a bush at the garden entrance allows the passive deterrence as well as being able to pull off a leaf, crush it and rub it on clothes to keep the biters at bay. When the flowers are in bloom, simply pulling the flowers through your hands and inhaling the heavenly aroma works wonders for relaxation and clearing the mind for a few minutes.
Too often, home gardeners think when a basil plant “bolts” or starts setting flowers that it is done for the season. This is not true at all! The flower stalks can simply be pruned at the base of the first flower, re-setting the leaf production mechanism for another round if the weather is still warm enough and the days long enough. Some cultivars, such as the Genovese variety, can be encouraged back into leaf production and give six or even eight harvests of leaves, making for lots of fresh pesto in the freezer to remind us of just exactly what high summer smelled and tasted like during the coldest depths of winter.
It is highly advisable to let a couple of the plants keep their flower stalks as basil is a very strong pollinator attractant, bringing in many different species of
The freshly trimmed flower stalks are excellent when shredded and tossed into salads or among greens on a sandwich, giving a delightful aroma and light, bright flavor. We have also used them in our breakfast eggs and green smoothies for the same effects. Just be aware that a little goes a long way and start with just a couple of flowers so as not to overpower the rest of the dish.
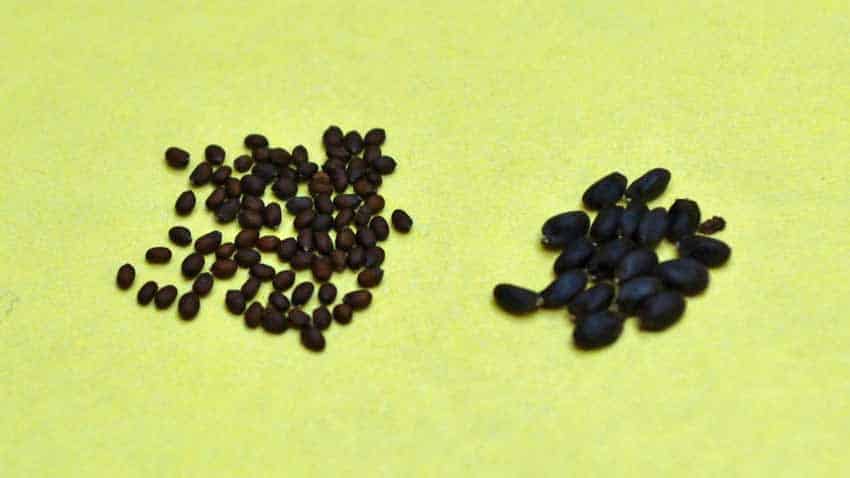
Holy Basil seed on left, Genovese basil seed on right
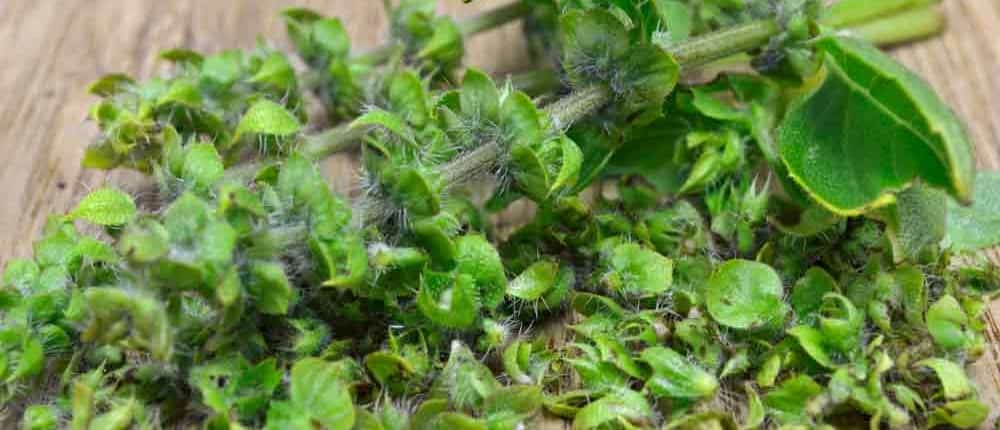
Once enough leaves have been harvested, let the flowers do their work and harvest the seeds as they have several different contributions to make besides just growing new plants next season. Basil seeds don’t readily “shatter” or scatter like sunflowers or other flowers, so it is simple enough to just let the flowers dry down and the seeds mature. To harvest, just snip the stalk at the base of the flower, exactly like pruning the early flowers. It is best to do this just before the flower stalks are completely dry as the seeds can scatter when the stalks are disturbed. Collect the stalks in a tall paper bag and allow them to completely dry for a month or more. Then shake the paper bag side to side and tap the stalks against the inside of the bag to finish freeing the seeds.
The resulting seed is delicately perfumed seed when crushed or ground. Its scent is unlike the parent plant, much more floral and light, but still strong enough to brighten up a room. Use a mortar and pestle or herb grinder to release its magic and use them in muffins, cakes, eggs, pancakes or any dish where a bright floral scent would be an unexpected welcome, especially in the colder seasons.
Making Fresh Tulsi Tea
We really enjoy fresh Tulsi tea in the summertime. We will walk you through just how easy it is to make-
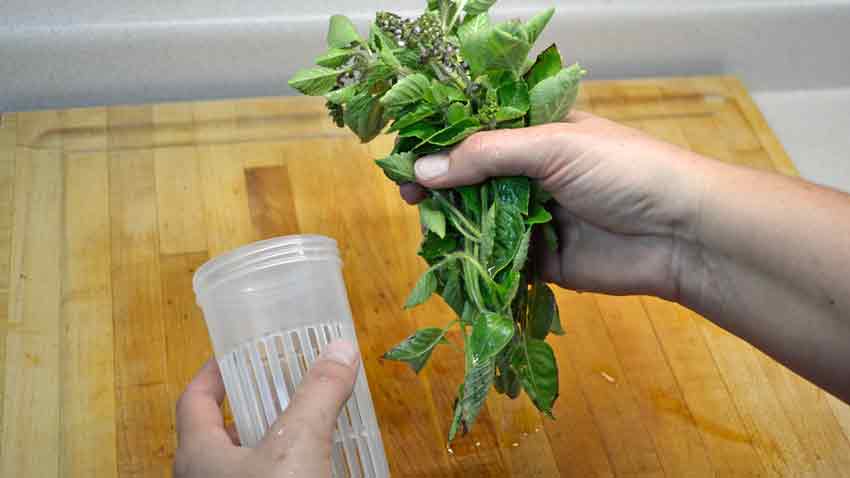
Making Tulsi or Holy Basil tea is very easy. We use a tea brewing pitcher that separates the tea leaves from the brewed tea, but you can use a large tea ball, or simply put the leaves into the water, let steep and strain. Boiling hot water isn’t needed, but warm water will brew faster and extract more of the essential oils than cold.

We like our Tulsi tea a bit stronger, so we gently pack the leaves in, but not too tight or they won’t brew well.

After putting the leaves into the pitcher, adding hot water and closing the top, let the tea brew.

The tea is ready to drink when you think it is – meaning, let your taste be the guide. Some like it much milder than others, so enjoy it your way!
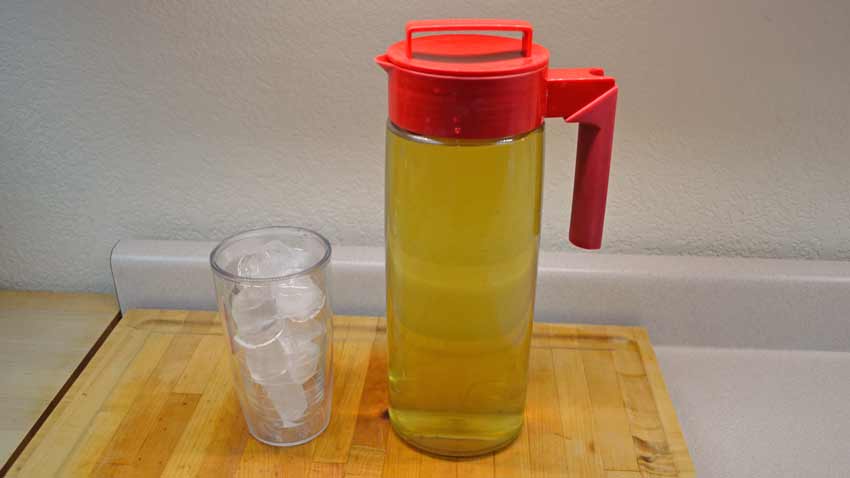
After removing the strainer, the pitcher is the serving and storage container.

Time for some Tulsi tea and a few minutes to sit and relax!
Papalo is a fabulous, but still relatively unknown, ancient Mexican herb you should be growing. A heat-loving alternative to cilantro, its flavors are both bolder and more complex. It has been described by some as somewhere between arugula, cilantro and rue; others say it tastes like a mixture of nasturtium flowers, lime, and cilantro. Younger leaves are milder flavored, gaining pungency and complexity as they mature.
Papalo (PAH-pa-low) is known by many names; Quilquiña, Yerba Porosa, Killi, Papaloquelite and broadleaf in English. It is a member of the informal quelites (key-LEE-tays), the semi-wild greens rich in vitamins and nutrients that grow among the fields in central and South America. These green edible plants grow without having to plant them. They sprout with the first rains or field irrigation, often providing a second or third harvest, costing no additional work but giving food and nutrition.
Other quelites include lamb’s quarters, amaranth, quinoa, purslane, epazote and Mache or corn salad.
Papalo pre-dates the introduction of cilantro to Mexico by several thousand years, which is a very interesting story all by itself. South America is thought to be the ancestral home of papalo.
Cilantro is also known as Chinese parsley and was brought to Mexico in the 1500s by Chinese workers in the Spanish silver mines of southern Mexico and South America. Spain had a huge trade industry with China, exchanging silver from America for china, porcelain and various drugs – opium and hashish among them. They also imported many Chinese workers for the silver mines, as European diseases had decimated the native population which had no immunity. The Chinese workers brought along foods, herbs and spices which were familiar to them, so cilantro came to the Americas.
Papalo is sometimes called “summer cilantro” due to its heat-loving character and its delay in bolting and setting seed until late summer or early fall.
The name Papalo originates with the Nahuatl word for butterfly, and Papaloquelite is said to mean butterfly leaf. The flowers provide nectar to feeding butterflies, while also attracting bees and other pollinators to the garden with their pollen.
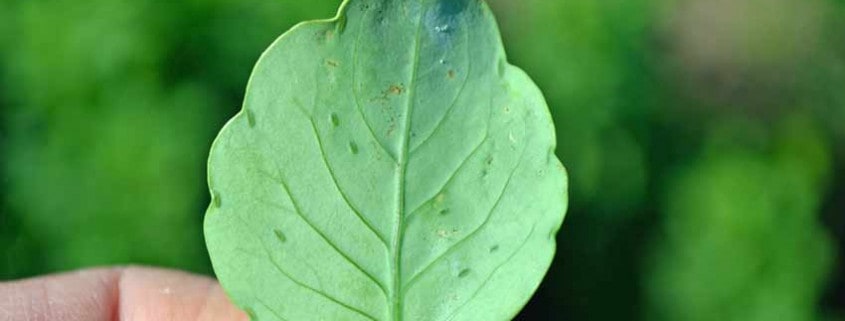
Part of the aroma and flavor is seen above with the oil glands which look like spots on the underside of the leaves. Those glands produce a fragrance which repels insects from eating its leaves.
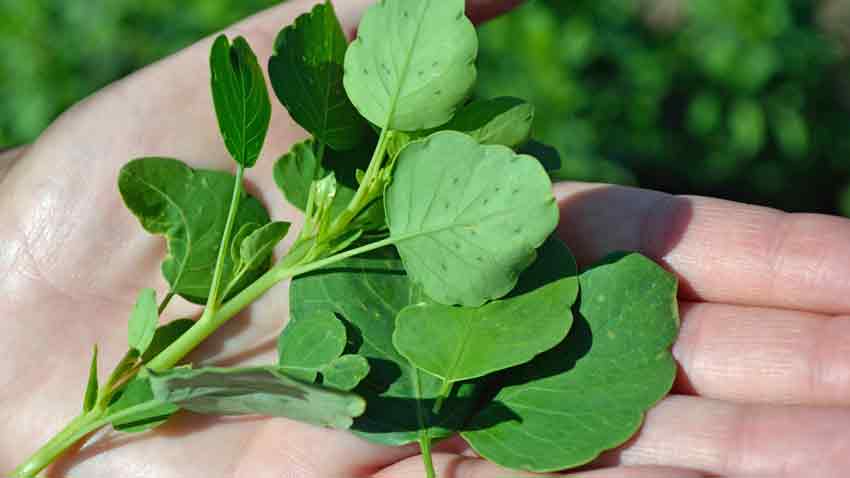
There are two different leaf shapes grown – a broadleaf and a more narrow leaf, often called poreleaf. We have found the broadleaf variety to be more palatable, quite a bit more pungent than cilantro but quite tasty. When beginning to use papalo, start with 1/4 to 1/3 as much as the normal amount of cilantro. The flavor is much stronger and lasts longer, so a little goes a long way until you’ve gotten used to it. We grow and offer only the broadleaf variety.
When we hear about people complaining of papalo tasting of soap, detergent or having a rank or funky odor, usually they have encountered the poreleaf or narrow leafed variety. It is quite a bit more pungent than the broadleaf type, so usually comes as quite a shock to our palates.
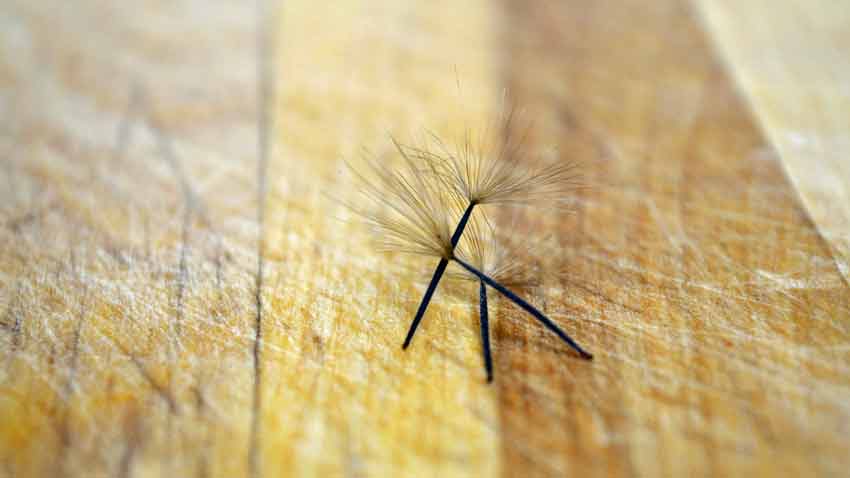
Papalo seeds look much like dandelion seeds, with the stalk and “umbrella” to help carry them on the wind to their new home. Having the umbrella attached is very important to good seed germination, which we will show you in just a bit.

The harvested seed comes from our grower in a big clear plastic trash bag, as it just isn’t possible to harvest and clean the seeds without breaking the umbrellas off. The seeds are almost weightless, so a big bagful that you can hide behind weighs less than a pound.
Cindy has a handful of seed heads, showing how they clump together after maturing. As the seed matures, the sheath or covering that protects the young seeds peels back, exposing these clusters to the wind, which will carry them away as they dry.
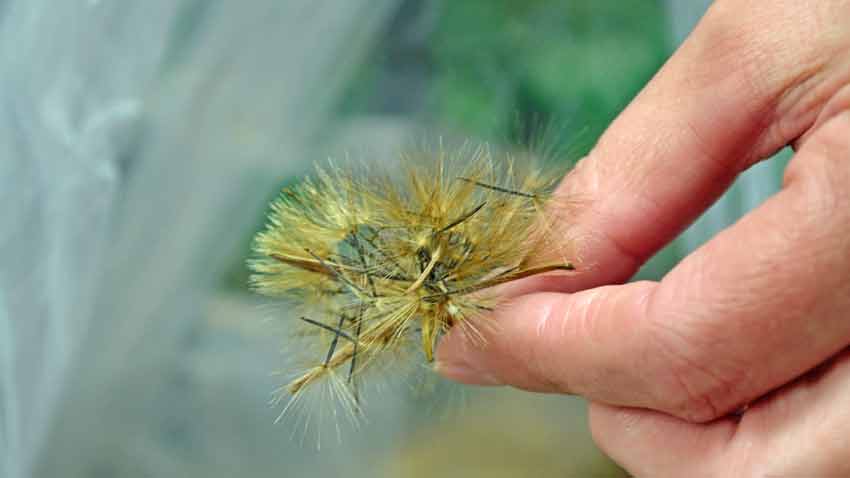
A closer look at the clump of seeds. We haven’t found a better way to separate them without damaging them, so we usually pack them much like this – by the ever so gentle pinch! There are probably 30+ seeds in this photo.

Papalo is often described as having “very low and variable” germination. This is true if the seed is packed in a standard seed packet, which breaks off the umbrella from the stem. From experimenting, we have found germination will drop to around 10% if the seed is broken, but will be as high as 90% or better if the seed is intact.
This photo of papalo in our germination tray shows the proof. Using seed germination paper to keep the seed damp, there was 100% germination in less than 72 hours. In fact, the seedlings hit the lid of the germination chamber, trying to get to the light.
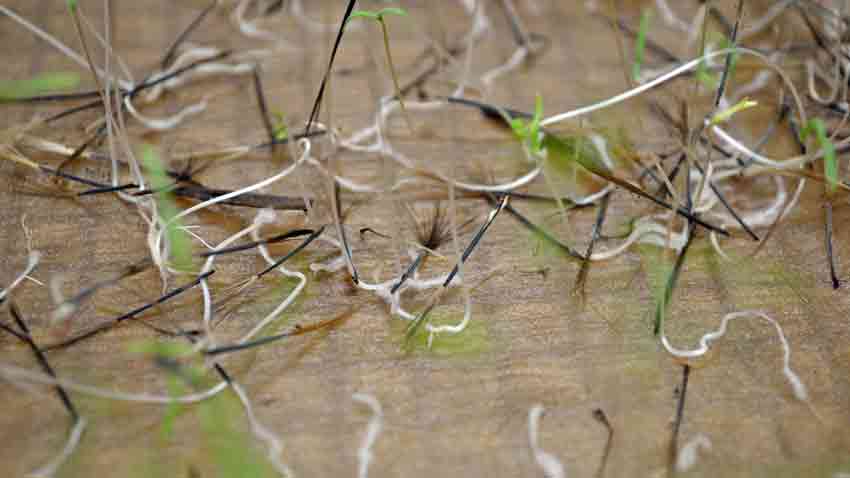
A close-up shows how the stem emerges from the bottom of the stalk, immediately turning vertical in growth, searching for light.
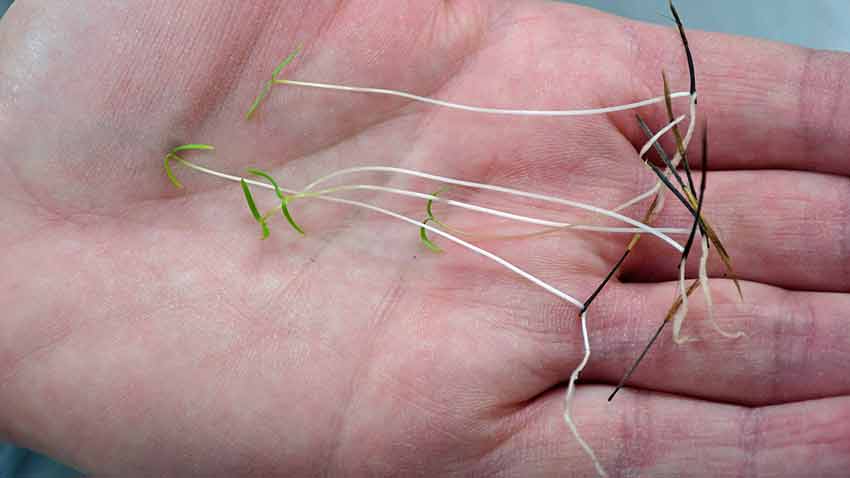
Seen in Cindy’s hand it is easier to identify the parts of the seed and where the seedling emerges from, as well as how tall they can grow in a short time.

We have developed this simple but highly effective packing box from our germination experiments. It keeps the seeds intact for planting as well as protecting them from being broken during shipping.
Young seedlings don’t have the oil glands developed yet, so they are milder in flavor and aroma than when they begin to mature. This planting is a bit thick, but it is sometimes difficult to separate the seeds without damage. In this case, just plant them thick and don’t worry about it. If desired, you can clip the unwanted or unneeded seedlings to thin them. Make sure not to pull them out, as this really disturbs the roots of the adjacent plants and seriously disrupts their growth.

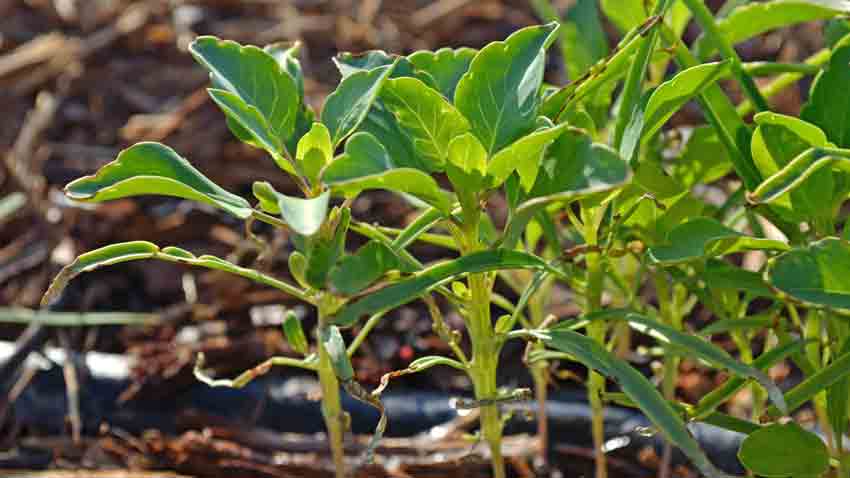
Even in a very harsh spring with sustained high temperatures and punishing winds, the young papalo grows strongly. The weather effects can be seen in the drying of the leaf margins, as well as the scruffy and dry leaf appearance. The holes are not from a bug chewing on the leaves, but from the oil vaporizing from the porous oil glands. The lighter colored spots on the leaves are additional oil glands.
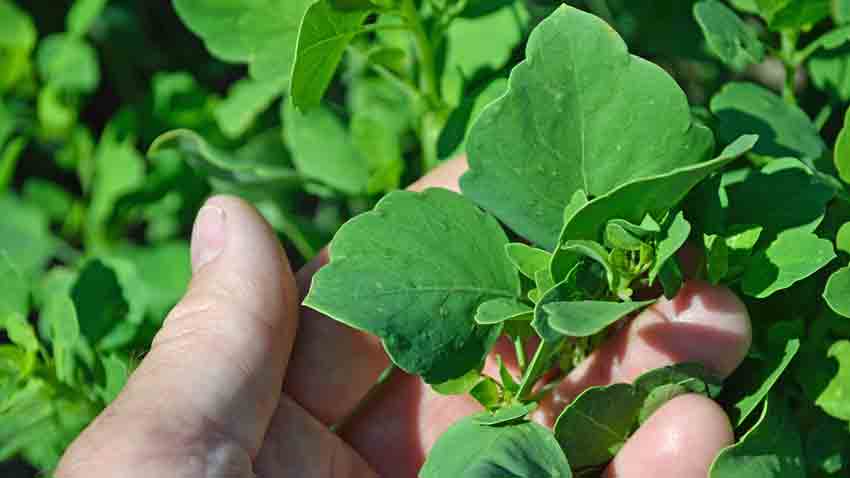
A fully mature papalo leaf in good growing conditions looks like this – a moderately deep, rich green with oil glands distributed across each leaf. The leaves have a medium thickness to them with a fairly substantial feel. They don’t feel delicate like some vegetable leaves, but aren’t thick and succulent either.
Touching them will release some of the aromatic oils, so you should be able to immediately experience their singularly unique aroma, even from an arm’s length away. This is the same with organically grown or home-grown cilantro – the aroma will be much more pronounced.
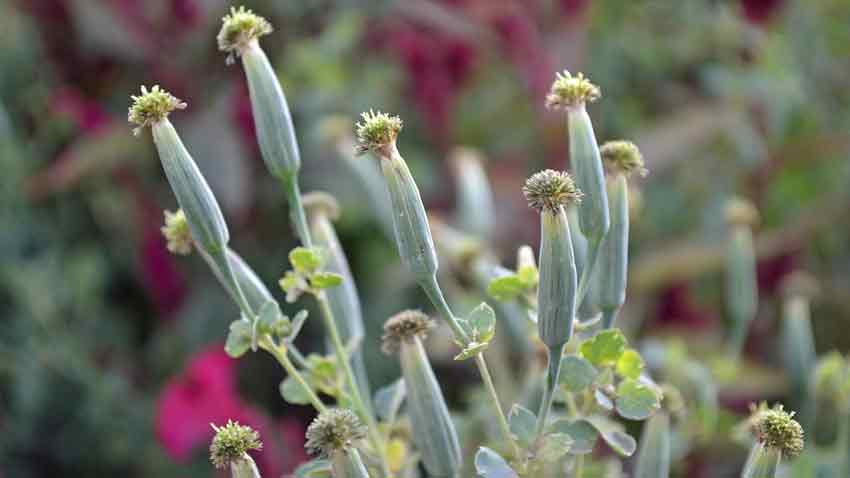
The seed heads start out looking much like marigold flower heads. After flowering, they will set seed and begin the cycle anew. When harvesting seeds to save, make sure to clip the seed head after it has fully matured and begun to dry but before it is completely dry. Otherwise, you will go out to the garden to collect seeds to find it has all blown away!
In October 1999, when Alice Waters, renowned chef of Chez Panisse in Berkeley, California, first tasted one variety of papaloquelite, she was ecstatic and demanded to know why she had never experienced it before. She purchased every seed packet available from the Underwood Gardens booth at the Taste of the Midwest Festival, an annual event sponsored by the American Institute of Wine and Food.
When we met Alice at Slow Food Terra Madre in Turin, Italy, in 2012, we mentioned this past connection. She immediately remembered the event, and her eyes lit up when we discussed the aromatic flavors and how she introduced them to her restaurant patrons.
It’s always used raw and added at the last minute, giving its signature, unique piquant flavor to dishes. It’s used in fish dishes, salsas and guacamole. There is a memorable guacamole that uses cucumbers and papalo for added depth of flavor that we can’t get enough of. We also really like it in scrambled eggs, fresh salsas, and finely diced in a strongly flavored salad of spinach, arugula, mustard greens, and kale. Devilled eggs take on an entirely new dimension with a couple of leaves finely diced and mixed into the filling. People always try to guess the mystery seasoning and always mistake it for something else.
In restaurants in the state of Puebla in Mexico, it’s common to find a sprig of papalo in a glass jar of water on the table, next to the salt, pepper and salsas — ready to be added raw to soups, tacos, tortas or beans. The diners will take off a leaf or two and tear it up finely before sprinkling it over their meal.
Papalo is very easy to grow and has a history stretching back thousands of years, so give it a try in your herb garden this season!
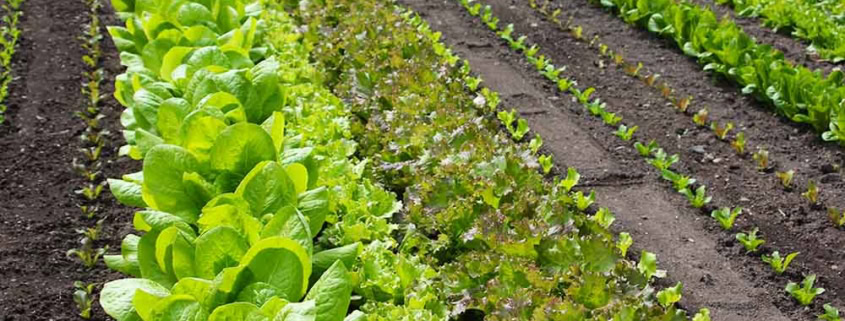
Transform your garden with succession planting. Learn how to create a continuous harvest of fresh vegetables, herbs, and flowers throughout the growing season.
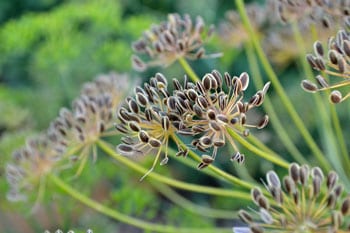
Homegrown dill is delicious, easy to grow and easy to harvest. We’ll show you how! One thing to remember – you want to harvest almost mature dill seeds, not the green ones or the completely dry ones. The green ones won’t have the flavor you are looking for and the dry ones will have already dropped most of their seeds, giving you much less seed than you bargained for!
 First you need a few simple tools:

Next, you might want to consider some accessories! Puppies make the job much more fun!
Seriously, though, harvesting the dill seeds couldn’t be much simpler, even with puppy assistance. What you are looking for is almost-dry seeds like this:
 This is what the green or immature seeds look like, along with some very welcome Ladybugs!

Simply snip off the almost-mature seed stalk,

and drop it into the box you’ve brought. Some of the more mature and dried seeds are on the bottom, having fallen off when the seed head or umbel hit the bottom of the box.

This is what the seeds and one of the smaller umbels look like:
Once you’ve collected all of the dill seed, store the box in a room where it can finish drying for a couple of weeks. Then bounce the seed heads on the bottom of the box a few times to get the rest of the seeds to drop, empty the box into a storage container and you have dill seed for the winter and next year!

One of our best selling herbs is the Toothache Plant or Szechuan Buttons. Spilanthes oleracea, also known as Acmella oleracea is a low-growing plant with bronze-purple leaves hosting yellow/red “gumdrop” flowers that bloom repeatedly summer through fall. The medicinal uses of spilanthes have been around for a long time. A mouth rinse of spilanthes extract can be used daily to promote gum health. In vitro testing has shown that the plant’s extract has strong effect against E.coli, pseudomonas, salmonella, klebsiella pneumonae and staphylococcus albus, as well as inhibiting the growth of candida albicans. Improves digestion, eases flatulence, improves the appetite, and helps to overcome nausea and vomiting by its stimulating effect on the salivary glands.
We don’t sell spilanthes soleley for its medicinal properties but also for its “Rock Star” qualities. NPR has a story about using the Szechuan Buttons in high-end restaurants and bars. The Washington Post did one as well. We were very intrigued and had to grow these amazing little plants last summer to see for ourselves, had a nibble of the traditionally used leaves and it makes your mouth tingle. It is like the old pop rocks candy, a very effervescent feeling. The fresh buttons sell for somewhere around $40 for a bag of 30 buttons, but if you grow them yourself it’s around $3.50 for a packet of 30 seeds, and you’ll grow hundreds of buttons! Freezing does not hurt their buzz, so you can have them year round.
We also had to try out the buttons on a cocktail. What follows is a short photo essay of this experience. We would highly recommend growing the plant for its rock star presence but also for the beauty it adds to the garden.
Starting with this –

Szechuan Buttons in the garden
We selected three great specimens.

Szechuan Buttons ready for use
With the ingredients gathered, we were ready to start.

All ingredients are ready
After the drink is made, the magic is ready to be put into play! The Buttons must be pressed into the rim of the glass firmly, as the bud needs to be slightly crushed to release the “Buzz”.

Szechuan Buttons in action
We were surprised at the strength of the tingle and how long it lasted. Any part of our mouths or tongues that touched the rim of the glass had an immediately noticeable tingling or buzzing feeling, along with some numbness of the tongue that lasted at least 20 minutes. The height of the effect easily lasted 10-12 minutes, with a slow tapering off toward the end.
Seeing how easy it is to grow these, you can be the producer of a lot of “Buzz”!
 © 2024 Terroir Seeds | Underwood Gardens