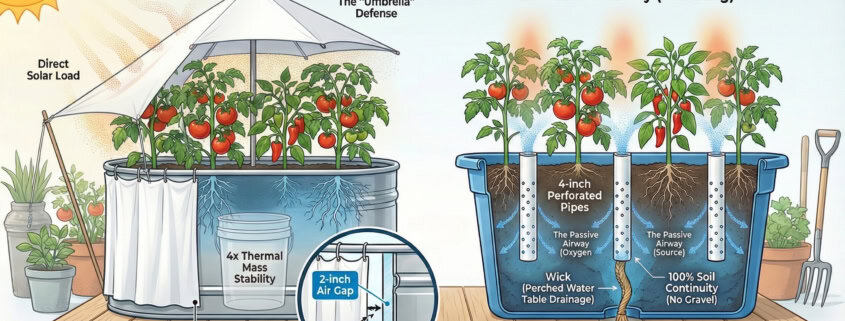
Why do most pots fail in August? It’s not water; it’s physics. Discover the 5 engineering principles of regenerative container gardening—from “Thermal Jackets” to “Wicking Beds”—and learn how to build a living soil system that thrives in the heat.

Why do most pots fail in August? It’s not water; it’s physics. Discover the 5 engineering principles of regenerative container gardening—from “Thermal Jackets” to “Wicking Beds”—and learn how to build a living soil system that thrives in the heat.
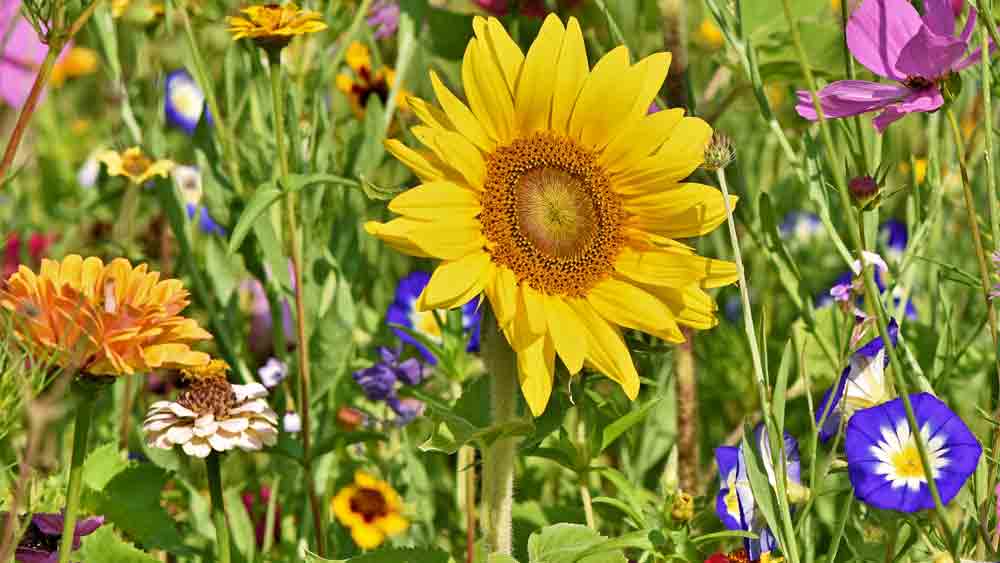
Get ready for a vibrant spring garden! Learn why fall is the perfect time to plant wildflowers and flower seeds for a blooming display.
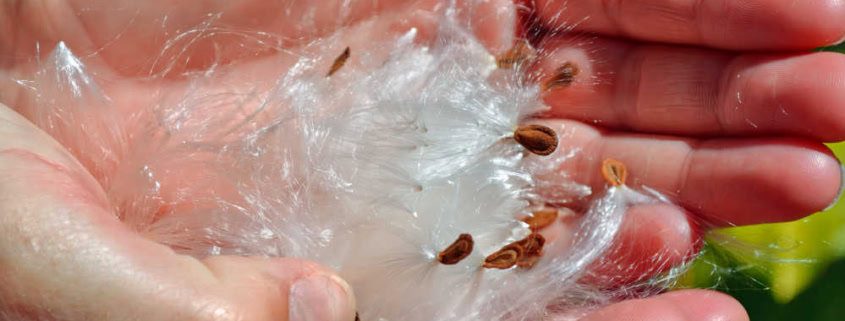
Milkweed Seed Germination uses soaking and rinsing of the seeds to remove a naturally occurring chemical from the seed surface for better germination.
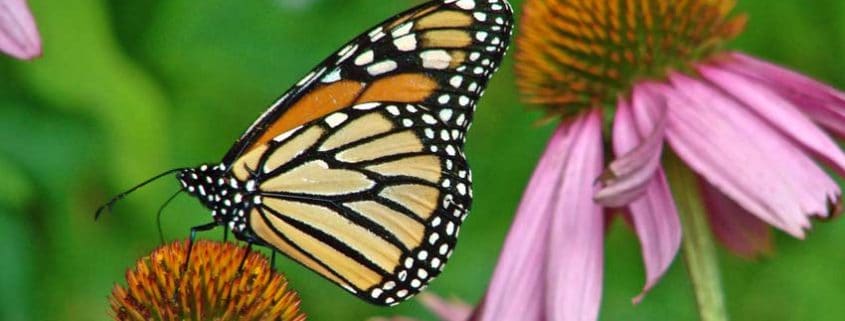
Enhance your garden’s beauty and productivity with pollinator-attracting plants. Learn how attracting bees, butterflies, and hummingbirds can create a thriving and colorful garden.
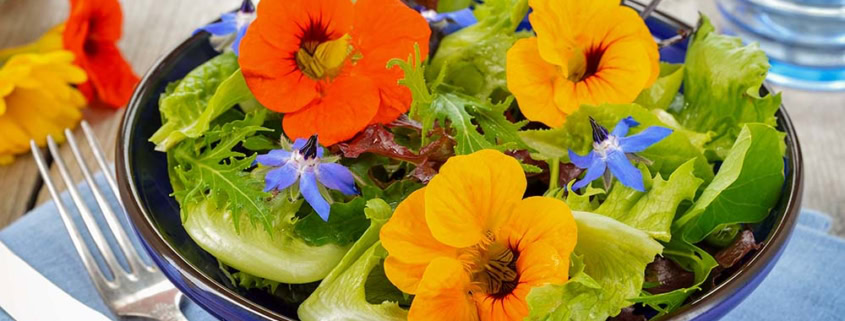
Transform your meals with the beauty and flavor of edible flowers. Discover how these easy-to-grow plants can add elegance to your cooking.
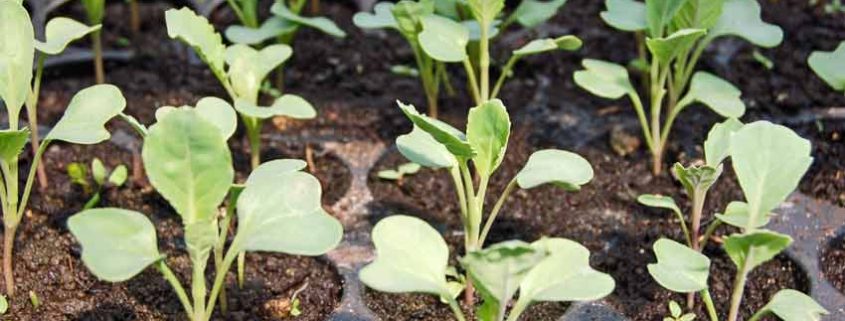
One of the best ways to grow a bigger or better garden is to start with robust, healthy seedlings and transplants. Starting them yourself allows you to select and control the conditions, which often means needing a seed starting station. Gardeners and growers looking to improve their seed germination rates and have stronger, healthier transplants that produce earlier and longer need this tool!
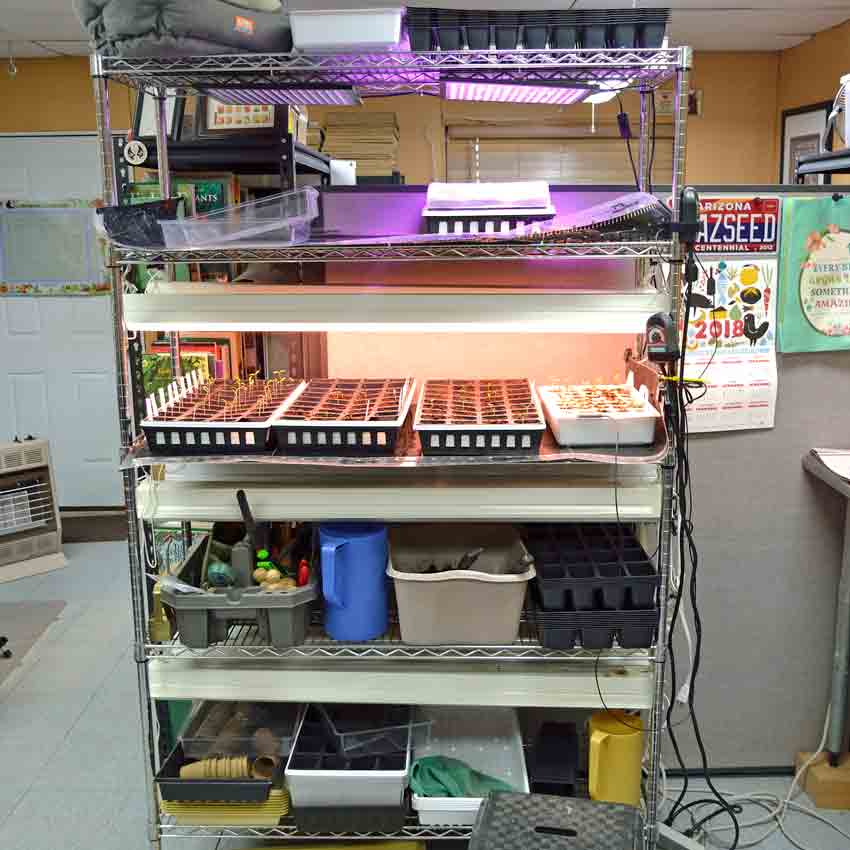
A seed starting station can be almost any size—from a single seedling tray to a full commercial table system. Most gardeners use a moveable wire restaurant rack as the frame, but there are many other ways to set one up.
A major advantage is that placement is not limited to a sunny and warm location because the light and heat are on the station itself. This gives you flexibility in placing it in your house, workshop, or garage—anywhere that remains above 50°F at night.
We’re sharing what we’ve learned from building and using our seed starting station for almost 25 years – what works, what doesn’t, and how to save some money!
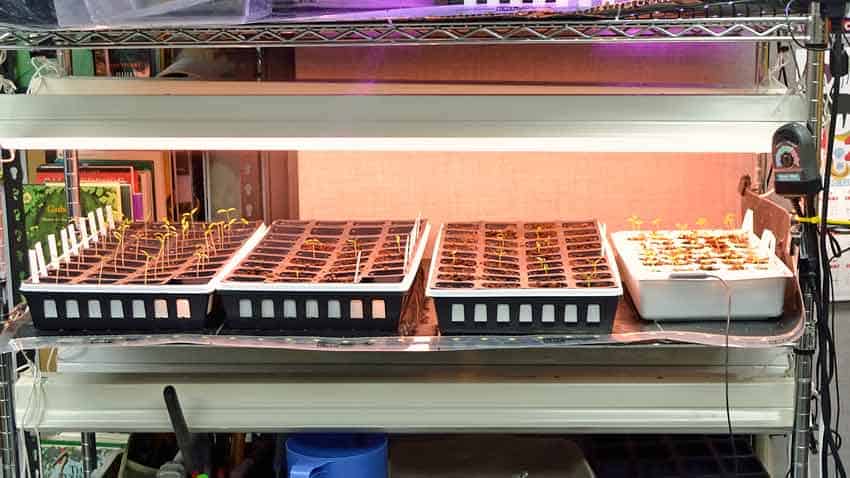
Seed starting station with seedling trays on top of heat mats with lights and thermostat.
A dedicated seed-starting platform isn’t required for a great garden, but it helps! A good seed starting station is self-contained, creates the perfect conditions for seed germination, and adjusts those conditions as the seedlings grow and develop. You easily control the warmth, moisture, and light in just the right amounts.
We invested in our initial seed rack almost 25 years ago; it still has most of its original parts, and we use it every season. A few parts have been replaced or upgraded as needed, but the money spent two decades ago is still paying out – every season – and will for the next couple of decades. That is money well spent!
Here are three more reasons to seriously consider your system –
1- Get a head-start on your season
Starting seeds like tomatoes, peppers, and eggplant earlier gives you bigger and stronger transplants than with a seed flat in the window. Instead of having a 4 – 6-inch tall seedling, you can have a 10-inch tall transplant, as you see at the garden center, which is robust and more resilient to weather fluctuations. An added benefit is earlier harvests as they go to work sooner than smaller seedlings – as much as a month earlier! In very short-season climates, a seed starting station is almost required to have vegetables like tomatoes, peppers, and squash that need longer to mature.
A seed starting station has adjustable lighting, so seedlings grow stronger and more compact instead of spindly and weak ones that struggle toward the light in a window. The protected environment keeps your young, tender, and delicious seedlings from becoming snacks for critters and insects looking for an easy meal outdoors.
The station works for spring, fall, or winter gardening—we start our spring seeds in mid-to-late February and the fall crops in August for transplanting in early September.
2- Dramatically improve your seed germination rates
The seed starting station has light and heat, and you provide moisture using germination trays with lids, adjusting as needed. Dial in heat and add moisture after planting your seeds, then add light when they sprout while reducing the moisture and heat to grow stronger, more robust seedlings than ever before.
Starting seeds becomes so easy that you can start transplants for your friends and neighbors with almost no additional effort, becoming the local garden hero.
3- Grow salad greens or microgreens indoors year-round
Lettuce, spinach, baby Swiss chard, and mustard are greens that grow well in little soil and cooler temperatures – making your seed rack the perfect location. Just dial the heat down – or turn it off in warmer climates – and keep the lights on with sufficient moisture. You’ll have fresh salads in January, even in Alaska.
Another view of the grow rack with seedling trays, heat mats, thermostat, and adjustable lighting.
A growing station, grow rack, or seed starting station is any setup that provides light, heat, and moisture in a controlled environment and can be easily changed as needed.
Often made from commercially available wire racks on wheels, they can be as simple as a couple of hoops made from PVC tubing supporting lights over seed starting trays with lids and a heat mat or heating pad underneath.
They are usually very space efficient, only needing a couple to a few square feet, and can be tucked away in little-used areas because they provide their own light and heat. A spare room, unfinished basement, or even a garage will work to start your seeds, as long as the minimum nightly temperature is above 50°F.
A growing station – simply stated -helps you start seeds better and grow stronger transplants.
It really is that simple.
Anyone starting their own seeds gains an immediate advantage using a grow station. You have complete control over the specific conditions that seeds need to germinate – light, water, and heat. This means you provide the perfect environment at the perfect time for faster seed germination, then decrease the moisture and heat while increasing the light to grow stronger seedlings than ever before.
The foundation of any seed-starting system is the support structure that holds the lights above the seed trays, allowing them to move up and down over the young seedlings as they grow. Larger stations support the seed trays and heating mats, while simpler systems suspend the lights over any level surface.
If you have space, investing in a restaurant-style wire rack on wheels gives you a lifetime of use—and possibly more! Our rack is almost 25 years old and is still functioning just as well as the first day we assembled it. We’ve moved its location about 8 – 10 times and reconfigured the lighting system a few times as we tried different ways to hang and adjust the lights over the seed trays.
We easily see another 25 years of use from it because there isn’t much stress on the rack. We’ve removed two original shelves to give us more vertical space for growing seedlings and provide light above each shelf.
The five-shelf system that we use (74-in Tallx 48-in Wide x 18-in Deep) is ideal if you’re growing a larger garden or want to start and transplant several dozen seedlings indoors simultaneously. Depending on your needs, you have the flexibility in how many shelves are in use at once – from one to all of them. Here’s a materials list with sample pricing from Home Depot:
TOTAL COST: $355.04with Plant and Aquarium bulbs from Home Depot
OR
TOTAL COST: $295.26 with Daylight bulbs
Once you see the cost of a professional seedling cart (without heat mats), you’ll see what a difference building it yourself makes!
The consumables—items that are reasonably expected to wear out—are the power strips and bulbs. The power strips should last 3 – 5 years, possibly more, while the bulbs have an average lifespan of 20,000 hours. Using them 14 hours per day gives almost four years of continual use, but normal use is about four months for both spring and fall transplants, giving a potential 12 years. In our experience, we usually see about 8 – 10 years of use.
The pricing example above is for purchasing brand-new equipment simultaneously, but it doesn’t have to be built this way. Your local Craiglist is an excellent option, and you can set alerts for keywords—”wire shelving,” for example—to avoid having to search every day. Yard or garage sales, used equipment, or restaurant supply companies in your area are other choices. If you get creative, you’ll find several ways to save money over buying new.
Even if you buy new, you can build a shelf or two at a time as needed – nothing says you have to build it all at once!
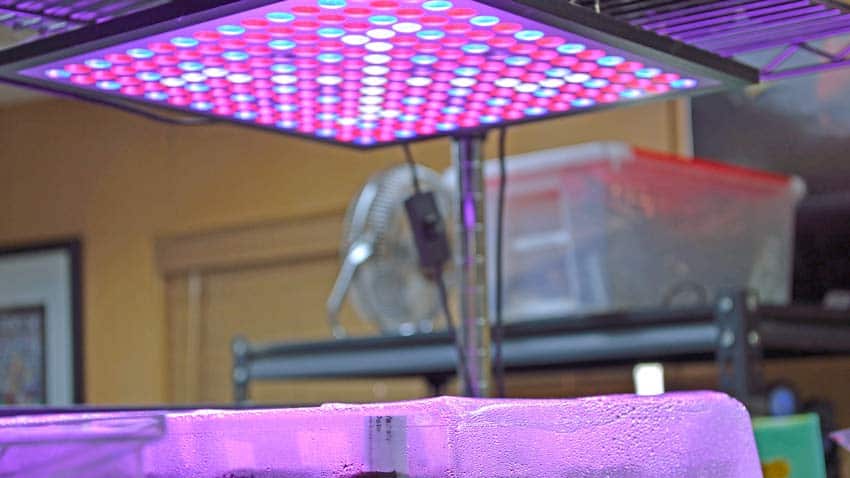
Spectrum-tuned LED grow light – good idea, but it doesn’t last long enough for the price.
You’ll see two different choices in bulbs in the materials list – Plant and Aquarium bulbs vs. Daylight bulbs. Both are fluorescent and will last 20,000 hours, but they emit a different spectrum of light. Red and blue are the two most important colors that plants use, as most of the photosynthetic activity of chlorophyll is in the blue and red frequencies. In simple terms, blue wavelengths encourage vegetative growth, while red is best for flowering and fruiting.
The Plant and Aquarium bulbs are tuned toward the red end of the spectrum, while the Daylight bulbs are more blue. If you are using the grow station exclusively to start seedlings for transplanting, then use the Daylight bulbs. For those using the grow rack for growing greens for harvesting, choose one of each type of bulb for each fixture, giving you better coverage of the spectrum.
LED lights are available, and we are testing some, but we aren’t ready to recommend any particular brands yet. The advertised advantages are a longer-lasting light that uses less power than fluorescent bulbs. The disadvantages are usually higher initial costs and less than optimum real-world lifespan. For example, one light we tested cost $30—which is good—but started to fail in the second year of use, which is bad.
Commercial LED lighting is extremely expensive and has not – yet – lived up to all of its claims. Research is ongoing, and we expect to see a large shift to more affordable and better LEDs soon.
Most vegetable seeds don’t require light to germinate, but some herbs and flowers do. When we start vegetable seedlings, we don’t turn the lights on until they have popped up and opened their cotyledon leaves. This is when they switch from living off the stored food and energy in the seed to making their own through photosynthesis. 10 – 12 hours of light is good to start. The lights are lowered to about 3 – 6 inches above the seedlings or moisture domes to give them the strongest light possible.
Monitor the soil moisture levels, as the warmth from the lights can sometimes dry out the soil.
You can’t hurt the seedlings with too much light – they will not use what they don’t need. In photosynthesis, there are two cycles – a “light” and a “dark” cycle. The light cycle depends on light to function because it’s based on photosynthesis, but the dark cycle doesn’t require light. That doesn’t mean it needs to be dark for the “dark” cycle to function – it happens after a certain amount of energy is built up from photosynthesis during the light cycle, which then switches to the dark cycle to store that energy. This switching happens continuously, so don’t worry about giving your plants too much light!
Providing lots of light builds strong plants because they have lots of light energy to capture and store for future growth.
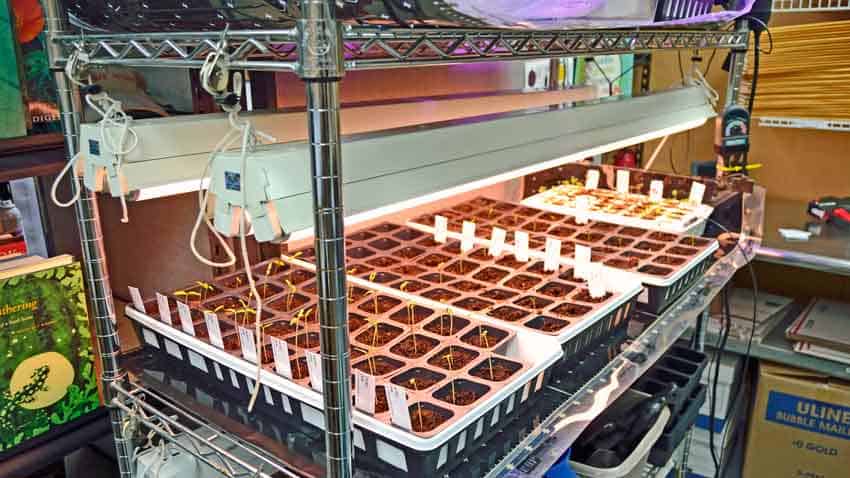
Early season view of our grow rack with two shelves for starting seeds.
Now that you know what you need, let’s walk through how to set it up and start your first batch of seeds!
Start with the wire rack – this is the foundation for everything else. Use the instructions and carefully assemble the rack, installing the rollers on the bottom. Moving the rack to install or adjust heating or lighting makes it much easier.
We allow about 18 inches between each shelf, installing the top at the very top and the bottom at the bottom to give us the most room possible. The top rack is used for storage and to support the top level of lights. This gives room to move the light, keeping it 3 – 5 inches above the seedlings.
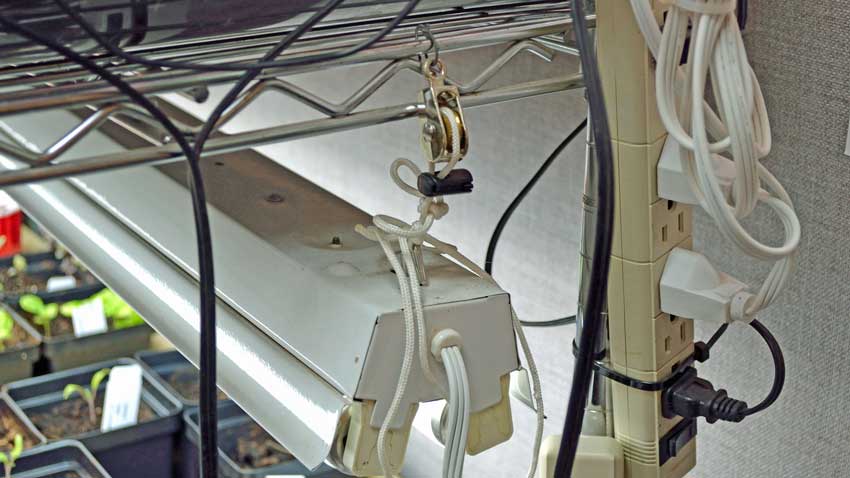
Lighting and electrical connections, showing pulley and cord on the light fixture.
Using the Zip ties, fasten the power strips to one of the wire shelves within easy reach. We use one set for the lights and another set for the heating mats—this way, we can turn all of the lights on with the flip of one switch.
Cut two pieces of the nylon cord into 24-inch sections and securely tie one end onto the provided hooks for the shop light housing. Then, install the hooks into the housing. Zip-tie the small pulleys onto the end of the shelves to support the shop lights, run the cord through the pulleys, and tie them off. If you aren’t confident with your knots, the optional cord locks might come in handy. Finally, install the bulbs into the fixtures and plug the cord into the appropriate power strip.

Heat mat and thermostat with temperature probe.
We use commercial heat mats on two wire shelves, setting the seedling trays directly on top to keep the soil warm. Thermostats with temperature probes keep the soil at a pre-set temperature range and are adjustable according to the needs of the seed or seedling. Both are commercial quality and last many years, but they are an investment as they are somewhat costly. We set them at 80-85°F after sowing, then reduced them to 75°F once the seedlings were up and lowered them to 70°F as they matured. Providing heat to the roots keeps the plants healthier and allows them to tolerate air temperatures as low as 50°F overnight with no adverse effects.
Gardeners in warmer climates may not need heat mats, as the fluorescent bulbs provide heat to the shelf above. If you are in a milder climate, experiment with this before investing in heat mats and thermometers!
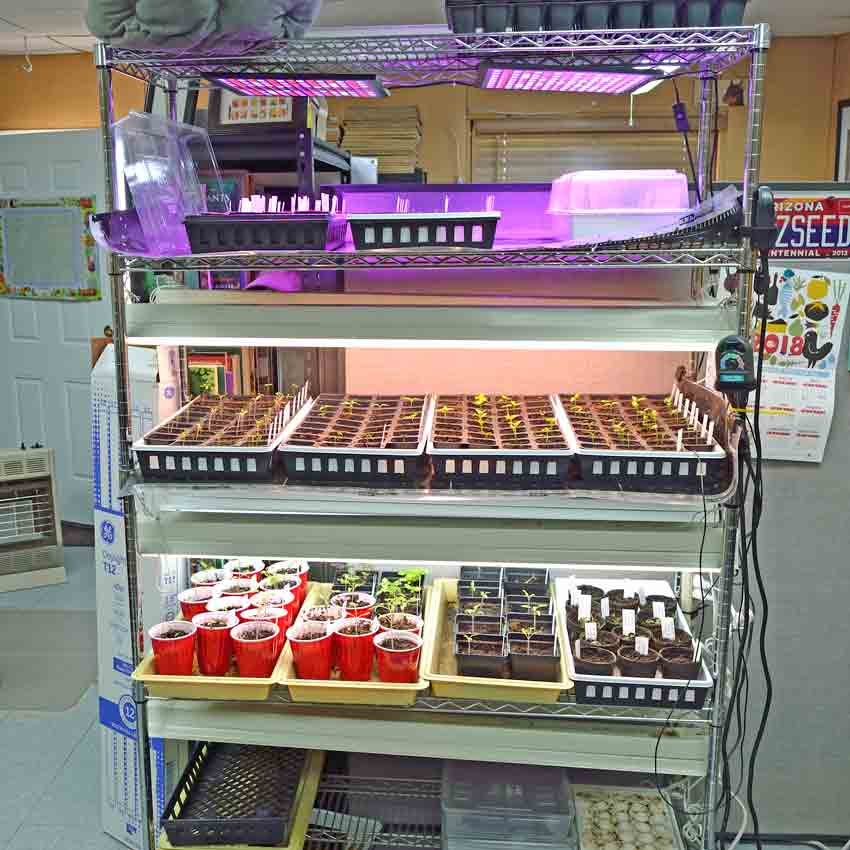
Mid-season growing station configuration with larger seedlings on non-heated shelves (click to see larger photo).
Once the seedlings are transplanted into larger cups, they are moved off the heating mats onto lower shelves, allowing them to grow in cooler conditions closer to those they will experience in the garden. We only have two shelves with heat mats for this exact reason.
Even if you have little (or no) extra space, you can get creative in setting up your seed starting station. A longtime friend lives in an apartment with little extra space and gardens in a community garden, so she has come up with a remarkably inventive method to start her transplants.

Starting seedlings under a table.
She uses the underside of a table to support the lights for her seed-starting station! Her apartment is naturally warm, so combined with the warmth of the lights, there is enough heat for the seedlings to thrive.

Larger seedlings mature before being transplanted. The heat mat is turned off.
We’ve provided you with lots of information and details on building your own seed starting station. Use this article as a checklist, and you’ll soon see the strongest and healthiest seedlings ready for transplanting into your garden!
As you progress, we’d love to see photos of your creativity and how you solved particular challenges with your climate or situation. We will share them with everyone to help others overcome similar issues!
Stephen was invited to provide an article on seed quality for Acres USA’s January 2017 issue that focuses on seeds. This is the article that was published in that issue.
Everyone wants higher quality seed – from the seed company, seed grower, breeder and home gardener to the production grower. Even people who do not garden or grow anything want better seed, though they may not realize it.
Education and quality seed is the focus of our company – Terroir Seeds. We make constant efforts to continue learning and educating our customers about how seeds get from the packet to their garden. We recently had the opportunity to visit several cutting-edge seed testing laboratories and the USDA National Center for Genetic Resources Preservation to learn even more about seed testing and preservation. We want to share an insider’s look into a side of the seed world that the average person may not know exists.
Let’s look at this need for higher quality seed from a different perspective.
Everyone is a participant in what can be called the “seed economy”. Everyone, that is, who eats or wears clothes!
Anyone who eats depends on seed of some sort for their daily food – from fruits and vegetables to grains, beans, rice and grasses for dairy and meat production. Seed is intimately tied into all these foods and their continued production. Without a continued, dedicated supply of consistently high quality seed there would be catastrophic consequences to our food supply.
Cotton, cotton blends, wool, linen, hemp and silk fabrics all come from seed. Cotton comes from a cotton seed, wool from a sheep eating grass and forage from seed, linen from plant stalks grown from seed, hemp from seed and silk from silkworms eating leaves that originated as a seed.
Even those who grow and cook nothing need better seed! They still eat and wear clothes.

Chile de Agua for sale at market
The Chile de Agua pepper from Oaxaca, Mexico is a prime example of how seed preservation works. A well-known chef specializing in the unique Mexican cuisine of Oaxaca needed this particular chile for several new dishes. This chile wasn’t available in the US, so we were contacted through friends to work on sourcing the seed.
We found two sources in the US of supposedly authentic Chile de Agua seed and another in Oaxaca, Mexico. After the Oaxacan seed arrived, and those from Seed Saver’s Exchange network and the USDA GRIN station in Griffin, GA we sent them to our grower for trials and observation. All three seed varieties were planted in isolation to prevent cross pollination.
Authentic Chile de Agua has unique visual characteristics, the most obvious being it grows upright or erect on the plants, not hanging down or pendant. Both seed samples from the US were pendant with an incorrect shape. Only the Oaxacan seed from Mexico was correct. We then pulled all the incorrect plants, keeping only the seed from the correct and proper chiles.
The next 3 seasons were spent replanting all the harvested seed from the year prior to build up our seed stock and grow a commercial amount sufficient to sell. This process took a total of four years to complete.
There are two major approaches to improving seed quality – seed testing and seed preservation. One verifies the current condition of the seed, while the other works to preserve previous generations for future study and use.
There are several different methods of seed testing, from genetic verification and identifying DNA variations to diseases to the more traditional germination and vigor testing.
Likewise, approaches to preserving the genetic resources of seed are varied – from a simple cool room to climate and humidity controls for extended storage to cryogenic freezing with liquid nitrogen.
At its most basic, testing of seed simply verifies the seed’s characteristics right now. Whether testing for germination, vigor, disease screening, genetic markers or seed health, the results show what is present or absent today. Changing trends in important characteristics are identified by comparing with previous results.

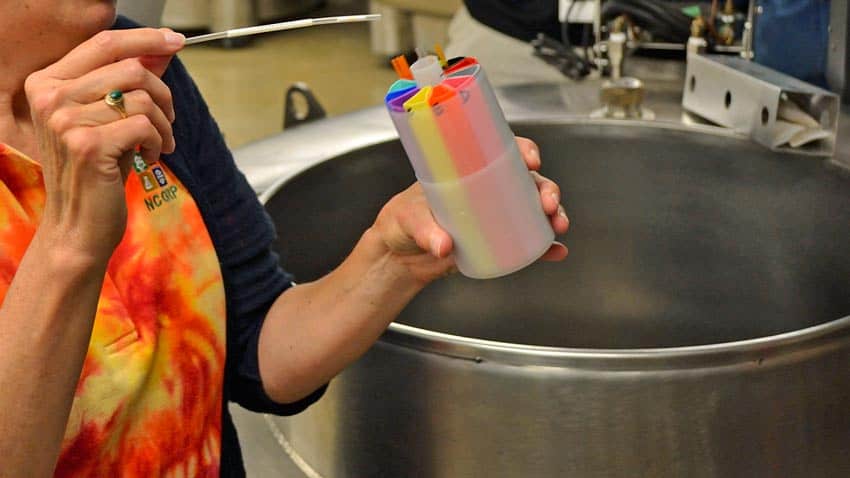
Seed germination testing
This trend analysis is a perfect example of seed testing and preservation working together, as previous generations of seed can be pulled for further testing or grown out and bred to restore lost traits.
Modern seed testing labs perform a staggering array of tests and verifications on seed samples.
Germination, vigor and physical purity are the standard seed tests for agricultural crops, flowers, herbs and grasses.
These three tests are critical for determining a seed’s performance in the field, and satisfy the US seed labeling law showing germination, physical purity and noxious weed percentages.
Seed health testing screens for seed-borne pathogens like bacteria, fungi, viruses and destructive nematodes. Seed for commercial agriculture and home gardens are often grown in foreign countries and shipped into the US, and vice versa. Seed health testing verifies the incoming or outgoing seed is free of pathogens that could wreak havoc.

Seed vigor test
Plant breeders use the healthiest seed stock possible that is free of any pathogens which would compromise breeding efforts. Agricultural researchers use tested pathogen-free seed to avoid skewing results or giving false indications from unforeseen disease interactions.
Hybrid seeds need to be tested for genetic purity, confirming their trueness to type and that the hybrid crossing is present in the majority of the seed sample. Traditional open pollinated breeders will use genetic purity testing to confirm there is no inadvertent mixing of genetic variations, verifying the purity of the parental lines.
It is common to test heirloom corn for GMO contamination – called adventitious presence testing. This test identifies any unwanted biotech traits in seed or grain lots. This is an extremely sensitive DNA based test, capable of detecting very low levels of unwanted traits in a sample – down to hundredths of a percent. This relatively expensive test demonstrates the absence of GMO contamination, an important quality aspect in the heirloom seed market.
Genetic fingerprinting, also called genotyping, identifies the genetic make-up of the seed genome, or full DNA sequence. Testing with two unique types of DNA markers gives more precision and information about the genetic diversity, relatedness and variability of the seed stock.

Computer graph of DNA testing
Fingerprinting verifies the seed variety and quality, while identifying desirable traits for seed breeders. This testing identifies 95% of the recurrent parent genetic makeup in only two generations of growing instead of five to seven with classic breeding, saving time and effort in grow-outs to verify the seed breeding. Genotyping also accelerates the discovery of superior traits by their unique markers in potential parent breeding seed stock.
Using established open pollinated seed breeding techniques, genetically fingerprinted parents help produce the desirable traits faster and with less guessing.
To be clear, these are not genetically modified organisms – GMOs – they are traditionally bred by transferring pollen from one parent to the flower of another, just as breeders have done for centuries. No foreign DNA is introduced – a tomato is bred to another tomato, or a pepper to another pepper.
The difference is how the breeding is verified, both before and after the exchange of pollen from one plant to another. The genetic markers identify positive traits that can be crossed and stabilized, and those markers show up after the cross and initial grow-outs to verify if the cross was successful. If it was successful, the grow-outs continue to stabilize and further refine the desired characteristics through selection and further testing. If it wasn’t successful, the seed breeder can try again without spending several years in grow-outs before being able to determine the breeding didn’t work like expected.
There are several different types of seed preservation, just as with seed testing. The foundational level is the home gardener, grower or gardening club selecting the best performing, best tasting open pollinated varieties to save seed from. Replanting these carefully selected seeds year upon year results in hyper-local adaptations to the micro-climates of soil, fertility, water, pH and multiple other conditions.
Seed preservation work also happens with online gardening or seed exchange forums, regional and national level seed exchanges such as Seed Saver’s Exchange and governmental efforts with the USDA.
Many countries around the world have their own dedicated seed and genetic material preservation networks, such as Russia’s N.I.Vavilov Research Institute of Plant Industry. It is named for Nikolai Vavilov, a prominent Russian botanist and geneticist credited with identifying the genetic centers of origin for many of our cultivated food plants.
The Millennium Seed Bank Partnership is coordinated by the Kew Royal Botanic Garden near London, England and is the largest seed bank in the world, storing billions of seed samples and conduct research on different species. Australia has the PlantBank, a seed bank and research institute in Mount Annan, New South Wales, Australia.
The Svalbard Global Seed Vault on the Norwegian island of Spitzbergen is a non-governmental approach with donations from several countries and organizations. AVRDC – the World Vegetable Center in Taiwan has almost 60,000 seed samples from over 150 countries and focuses on food production throughout Asia, Africa and Central America. The International Center for Tropical Agriculture (ICIAT) in Colombia focuses on improving agriculture for small farmers, with 65,000 crop samples. Navdanya in Northern India has about 5,000 crop varieties of staples like rice, wheat, millet, kidney beans and medicinal plants native to India. They have established 111 seed banks in 17 Indian states.
It has been estimated there are about 6 million seed samples stored in about 1,300 seed banks throughout the world.
Seed banks aren’t the only ways to preserve a seed. Botanical gardens could be called “living seed banks” where live plants and seeds are planted, studied, documented and preserved for future enjoyment and knowledge. Botanical gardens range from established and well-supported large city gardens to specialized and smaller scale efforts to preserve a single species or group of plants.
100 year old Native American corn in herbarium
An herbarium is another form of seed bank with a single purpose of documenting how a plant looked at a specific location at a specific time. Herbaria are like plant and seed archeological libraries with collections of dried, pressed and carefully preserved plant specimens mounted and systematically cataloged for future reference.
An herbarium can show what corn grown by the Hopi tribe a century ago looked like, or how large the seeds and leaves of amaranth were 50 years ago. Different herbaria focus on certain aspects such as regional native plants or traditional foods grown by native peoples during a specific time.
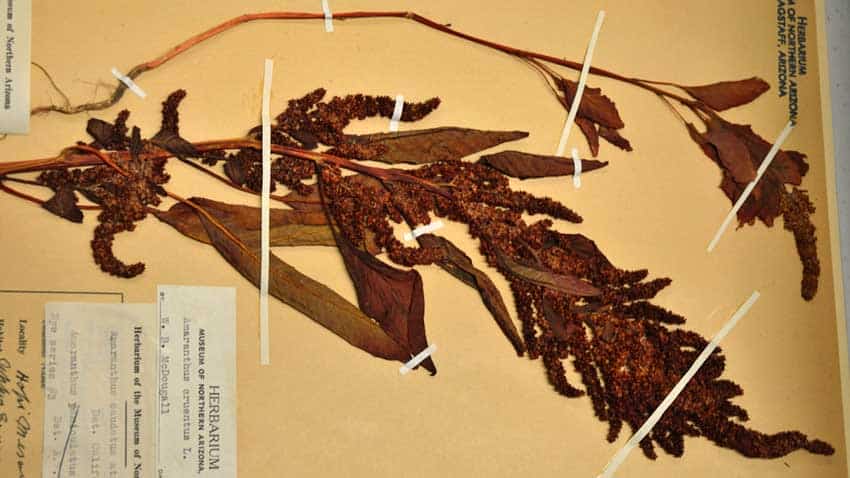
50 year old Amaranth in herbarium
The USDA plays two important roles in seed preservation that is little understood outside those in the seed industry.
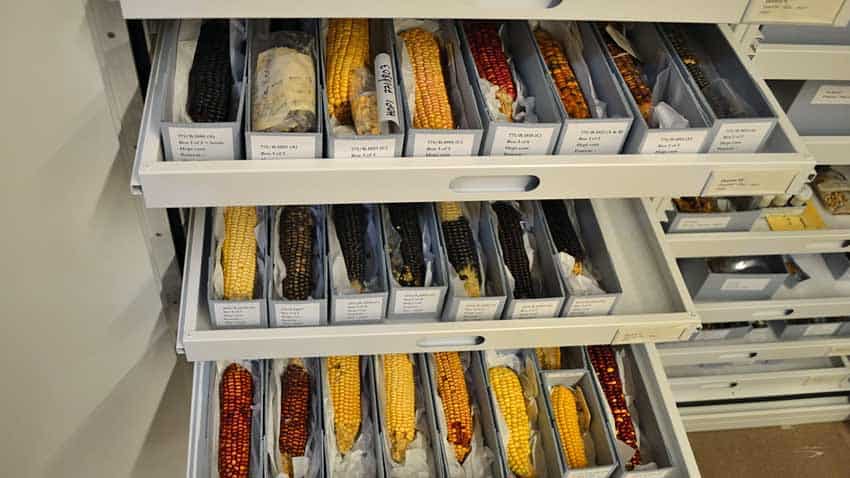
The first is the Germplasm Resources Information Network or GRIN for short. It is also known as the National Plant Germplasm System. This collaborative system works to safeguard the genetic diversity of agriculturally important plants. Congress funds the program but it partners with both public and private participants. Many of the seed banks are on state university campuses with private sector breeders and researchers using the available seed resources.
USDA National Center for Genetic Resources Preservation cold vault
There are 30 collection sites that maintain specific seed stock and conduct research on them. Some are dedicated to a single crop like the Maize Genetic Stock center in Urbana, IL which collects, maintains, distributes and studies the genetics of corn. Potatoes are maintained and studied in Sturgeon Bay, WI and rice is kept in Stuttgart, AR. Others maintain regional varieties like the UC Davis location that focuses on tree fruit and nut crops along with grapes that are agriculturally important in the central valley of California.
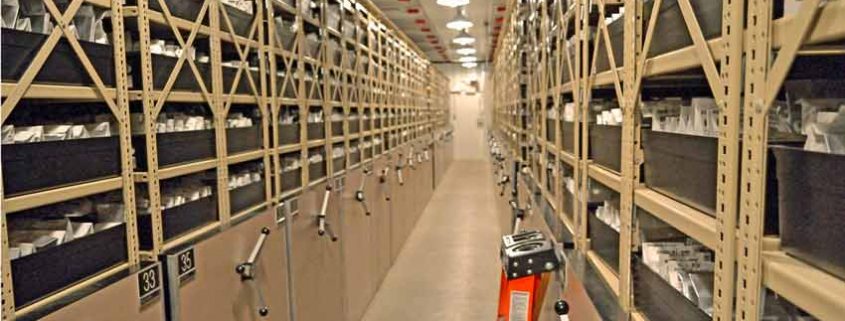
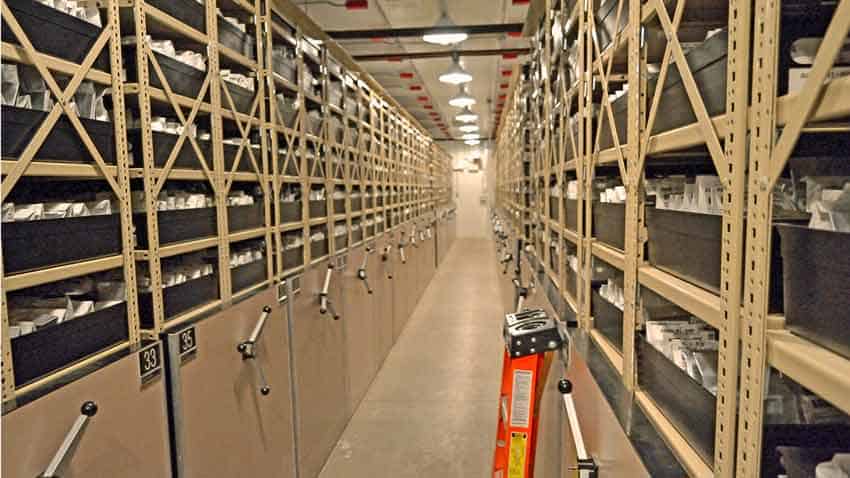
The second role is the USDA National Center for Genetic Resources Preservation (NCGRP) in Fort Collins, CO. This is the “back-stop” for the GRIN system as well as other private, public institutions and government programs around the world. They store the foundational collections of all the GRIN locations while also working with organizations such as the International Maize and Wheat Improvement Center in Mexico, the International Rice Research Institute in the Philippines and the International Plant Genetic Resources Institute in Rome.
Founded in 1958, the NCGRP maintains, monitors and distributes seed and genetic material samples from their long-term backup storage. After receiving seed samples, they test, clean and condition the seed for the proper long-term storage environment.
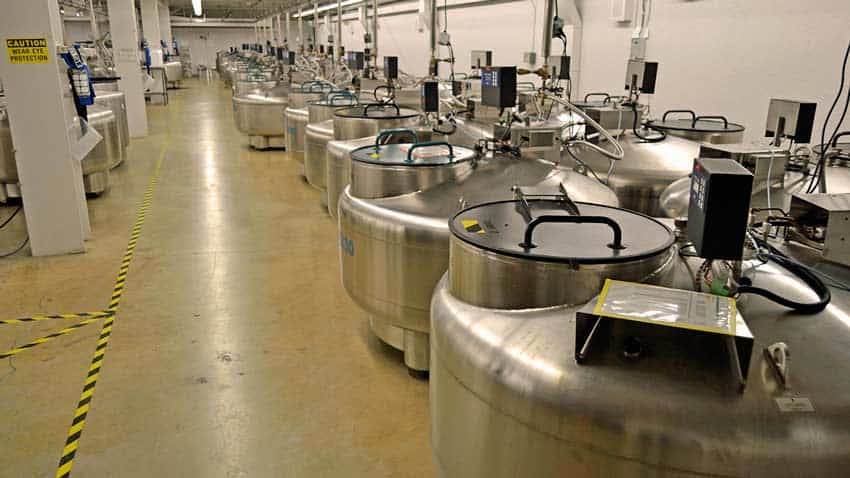
USDA NCGRP’s liquid nitrogen vault
Two long-term storage methods are used. One is a traditional low temperature/low humidity storage and the other is liquid nitrogen storage. The traditional storage is kept at 0°F and 23% relative humidity. Seeds are kept in heat sealed, moisture proof foil laminated bags.
Before seeds are stored in liquid nitrogen a sample is given a liquid nitrogen test to ensure the extreme cold won’t damage the seeds. The sample is exposed to liquid nitrogen for 24 hours, then germinated after coming back to room temperature and evaluated for any germination issues.
If the test results are normal the seeds are stored in clear polyolefin plastic tubes that are barcoded and sealed. The filled tubes are arranged in metal boxes, labeled and stored in liquid nitrogen tanks.
USDA NCGRP’s liquid nitrogen vault sample straw
The vault housing both storage areas is completely self-contained and separate from the adjoining buildings. It has its own backup generator, can withstand up to 16 feet of flooding, tornadoes and the impact of a 2,500-pound object moving at 125 miles per hour. It also has a full suite of electronic security.
If these approaches and techniques seem extravagant, it is with good reason. Our food availability and security increasingly relies on intensive production of fewer variety of crops that are very similar genetically. Along with increased production is increased vulnerability on a larger scale to pests, diseases and other stresses.
By collecting, preserving, testing, studying and distributing seeds and genetic materials immediate food system challenges can be met along with solutions and adaptations for future needs. Changes in growing conditions due to population growth, weather variability, transitions in land use and economic development all make the need for quality seed more important.
All the players in the seed economy support and advance the knowledge and quality of our seed used today. Just as the home gardeners and garden clubs preserve local seed varieties, seed companies are a “back-stop” for them. Seed banks and research facilities back up the seed companies and provide material for seed research.
Transform your garden with succession planting. Learn how to create a continuous harvest of fresh vegetables, herbs, and flowers throughout the growing season.
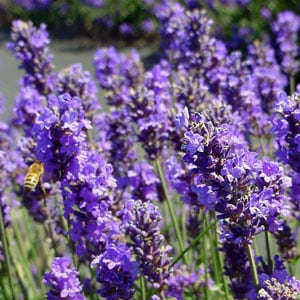
Lavender has been used to soothe and heal people for a long time, dating back to at least the Egyptians where it was commonly used in daily life. Not only does the fragrance refresh and soothe our senses, but the scent or aroma molecules pass to the limbic area of the brain directly from the nose. The limbic area deals with instinct and emotion as well as many of the body’s autonomic systems, such as the immune system. This is one of the primary ways that inhaling lavender essential oils helps to calm us down and restore a sense of peace. This aromatherapy is also highly effective with the animals we share our lives with.
Aromatherapy is the use of specific plant essential oils to enhance physical and psychological well-being. As a therapy it has been proven with use dating back thousands of years. Essential oils are distilled from specific plants and are 100% pure aromatic oils. Some oils are especially potent and are highly valued for their benefits and concentrations of essential oils. Lavender from Provence, France is one such oil as it is grown in the high altitude and harsh climate where the lavender plants respond to the environmental stresses by producing higher than normal amounts of protective oils, which give us benefits when the flower buds are harvested and distilled. Another source of high-altitude lavender oil from the United States is Red Rock Lavender, grown outside of Concho, AZ with a climate that is very similar to Provence. The essential oils produced in Concho are the second most potent in the world behind that from Provence.
It must be noted that there is some confusion due to exceedingly clever marketing on aromatherapy oils. As a result, many people have the mistaken idea that any kind of perfumed scent is aromatherapy. This is not true. Synthetic oils, often labeled “fragrance oils,” are not the same as essential oils. There is no therapeutic effect on the body like with true distilled essential oils. If you are buying essential oils, make sure to source them from a reputable company and that the oils are true, therapeutic grade essential oils and not fragrance oils.
Another approach is to grow your own lavender. It is a hardy perennial in most parts of the United States, with several different varieties that are suited to different climates. You can buy starts and transplant them or start your own from seed. Once your lavender plants are established, you will have an abundance of lavender sprays for many uses!
Aromatherapy is a little different for animals than for humans, with the main difference being the sense of smell that most animals have over humans. Animals have a much more acute sense of scent than we do, so the amount of oil or scent will need to be reduced by 2/3 for a start to see how the response is. It is much easier to increase the amount bit by bit than to overwhelm their nostrils on the first whiff!
A word of caution is needed here, as some essential oils can be toxic to cats. Certain essential oils naturally contain phenols and should never be used with cats. Their liver does not produce the enzymes to digest these compounds allowing them to build up to toxic levels in their systems. It is safer to avoid using aromatherapy with cats, unless you are working with a skilled aromatherapist with experience and knowledge in working with cats.
Lavender is well known for its effectiveness in calming people, horses and dogs. There are many studies that show the immediate and intermediate positive effects that lavender has on sensitive, stressed, anxious animals. Both horses and dogs respond very well to the scent of lavender with decreased heart rate and respiration, a calmer posture, less shaking and pacing or other nervous behavior. Spray some essential oil on a cloth or the dog’s bed before a car trip to ease stress, just before thunderstorms and for separation anxiety. You can also put a few drops on a cloth and tie it to the dog’s collar for a longer-lasting effect. For horses, a cloth with a couple of drops to introduce the new scent to them will usually have a beneficial effect. After they are used to the aroma, it is easy to let them inhale the scent off of a cloth that is kept for that purpose. They can benefit from a cloth hung in the trailer before a trailer loading session, before and during a road trip – adding a few drops of oil if needed during fuel or rest stops.
One other benefit of lavender essential oil is it is a highly effective insect repellent for both horses and dogs. The same properties that make it a pleasing and relaxing aroma for us and our animals make it the ideal insect repellent. Just add 10 – 15 drops of lavender essential oil to a spray bottle and fill with water, shake well and apply! Make sure to avoid the eyes, but all other parts of the body are ok.
As a small family owned heirloom seed company, we receive many requests for partnerships with or donations to some great causes. Some of these are exceptional, as when the Xerces Society contacted us in January 2012 about growing a specific species of milkweed that is native to our part of central Arizona. Pollinators and pollinator attractants are very important to the success of any garden, so we jumped at the chance to connect the right people who share our passion for this project. Here is how that story unfolds!
Monarch butterflies have seen steady population declines across their native range since population monitoring first began in 1976. Several 2012 reports show that Monarch numbers will drop almost 30 percent this year, continuing a decline that has lasted for the past decade. The severe drought seen across Texas and Northern Mexico, combined with wildfires across the entire southwest has been a large factor. The biggest contributor is simply the loss of land that supports the Monarch’s food source and hatchery – the Milkweed plant. Much of the land has been converted to commercial herbicide tolerant corn and soybean production, or developed into housing. Overuse of persistent chemical herbicides and roadside mowing for weed control has also created loss of milkweed habitat and thus reduced Monarch numbers.

Monarch Butterfly on Milkweed
The milkweed plant (Asclepias spp.) plays a critical role in the monarch life cycle. Each spring Monarchs move across the United States, laying eggs on native milkweeds, the only plants that serve as food for newly hatched monarch caterpillars. Because of their migratory life cycle–breeding in the United States and Canada, and overwintering at only a few locations in Mexico and California–the most effective conservation strategies for Monarch butterflies are those that protect and restore habitat across their entire range. As a result, the North American Monarch Conservation Plan recommends planting native milkweed species to restore habitat within the Monarch butterfly’s breeding range.
The Xerces Society is working to increase the availability of native milkweed seed and encourage restoration using milkweed in California, the Great Basin, the Southwest, Texas, and Florida. These are important areas of the Monarch’s spring and summer breeding range where few commercial sources of native milkweed seed currently exist. To conduct the project, they are partnering with the Monarch Joint Venture, a coalition of federal and state agencies, scientists, and nonprofit conservation organizations.

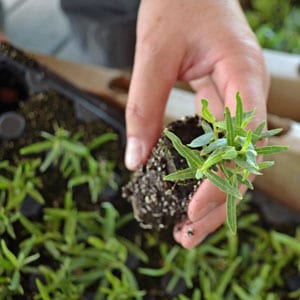
Brianna Borders and Cindy Scott with Milkweed plugs
At the end of this past January, we were contacted by Brianna Borders, Plant Ecologist for The Xerces Society about a possible project to propagate a subspecies of Milkweed – Asclepias asperula that is native to Arizona. She had about 2 ounces of seed (approximately 7,000 seeds) that had been collected in the southern portion of our local county by the Desert Botanical Garden volunteers in Phoenix. Through grant funding, a California native plant nursery could propagate the seeds into plugs ready for planting. The Xerces Society was looking for a grower in our area that could bring the project into being. This would be a minimum 2 year project to grow a commercial quantity of seed to offer for sale.

Spreading Mulch for Milkweed plugs
After some thought, we decided that Fiona Reid was the perfect fit for this project. Recently retired as Education Director from a natural history education center, she was already growing and saving milkweed seeds at her property – Painted Lady Vineyard! One of her passions is native plants of the area, with an emphasis on butterfly attractants, and has solid connections with the Arizona Native Plant Society, as well as the Desert Botanical Garden in Phoenix. The Painted Lady is a beautiful, ephemeral butterfly that happened to visit the vineyard in droves as the initial vines were being planted, thus the name for the vineyard came about.

Drilling Holes for Milkweed Plugs
The planting took place over a long and extremely hot weekend in the middle of June after much work over many weeks not only by Fiona but her volunteer crew to prepare the ground to receive the fragile tiny plugs that had arrived overnight in flats from the grower in California. We took part in the planting, but what really inspired, amazed and humbled us was the outpouring of community support from all walks of life and all interests in this project that will only benefit the Monarch butterfly. There are no financial rewards for any of the volunteers for the hours spent bent over in 100 degree heat planting over 2,000 fragile plugs. Many of the people helping were native plant enthusiasts, some were butterfly lovers, but a significant number had no real interest besides that of helping see a project to fruition on nothing more than the basis of it is the right thing to do.

Planting Milkweed is a Team Effort
We received this email from Fiona on Monday after the planting weekend. When we left Saturday evening, a little over half of the plugs were planted. There was some concern of getting the rest planted with the remaining group and the high heat creating a deadline of viability for the milkweed plugs.
“Monday morning, after a pretty blazing hot weekend, and the little plants – ALL of them – are sitting in the ground, protected by mulch, and getting the necessary drink of water. Mission accomplished!
320 hours of volunteer labor, not even counting mine, to get this job done from start to finish. It has been an amazing community effort and I have had the pleasure of working with a great group of people, children included. As we began to close in on the finish yesterday, and everyone was hot and very dusty and sometimes muddy, I was almost overcome by the understanding that people don’t have to involve themselves in such hard work – sometimes backbreaking work, sometimes knee-breaking work, and always hot work. They could sit at home in the cool, or an office somewhere, and do good for someone else. But none of you did that. You came knowing it was going to be outside in the heat; knowing you would kneel and bend; knowing you would get dust in your nose and eyes; knowing that – as Rachel Carson said – “there is something beyond the bounds of our human existence” that matters. You also know that you won’t get any thanks from the butterflies that find all the little milkweed gardens that will eventually grow from this project. I do know, from the simple fact that you involved yourselves in this effort, that you will one day spot a monarch butterfly and in that fleeting moment there will be a part of your soul that stirs and feels absolute content. There is something right with the world – it may be ephemeral, and maybe you can’t articulate what it is, but that moment is enough for us.
I don’t think we will get a harvest this year at all. Next year we will have to put our heads together to figure out how we take the next step – collection of the seed. In the meantime I hope you can pat yourselves on the back for a fantastic job, so well done. I cannot thank you enough.”

Planting Milkweed Plugs
Here’s Fiona’s update on the project after the Monsoon rains have begun:
“It’s what we have all been waiting for – the rains! Right now, as I look through my office window, there are heavy raindrops exploding like little bombs on the driveway, and I know they are doing just the same over the new milkweed fields less than a hundred yards away. Perhaps I should take this very opportunity to celebrate these first rains of the monsoon season and take off all my clothes and run over there and be like a little milkweed, totally open to the elements!”

Almost Half Way!
“2,190 milkweed plugs, grown from seed in a California greenhouse, are now at home in our native Skull Valley soil, barely 50 miles from their parent plants. And their roots are now moving out from the plug of soil which has been their ‘nest’ for so many months into the earth around them. These rains have showered them with nitrogen and freshness and their narrow leaves are pushing up towards the currently cloud covered sky. So I can pat myself on the back for a job well done, right? But nothing like this can happen without the help of others, so they all need a pat on the back as well.”

Busy Hands
“Community and connections make good things happen. Stephen and Cindy needed to think of me for this project; I needed Jodi Padgett, with whom I share life and land, to agree with the idea that we could plant the milkweed on the property; I needed to find someone to plough and level the planting areas; I needed volunteer help almost every step of the way. I needed Brianna Borders of the Xerces Society to support me when needed. Food and wine is usually a great incentive for volunteers, but that’s not all – realizing that there is, as Rachel Carson said, “something beyond the bounds of our human existence” worth paying attention to is probably more of an incentive for every single one of the volunteers who came and knelt, and dug, and laid weed barrier fabric, and connected irrigation parts, and invented hole-burners and augers, and finally, tenderly, popped these little milkweed plugs into the earth with a silent prayer that each one would grow strong. All of this work was done in unusually hot weather. The youngsters took much needed breaks by splashing around in the swimming pool; the elders sat in the shade gulping down iced mint tea. Everyone got hot, sweaty and very dusty.”

More Busy Hands
“And for the past month, as hot dry weather has continued to dominate our local area, I began and ended each day by watering those four blocks of milkweed. Today the rains did the watering for me, and moments ago, (fully clothed) I wandered around the blocks and, yes, all of a sudden it seems that these small plants have decided this is a good place to be and have sent their roots out into the native soil and are prepared to call this place ‘home’.
We don’t get paid dollars for doing this. What we get is priceless. One day, in many gardens around this area and scattered throughout the southwest, the most ephemeral of creatures – a butterfly – will lay her eggs on the milkweed that has been grown there especially for her, and the stunning caterpillar that emerges will have all the nourishment it needs right there. Soon thereafter, through the miracle of metamorphosis, a monarch butterfly will continue the northward journey. We may only get a fleeting glimpse of this whole cycle, but that’s OK – we just need, it seems, to know that we are part of a bigger whole that is life on earth.”
Very well said, Fiona!
It has been just over a year now, and things are looking very well indeed! We visited Fiona recently to see how the seed production was coming along, took some photos and video and wanted to share them with all of you.
There are several things that have been learned from this experience. First off, the milkweed is an on-going production plant, meaning that it doesn’t set all of its flowers at once. This means that there aren’t a crush of seed pods that need to be bagged (needing a crew or a bunch of hardy volunteers), but it does mean that there are little bunches of pods that always need bagging, so it is seemingly never done. Second, there is no real seed cleaning equipment available for the small scale grower to process and separate the seeds from the floss. There is equipment for the large seed grower that costs as much as some folks homes, but nothing for the smaller scale grower. We have known that as an heirloom seed company, as we’ve had to adapt other industry’s equipment and needs to serve our own. Third, there isn’t an established market for a regionally adapted milkweed seed of a specific species, as there hasn’t been any available up until this point in time.
Let’s look at how things have developed:

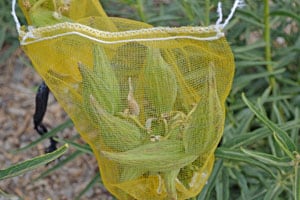
This is what a milkweed pod that has been bagged looks like. It is bagged to capture the “floss” or fluff that transports the seeds on the wind. This has to be done on an on-going basis, as the pods grow and begin to mature.
This is what good pollination will do for production, and really emphasizes the importance of all pollinators, but especially bees. Big black carpenter bees are what do the most effective pollination for Painted Lady Vineyard, as they get into the flowers and do a tremendous job that the smaller pollinators can’t.
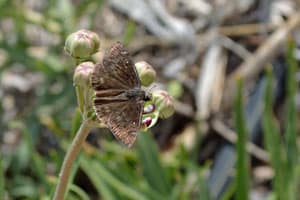
This is one of the several butterflies that were visiting the milkweed the day we were there.

The star of the show appears: the carpenter bee!
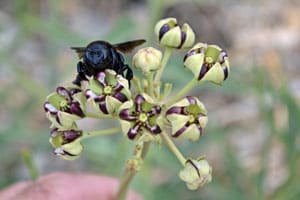
Another view of this hard-working bee. Notice my hand in the background, holding the flower stalk steady as the wind was starting to pick up. The bee didn’t mind and let me get several close-up “glamour” shots! They are big enough to get down into the flower and do the pollination work that smaller insects just can’t reach. The flowers are quite stiff, and some insects will be damaged trying to get into these flowers as their legs get caught.
Here’s a short video showing what the field of milkweed looks like, as well as how Fiona and Brianna have worked together to determine how to separate the floss from the seeds.
 © 2024 Terroir Seeds | Underwood Gardens