This Sicilian eggplant and tomato sauce is wonderful and surprising with its richness and depth of flavors, both fresh and roasted. Easy and delicious!

This Sicilian eggplant and tomato sauce is wonderful and surprising with its richness and depth of flavors, both fresh and roasted. Easy and delicious!
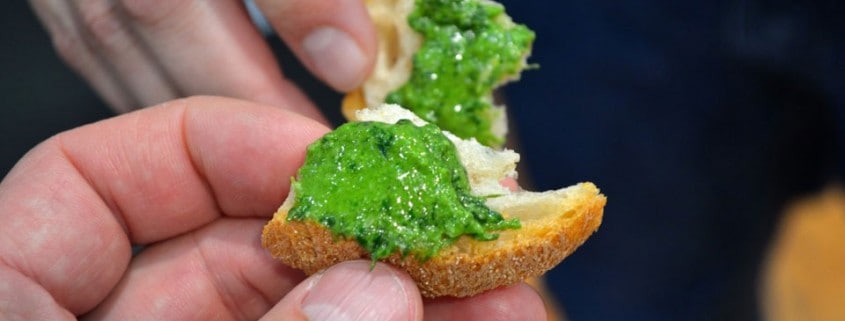
Fresh, homemade basil pesto is one of the treasures of summer. There are many tasty treats that come out of our gardens during summertime, but pesto is one that is very easy and pretty quick to make. It freezes well and there is very little that evokes the flavor and fond memory of warm summer days than the taste of a batch of pesto on a cold winter’s day.
It might be because almost all of the other garden offerings are cooked in some way while preparing them for storage, while pesto is just frozen. It retains that true, fresh flavor better than many other vegetables that are frozen while fresh.

If you haven’t made your own fresh pesto from basil you’ve grown, you might be surprised at how easy it is to grow or how small of a space it takes to grow a good amount. This is an old horse water barrel that was “up-cycled” from a 55-gallon water drum that was cut in half. It is about two feet deep, and we filled it with a mixture of soil and aged compost.
We planted Thai basil in one half and Sweet basil in the other, so you can see how vigorously they grow. We’ve been enjoying fresh basil sprigs in our morning eggs – both the Sweet and Thai work wonderfully, giving their signature perfume and aroma to the breakfast. We also love the Genovese basil, considered the classic pesto basil – but it bears experimenting with different basil varieties and even mixtures of basils in a pesto recipe to see what flavors come out and find what you particularly love!
For this batch, we trimmed about half of the Sweet basil – about 1/4 of the circle- so there would be plenty left for another batch. Basil will grow back quickly, so don’t worry about trimming it short – we left about 3 inches above the soil.
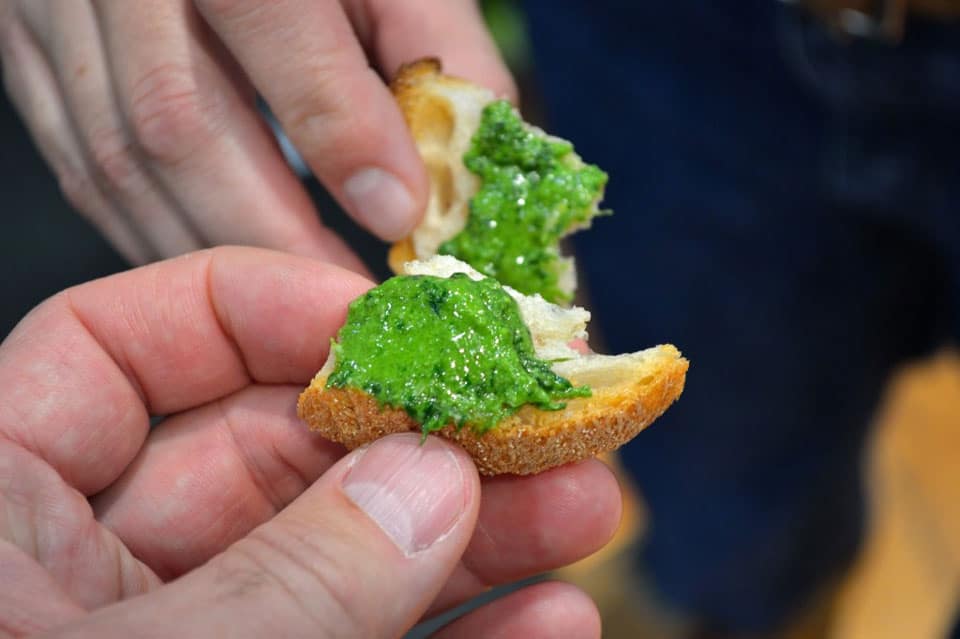
This is our adaptation to the time-honored Pesto Genovese. It is made by pounding in a large mortar and pestle, but we find the flavors are very good when made with a food processor. It won’t be quite the same, and you owe it to yourself to make it the classic way at least once—even if only to see the difference in flavor.
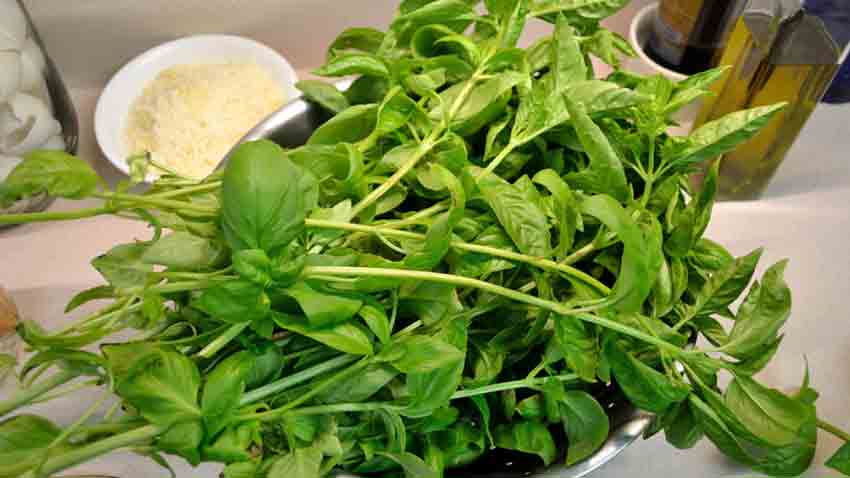
This is what that 1/4 of a circle planter of basil looks like! It overflows a large colander and is ready for the leaves to be picked.
If you are making fresh pesto for dinner, put the water on to boil just before you start picking the leaves. The water will be boiling when you’ve gotten the leaves off and washed and the cheese grated. With just a little preparation on the timing and ingredients, you can have the pesto done just about when the pasta is ready.
It took us about a half hour total to make this batch, including photos.
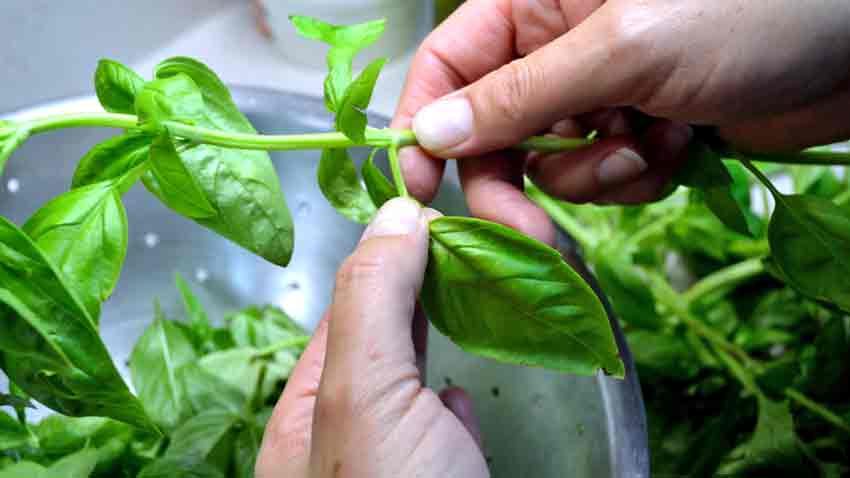
Harvesting the basil leaves is straightforward – pull them off the stem. You can change the overall flavor of the pesto by harvesting more of the younger leaves for a milder flavor or older and larger leaves for a deeper flavor. If you see young buds or flowers, adding a few of these will add a completely different flavor profile to the pesto. When making pesto to use as a remoulade to top a grilled steak with, using more of the buds will give it a sharper flavor to counter the rich, meaty steak.
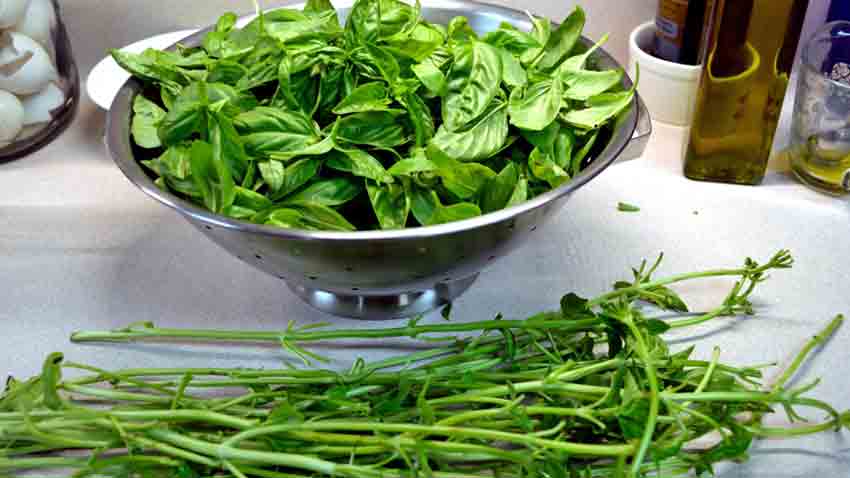
You’ll have this in just a couple of minutes – a colander full of leaves and a pile of stalks. Rinse the leaves well and compost the stalks. If you’ve grown your own basil, you’ll probably notice that there is much less dirt than when bought at the store. This results when growing in a raised bed, especially using a drip system. The drip will not splash dirt up on the leaves, and a mulched raised bed will greatly reduce the rains from splashing dirt up as well. It makes a noticeable difference in how long it takes to rinse the leaves.
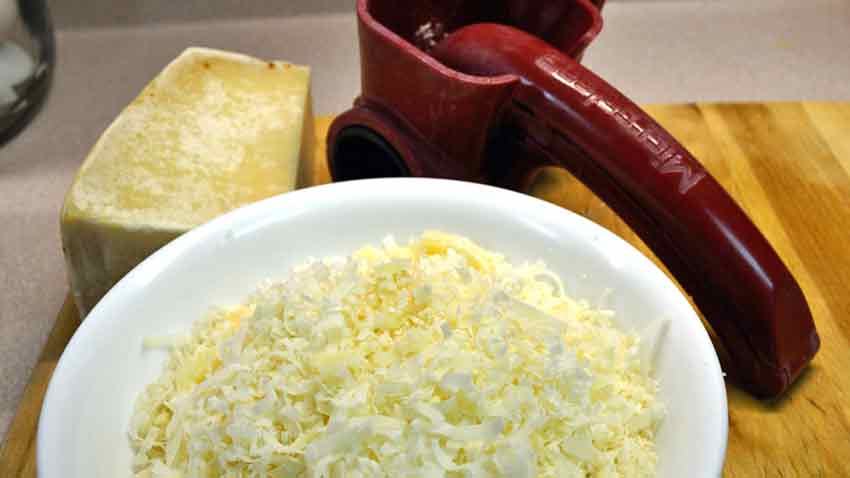
After rinsing the leaves, leave them to drain for a few minutes and grate the cheese. This is another chance to experiment with flavors, as the classic Parmigiano-Reggiano cheese is great, but a Pecorino is also delicious. Don’t be afraid to try different types of hard-grating cheeses to see what they bring to the recipe. Several hand-crafted American cheeses would be a tasty addition – not “authentic” but very delicious all the same!
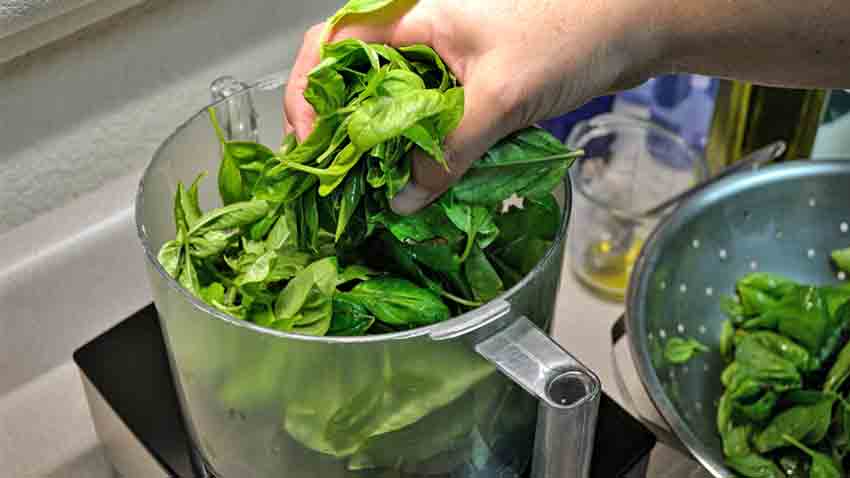
By this time, the basil leaves had drained, and it was time to add them to the food processor. All of the other ingredients, except the oil, were added as well. The water was at a boil, so we added the pasta to the water and then returned to the food processor.

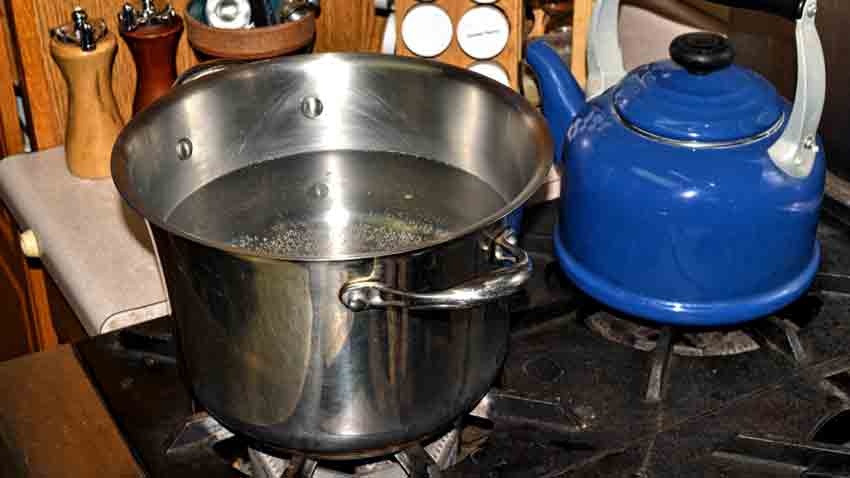
Does your pasta pot always seem to boil over, leaving a mess to clean up? We’ve found this Pot Minder to be a great little addition – it is a ceramic disc that almost stops the foaming that leads to boilovers. All you do is drop the disc in when you add the pasta, rice, or potatoes, and the boil-overs are decreased by at least 90%. I won’t say you’ll never have boil-overs again, but not very often, and they will be much smaller than before.

Here is the pot full of pasta at a full boil, with the small amount of foam being normal. The Pot Minder means one less thing to think about when you are in the middle of cooking dinner.
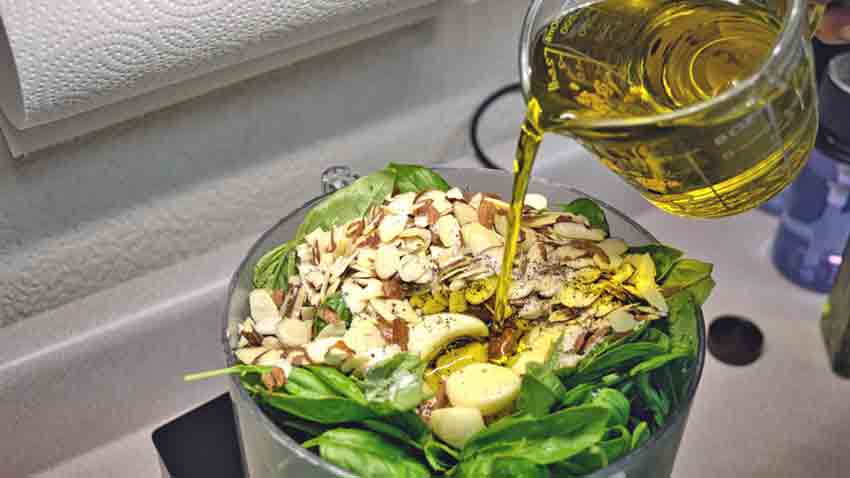
With the pasta starting to cook, the rest of the ingredients were added – garlic, nuts, and olive oil. We like to start with about 2/3 of the final amount of oil. That way, if more oil is needed, it is easy to add it, but if there is too much oil, it can’t be taken out!

The food processor is pulsed for several seconds at a time first to chop the ingredients and convert the mass of separate ingredients to the beginnings of a paste. After it has started to form a paste, use a flexible spatula to scrape the bowl and clean the sides, getting all of the good flavors into play.
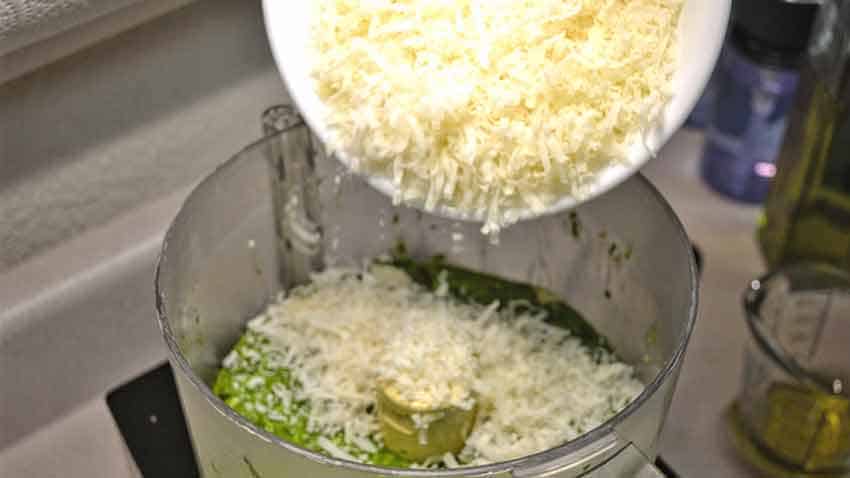
After all of the ingredients have started to incorporate into a loose paste, add the grated cheese. We like adding it in two parts to make blending in and combining the flavors easier. Make sure to pulse the processor a few seconds several times until it begins to disappear into the paste and become thicker. Do this until all of the cheese has been added. Use the flexible scraper to clean the sides of the bowl.
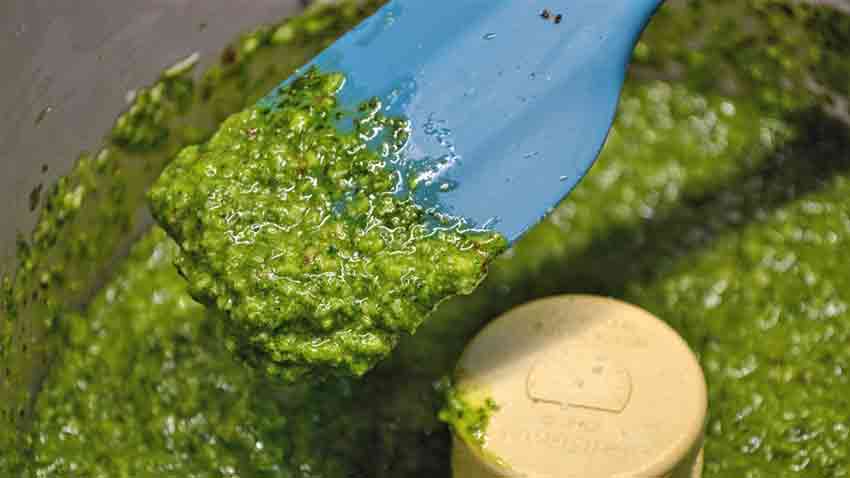
Now it’s time to examine the pesto. You can leave it fairly chunky and coarse, like the above photo shows, or you can make it much finer by pulsing the food processor for 30 – 45 seconds several times more. It is all up to your preference, both in flavor and appearance. The flavors will change as the pesto is chopped finer by the processor blades. Make sure to taste the pesto several times to determine what you like.
Don’t worry if you make it too fine. The basil plant will re-grow quickly, and you’ll have a second chance soon! The fine pesto will likely still taste good, giving you a chance to refine your technique and put your signature on the dish.
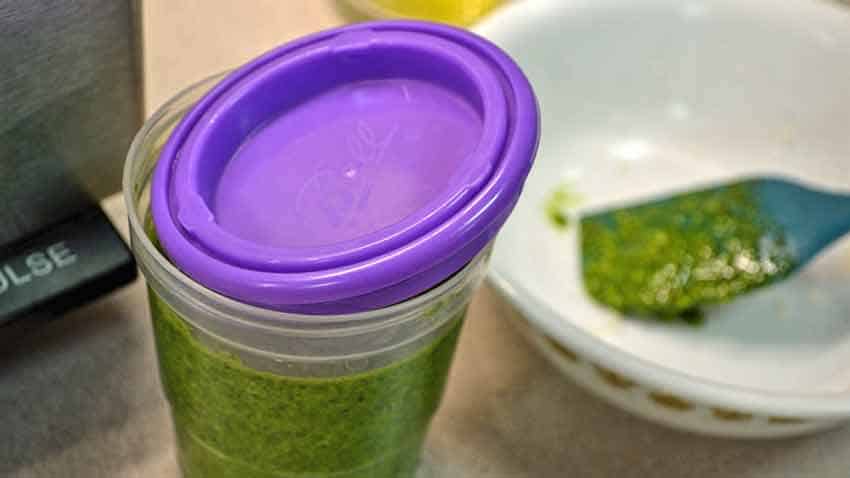
Fresh basil is one of the few herbs that freeze fine with very little, if any, loss in flavor or aroma. We always try to make extra to freeze some for the winter – reminding us of the incredible flavors of summer. If you really want to freeze a lot, plant 10 basil plants, and you’ll feel like you’re farming basil!
You will be able to get at least two cuttings and very possibly three in one season. With our 10 plants, we were able to put up about 18 freezer jars of fresh pesto, and that doesn’t include eating at least six more. The freezer jars are just big enough for one meal, so there is no waste, and you don’t wind up with soggy pesto in the fridge a few days after thawing it out.

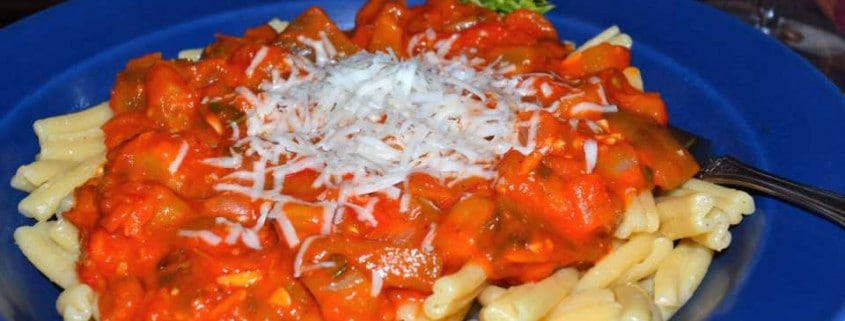
Here is the final product – a simple but delicious dinner just waiting to carry you away!
What do you think? Have you grown basil in a container like this, or do you grow it in a more traditional garden, or maybe inside? How else do you use fresh basil and pesto?
Here’s the full recipe –

To avoid spoiling the pesto flavor by the food processor, take care to minimize the heat produced by the blade. Some suggest chilling the blade and bowl assembly in the freezer before starting and monitor the amount of time the pesto is being processed, but it doesn't take that long to make a batch, and we haven't tasted a noticeable difference with not freezing the blade and bowl.
Using cheese fresh from the refrigerator helps control any heat as well.

 The intense aroma of fresh basil is one of the hallmarks of summer and a garden in the full swing of production. The Greek name for basil – βασιλικός – also translates as “royal”, showing the regard that it has had for a long time. It is also a symbol of love in Italy, where it is used generously in many dishes.
For the absolute best aroma and flavor, basil must be used fresh – the fresher the better. Luckily for us, it can be preserved through several different methods and brought out in the depths of winter to remind us of what summer was.
The easiest way is to freeze or dry the leaves. To freeze, just puree the leaves with a little water to a thick consistency and put into ice cube trays. When completely frozen, pop out into a gallon sized Zip-lock bag and store in the freezer until ready to use. They will brighten up soups, sauces and can be used to make a very tasty tapenade. Drying the leaves reduces the fresh aroma, but keeps most of the flavors for soups, stews and sauces. Make sure that they are dried to a brittle stage to avoid any moisture that can spoil the leaves in storage. Use sparingly when dried, as they rehydrate and can overpower milder sauces.
Yet another method to preserve those delicious summer-fresh flavors is to make pesto and freeze it, either in ice cube trays or in 6 – 8 ounce containers. It won’t have quite all of the punch of fresh pesto, but is mighty close when you are longing for the fresh flavors of summer! Read further for a traditional Pesto alla Genoves recipe, along with a video demonstration from Slow Food Terra Madre last October in Turin, Italy.
When you are absolutely overrun with basil, consider making herb-infused vinegar with basil, rosemary, thyme, marjoram or any combination for beautiful, thoughtful and highly tasty gifts. Just half fill a one gallon glass jar with air-dried herbs (leaves and stems, everything but the roots) and fill with almost boiling vinegar. High quality vinegar will give a better flavor; consider using apple cider or rice vinegar for great flavors. Cover loosely with a lid and let the herbs steep for at least one month or more. Taste occasionally to see when the flavors have developed to your taste, then strain the vinegar through cheesecloth and fill a decorative bottle.
Mention basil and immediately pesto comes to mind. Exactly when the combination of basil, cheese, garlic and pine nuts came to be is uncertain, but we do know that the Romans ate a paste of crushed cheese, garlic and herbs that was called moretum. The first recipe that we know of is from 1863 in La Cuciniera Genovese written by Giovanni Battista Ratto, so this delicacy has captivated us for quite some time!
Here is the classic Pesto alla Genovese followed by a video demonstration that we filmed at Slow Food Terra Madre in Turin, Italy in late October 2012.
Pesto alla Genovese – Classic Pesto
Directions:
With a pestle and mortar:
This is the time honored, traditional method that really does yield a superior flavor, if you have the mortar and pestle and the time.
With a food processor:
Purists will cry foul at this, but with care a food processor can give you very good results. It may take some experimenting to create a truly memorable pesto, but it is worth it.
Serves 4 – 6
To see how pesto is made in the traditional, handmade method, watch this video we shot at Slow Food Terra Madre last October.
The following best-practice rules and delicious recipe are courtesy of Farm Fresh Now!, a project of The Land Connection, an educational nonprofit that preserves farmland, trains new farmers, and connects people with great locally-grown foods. This series is made possible with generous support from the Illinois Department of Agriculture.
The best way to enjoy healthy, seasonal produce is to buy it from your local community farmer. To locate the farmers’ market or CSA nearest you, visit Local Harvest.
Ahhh, basil! Even the word carries a whiff of its invigorating scent.
But it’s the aromatic leaves themselves that contain dozens of volatile essential oils. Their relative concentration is the difference between “regular” Genovese basil, Thai basil, Lemon basil, Holy Basil, Cinnamon Basil, African Basil and all the other basils you’ll find your local farmer growing.
There are a few rules to remember when buying and using basil.
Rule #1: Use only the freshest basil. The fresher it is, the better it is. The fragrance of basil is never as seductive as when it is first plucked from a live plant and eaten raw, as quickly as possible after plucking. This is why you should think about having a pot of basil of your own – on the kitchen window sill or in your back yard. The next best thing is to get basil from a local farmer at a Farmer’s Market or through a CSA.
Rule #2: Don’t cook basil – don’t even heat it up if you can help it. When adding basil to a pasta sauce or a pizza, do so only at the last minute, while tossing with the pasta or after the pizza has emerged from the oven. Basil pesto too, should always be used raw, never warmed up or cooked.
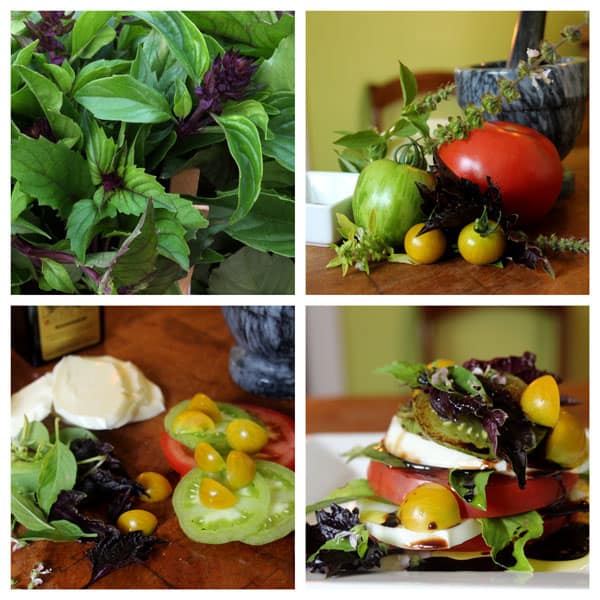
Rule #3: Stay away from knives. The cut edges of basil will blacken and the overall flavor will be diminished. Instead, simply use whole leaves or tear large leaves into small pieces with your hands before scattering them over a tomato salad, mashing them into a basil butter for corn on the cob, sprinkling on green bean salads, or roasted eggplant, zucchini, or peppers. For more summer fun, experiment with the many scented and colored basils that farmers are now bringing to market, including lemon, anise, Thai, cinnamon, and purple basils.
Rule #4: Use basil only in the summer. This relates back to Rule #1, bringing us full circle. Basil is the ultimate summer herb. Its rich perfume evokes warm sunny days and mouthwatering combinations with other summer vegetables – tomatoes, zucchini, peppers. Sure, you can get it year-round in the grocery store, but like tomatoes, basil tends to be insipid when grown in a greenhouse or flown in from California. Some things in life are definitely worth the wait. Basil is one of them.
Basil Caprese Salad
[dkprinterfriendlylinking file=”Basil_Caprese_Salad.html”]
Ingredients
Instructions
Seasonal Cook’s Notes:
Makes about 4 individual salads
Secrets of a Seasonal Cook
Article © Terra Brockman
Photo © Cara Cummings
With the garden in full production at this time of year, there is usually an over-abundance of fresh vegetables, especially tomatoes, basil and parsley. Of course, the first thought is a pasta sauce, but after the first few gallons have been made the magic fades a bit.
What else is there to create that is reasonably quick and stunningly delicious? With that we bring you a trio of antipasto recipes. These are perfect for light grazing through an evening with friends, or for just the two of you on the back deck watching a summer evening fade into twilight.
We will start with the simplest one first. It has been called a caponata spread, but is closer to a tapenade. This has been one of our go-to recipes for more than a decade, and came from a local wood-fired restaurant that has long since closed its doors. This is simple and quick to make and keeps well.
All of them are addictive, so double the amount you make for friends and you might have some left to enjoy the next day!
Zuma’s Caponata Spread
We will often use this as a base or starting point and substitute what is fresh at the moment. Adding green Spanish olives adds a nice flavor, as does adding one anchovy to move it more into the tapenade category. If we are pressed for time, we omit the onion and substitute 1/4 cup fresh garlic for the roasted.
Serves 4 – 6 as appetizers, 2 – 3 as antipasto
Classic Tapanade from Saveur Magazine
Serves 4 – 6 as appetizers, 2 – 3 as antipasto
Sicilian Caponata
This is an adaptation of one of the oldest, most widely travelled recipes from the Mediterranean region, with several cultures contributing to the flavors and preparation. If you use fresh-from-the-garden eggplant you might not need to do the salting step, as this is used to remove bitterness.
Serves 4 – 6 as appetizers, 2 – 3 as antipasto
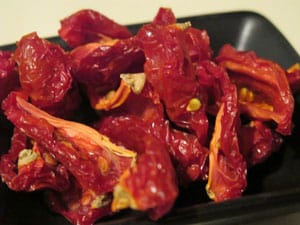
Here’s a recipe that will take a little preparation, but you will be thanking me for it later! Make a lot more of these dried tomatoes than you think that you will ever need, as once folks catch on to just how incredibly tasty these little jewels are, you will run out. You might want to hide some just for yourself!
These make beautifully presented, incredibly thoughtful gifts for the chef or serious home cook in your life. You cannot buy the flavor of these herbed tomatoes, anywhere, at any price. These will take a bit of time, but doesn’t require much hands-on time to make.
First, the tomatoes. Only heirloom tomatoes can really be considered, as the flavor is what you are after. The beauty of this process is that almost any tomato can be used, as the drying intensifies the flavors already present. Obviously, a paste tomato will give you a more substantial result. Good ones to look for are the plum and pear sizes with meaty walls, few seeds and a ton of flavor. If you don’t have these already growing in your garden, plan to plant some next year and look at your local farmer’s market. You will need a lot of fresh tomatoes, as they lose a lot of weight during drying. Plan on about 3 times the fresh volume as what you will get dried.
Drying them is the easy part. Wash them, slice and place on cookie sheets to dry. The oven is a great choice, as most gas fired ovens with a pilot light stay at around 90F or so. A consistently warm, sunny location is also good. If drying outside, cover with cheesecloth to prevent flies from snacking on your treats. Let them dry to a leather-like stage, then collect and start the marinating.
There are several different directions you can go with the herbs. A traditional approach is to use basil, oregano and garlic. A French approach would include lavender buds, Herbes de Provence with garlic. The strong punch of Mexican oregano accompanied by some smoked Jalapeno chiles, cumin and marjoram would be out of this world as well. Be creative, look at some herb combinations you enjoy and do some experimenting. The results will most likely be quite tasty!
We will start with the most basic recipe and then give you some alternatives to try. Use as you would sun-dried tomatoes – in soups, sauces, stews, bruschetta, pizza, spreads, salads or anywhere else the flavors would work well.
Herb Marinated Dried Tomatoes
Use these following recipes as the herb ingredients for the basic recipe above.
Herbes de Provence Marinated Dried Tomatoes
Mexican Herbed Marinated Dried Tomatoes
Italian Herbed Marinated Dried Tomatoes
Recipe Tip! Pickling salt is -simply put- fine, pure granulated salt. Grocery stores label it “canning and pickling salt”, health food stores call it “sea salt”. It is not table salt, which contains iodine and several other stabilizers and anti-caking agents that can ruin your pickles appearance.
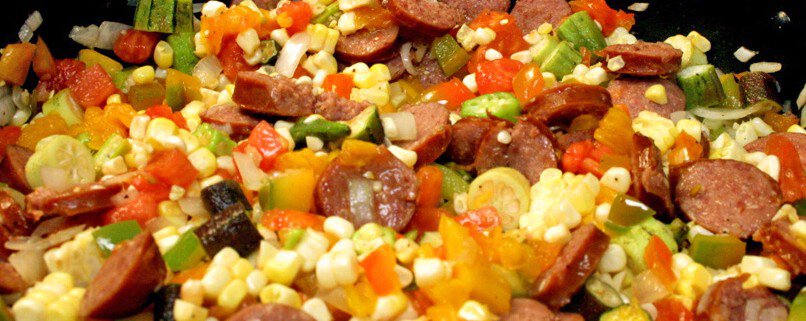
Chicken Maque Choux is one of the most wonderful, rich and flavorful chicken dishes there is. This has been one of our favorites for years, and is absolutely best cooked at the end of summer, when the corn is rich and ripe with plenty of other fresh vegetables available to round out the chicken and sausage. Fresh vegetables are essential for the complementary flavors, but you can do this with frozen and canned ingredients in the winter. This is one of the reasons to freeze and can your own produce, to be able to capture the taste of late summer in the middle of winter…
“Maque choux” is a Cajun word meaning a dish smothered with fresh corn and tomatoes. This is a stew dish in consistency and needs some liquid in the bottom of the bowls. Provide soup spoons and plenty of fresh bread, as the liquid in the bowls is delicious!
This is the traditional recipe, using the entire chicken, but one can use breasts or thighs if needed. We use Olive oil to cook in, and cast iron as it holds the heat better and adds more flavor, I believe. This is one recipe where the freshest ingredients will really shine. Fresh, local chicken will make this a dish that everyone will remember.
The sausage is optional, as it does add to the richness of the dish. For a lighter dish, use just the chicken. Who cooks Cajun in a lighter way though? Seriously, though, the chicken by itself is very memorable!
1/4 Cup Vegetable oil or Olive Oil
2 Small fryers, cut up (Can cut into bite sized pieces if desired)
1/2 Pound hot Cajun or Italian sausage links, cut into 1/2-inch slices (Optional)
4 Cups fresh corn cut off the cob, with cob liquid reserved (substitute 16 Oz frozen sweet corn if needed)
2 Tbs fresh heavy cream
3 Cups chopped onion
1 Cup chopped green pepper
2 large Beefsteak tomatoes, coarsely chopped (substitute Italian canned plum tomatoes if needed)
1/4 Tsp dried Thyme
1/4 Tsp dried Basil (or 1/4 cup chopped fresh basil)
1 Tbs finely minced fresh Parsley
2 fresh Thyme sprigs
1/2 Tsp cayenne, or to taste
3 Tsp salt
1 Tsp freshly ground Black Pepper
2-3 Tbs milk, if needed
Heat oil in a heavy 8-10 Qt pot or kettle over medium heat. Season chicken with salt and pepper and brown in hot oil, turning often to brown evenly. When chicken is just starting to brown, add sausage if using, turning often. Reduce heat to low once sausage has started to cook and chicken is almost browned. Add onion and cook for about 15-20 minutes. Add corn, corn liquid and cream, mixing thoroughly. Add green pepper, tomatoes, herbs, salt and pepper. Lower heat until mixture is just barely simmering, cook for 30-45 minutes. Check progress about every 15 minutes. Chicken and sausage should be very tender, chicken will be almost falling off bones. If dish is too soupy, uncover pot for last 15 minutes. If it is becoming a little too dry, add milk as needed.
Serve hot with fresh bread in soup or gumbo bowls. Make a full recipe, as everyone will go back for more, and it gets better the next day.
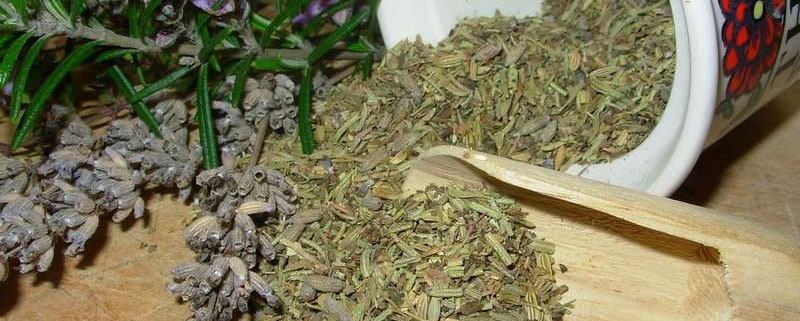
We are back from the Red Rock Lavender Festival, having met some wonderful people and loving the lavender scents for 4 days. While we were there, we picked up some Herbes de Provence and Herbes de Concho that are made at Red Rock Ranch. The high altitude, sparse soil and dry Mediterranean climate play a major part in the intensity of the scent and flavor of the lavender in their Herbes mix.
The amazing thing about Herbes de Provence is the adaptability of the mixture in so many culinary applications- from grilled, roasted or baked meats, to stews, soups and grilled or roasted vegetables, Herbes de Provence adds a depth of flavor and aroma that is unique and heady. Another interesting thing is the broad spectrum of ingredients that make up the Herbes mixture. The basic and classic mixture is equal parts dried Oregano, Thyme, Summer Savory and Lavender buds, mixed well. From this basis several other recipes have evolved, with both individual and regional preferences showing up. Many of the mixtures involve classical, foundation spices that are used in French and classical European cuisines. Some will argue that the essential ingredient is Lavender, while others will say that it’s exclusion does not lessen the mixture, and even enhances it in certain dishes. I’m not going to get into that argument, but will say that the Provence region is world famous for its Lavender, thus its inclusion into the Herbes de Provence.
This is the time of year to start selecting, harvesting and drying your garden herbs for the coming year. Rosemary has starting blooming and is incredibly fragrant now, as is Sage, Oregano, Basil, Thyme and almost all of the culinary herbs. Selecting the best leaves from the herbs and drying them in small batches starting now gives you plenty of time to accumulate the volume of dried herbs needed to not only have enough for general cooking, but will give you enough to make some mixtures that use foundational herbs without depleting your stocks. Starting now also gives you the time to do smaller batches, being more selective in quality instead of having to just pick what is available to do a large, rushed batch later in the Fall as the weather starts shutting the garden down. Ask me how I know… Plus it’s wonderful to improvise tonights dinner from the herbs and vegetables picked today from your garden!
The following recipes should be considered a starting point, not the definitive, final recipe. Use your tastes and flavor combination preferences as a guide, and adjust amount and types of herbs accordingly. How else do you think that so many variations on the theme evolved?
I will share several other recipes for the mixture below, as well as some ideas for using them. Dried herbs are important, as fresh herbs will lose their flavor in about 20 minutes of cooking.
Classic Herbes de Provence
Equal parts of the following dried herbs:
Oregano
Thyme
Summer Savory
Lavender buds
Mix well and store in an air tight container. Keeps for 3-6 months, depending on humidity and temperature.
Variations on Herbes de Provence
1 tsp thyme
1 tsp summer savory
1/2 tsp lavender buds
1/4 tsp rosemary
1/2 tsp oregano or basil (or both)
1/4 tsp sage
1 tsp marjoram
1 tsp basil
2 tsp thyme
1 tsp summer savory
1/2 tsp lavender buds
1 tsp rosemary
1/2 tsp fennel
1 tsp oregano
2 tsp thyme
1 tsp basil
1 tsp marjoram
1 tsp French tarragon
1 tsp rosemary
2 tsp summer savory
1 tsp fennel seeds
1 tsp lavender buds
1 tbs thyme
1 tbs chervil
1 tbs rosemary
1 tbs summer savory
1 tsp lavender buds
1 tsp tarragon
1 tsp marjoram
1/2 tsp oregano
1/2 tsp mint
2 powdered or chopped bay leaves
You can crush the mix prior to adding it to olive oil for a marinade or dressing. Add in crushed dried red chiles for a new taste dimension. Mix with homemade mayonnaise for a real taste treat.
Herbes de Provence/ Bleu Cheese Burgers
Mix lean hamburger meat with high quality Bleu cheese at a ratio of 3/4 meat to 1/4 cheese. Form into patties, dust liberally with Herbes de Provence mixture that has been crushed with fresh ground black pepper and salt, let sit for 20 minutes and grill till done. Make sure to make extras!
Marinated Herbes de Provence Steaks
The flavors will really be enhanced if you use grass fed beef.
1/2 cup extra virgin olive oil
1/4 cup Herbes de Provence
1 tsp fresh ground black pepper
1/2 tsp salt
Mix ingredients well, coat both sides of steaks, let sit covered for 30 minutes to 1 hour. Grill to taste. Optional- make 1/2 recipe extra to top steaks when served. Can add sprinkle of Gorgonzola cheese to top of hot steak as well.
Herbes de Provence Garlic Bread
1/4 cup Herbes de Provence
1/2 cup softened butter
3-6 large cloves freshly minced garlic
Fresh sourdough bread
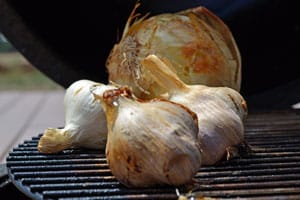
Mix Herbes with butter and garlic. For more garlic flavor- use more cloves. Optional- roast the peeled garlic cloves prior to mincing for a richer, mellower flavor. Lightly spread butter on both sides of thickly sliced bread, bake in 400F oven for 3-5 minutes or until just turning golden brown.
Hopefully you can start to see the versatility of the magical Herbes de Provence. You are only limited by your tastes and creativity!
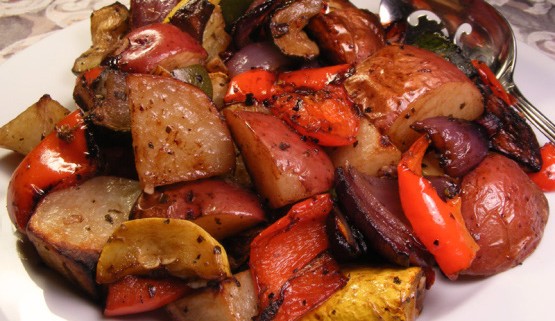
Today we have a new recipe that will work just about anywhere. I’ve used it when entertaining at home, at a friend’s house when cooking a shared dinner party and even when camping off road in our Land Rover! It lends itself to being cooked outside, which keeps the house cooler, and somehow increases the flavor…
It takes a bit of time, as this is a slow pan roast recipe, but is easy and you can do other prep or cooking while this is roasting. Total cooking time is around 30-45 minutes. Plan extra, as the flavor from the slow roasting is tremendous, and people will go back for more. That’s good, as this is real and healthy food! This is a perfect counterpart to barbecued chicken or burgers on a warm Spring evening. If you increase the vegetables and add warm fresh bread, this can be a light and healthy dinner in itself.
The eggplant must be fresh, as it can be bitter otherwise. Fresh means picked that day. If fresh is not available, leave it out. If you want an extra flavor, don’t peel the eggplant. This is the perfect showcase for fresh grown, heirloom ingredients, as the flavors will really shine. The ingredients are roasted in this order to bring out their flavors, as well as mingle them with the others. It is worth the time to do it in order!
Mediterranean Pan Roasted Vegetables
Serves 4-6
12 oz potatoes, cut into 1/2 inch cubes with skin on (Red potatoes are preferred)
2 bell peppers- any color, cut into 1/2 inch squares
1 medium red onion, diced into 1/2 inch squares
1 small eggplant, peeled and cut into 1/2 squares (Only use fresh eggplant to avoid bitterness)
3 or 4 cloves garlic, sliced
4 Tbsp extra virgin olive oil
2 Tbsp balsamic vinegar
1/2 tsp dried basil
1/2 tsp dried oregano
1/2 tsp fresh chives
1 tsp fresh rosemary, finely chopped
Salt and freshly ground pepper to taste
A large cast iron pan is best, but a heavy bottomed pan that retains heat well will also work.
Heat pan on medium heat, until thoroughly warm. A pan that is not heated all the way through will cause food to stick. Whisk balsamic vinegar, 2 Tbsp olive oil, basil, oregano, chives and 1/2 tsp rosemary together and set aside.
Add 2 Tbsp olive oil to pan, coat pan well and add potatoes, coating with oil in pan. Roast for 10-15 minutes, turning occasionally until they start to soften. Add onion and bell peppers, along with half of the rosemary and roast for 10 minutes, turning as well. Add eggplant and garlic, roasting for 5 minutes. Drizzle herb/oil/vinegar mixture over vegetables, stir well to coat and continue roasting until potatoes are tender, about 10 minutes more. Serve hot or let cool and store in refrigerator for next day to let the flavors set up and mingle.

Here are a couple of recipes that use fresh herbs- that you should soon have growing in your garden!
The first is the classic Basil Pesto. Make extra, freeze in small amounts for use later. We just finished using the last batch in a dinner that tasted like the height of summer. The second is a basic, classic tomato based pasta sauce that is not only easy to make, but lends itself to endless variations using what is fresh and on hand at the time.
You can easily have a fresh, incredibly tasty dinner on the table in 30 minutes with either of these recipes!
2 Cups fresh basil leaves, washed
3 cloves fresh garlic, mild flavored
2 Tbsp pine nuts or walnuts
1/2 Cup extra virgin olive oil
Salt to taste
1/2 Cup fresh grated aged Parmesan or Pecorino cheese
Makes about 1 cup.
Place all ingredients except grated cheese in food processor and puree until smooth, usually about 1-2 minutes. Add in grated cheese, pulse till mixed well.
Add to soups for a bright and fresh flavor, use as a sandwich spread or add to hot freshly cooked pasta for heavenly pesto pasta.
As basil production increases, make large batches to freeze into small single serving containers for use in the winter when you want a taste of summer. Most people think of pine nuts as the only nut to use, but experiment with other nuts including almonds and sunflower seeds for different flavor combinations. Use different basils as well, for the different flavors that they will bring.
1 Medium red onion, minced
1/2 Cup dry white wine
Pinch crushed red pepper flakes
3 Medium fresh tomatoes, peeled and chopped
1 Tbsp olive oil
1 Tbsp Balsamic vinegar
1 Tsp sugar
1/2 Tsp salt
1 Tbsp tomato paste
1 Cup fresh basil, chopped
Slow cook onion in wine over low heat in heavy bottomed sauce pan for 10-15 minutes, until liquid is reduced to a few tablespoons.
Add pepper flakes, tomatoes, olive oil, sugar, salt, Balsamic vinegar, and tomato paste. Simmer for 15-20 minutes, stirring occasionally until sauce is thickened.
Add basil, then remove from heat. Let sit for a couple of minutes to infuse basil flavor into sauce, then serve over fresh hot pasta.
Makes about 3 cups. Can be easily frozen for a quick, healthy and tasty dinner.
You can easily add fresh carrot thinly sliced, fresh oregano, different types of basil, fresh fennel sliced thinly, or whatever sounds good at the time. Experiment with different flavor combinations, use what is fresh and available at the time for new and great tastes.
I’ve never liked eggplant. The taste was bitter but past that, remarkably bland with a similar texture. Not that exciting.
So I decided to grow some this year. This is something I recommend against to my customers- “Grow what you like to eat” is what I advise.
My reasons for growing something that I don’t like are simple; I also don’t like supermarket tomatoes, yet love the ones that I grow. I wanted to try one eggplant to see if it was different than what I had tasted before. It’s the supermarket vs. homegrown argument on a different level. Supermarket tomatoes are merely tasteless, whereas eggplant is unpleasant to me.
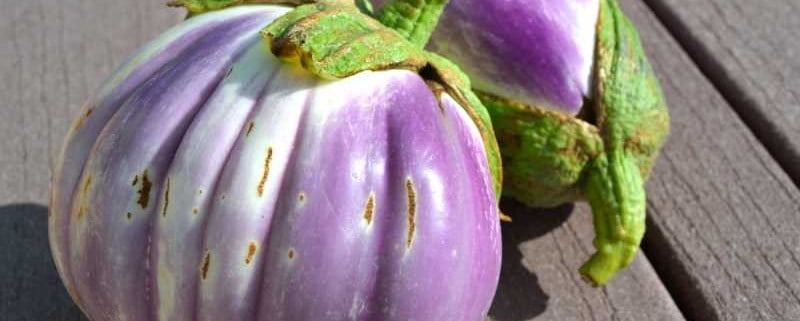
The first eggplant of the season was ready yesterday. A medium gorgeously purple beauty, surprisingly light in weight. I pulled the cookbooks out to see what made sense to try that would showcase the flavor of the eggplant and didn’t require the oven on for an hour, or at all. Marcella Hazan came to the rescue once again. She is an incredible chef and writer of the lesser known Italian cooking that most of us have never experienced. You get the recipe, and the reasons for the actions taken in the cooking and why to not shortcut the steps. Flavors are described in detail and reasons behind the techniques are given, something I’ve rarely seen. The stories behind each recipe are compelling as well, something I love from the heirloom seeds.
The recipe I tried is Eggplant Sauce with Bell Pepper, Tomato and Basil. I’ll give it to you at the end. The freshly sliced eggplant was not bitter, but had a slightly sweet flavor that compounded the smell of the fresh eggplant. I salted it according to the directions, which made it sweeter. I chose this recipe as it used more fresh ingredients from our garden. I’ve got some wonderfulGenovese Basil that has an incredible aroma and holds up in cooking. I don’t have the bell peppers or tomatoes yet, so will try it again when another eggplant is ripe.
The overall character is complex and slightly spicy with many individual flavors that come through, yet is in harmony as no single flavor overpowers another. Italian flavor at it’s finest! The flavors are not overbearing, as most common American Italian cooking has become, but are lively and pleasing. This is a lighter dish, perfect for summer cooking, and can be done outside on a grill if one is experienced at outdoor cooking, not just barbecuing. This is a dish I would prep ahead of time to do trail side at the end of a long day exploring the backcountry of Arizona or the Southwest. It’s not hard, but attention and patience are needed to bring the flavors out! The small investment of time is well worth it.
Here’s the recipe:
1 1/2 lbs eggplant
Salt
1 ripe bell pepper (yellow is best, but make sure it’s ripe)
3 Tbs extra virgin olive oil
3 garlic cloves sliced very thin
1/8 Tsp crushed red pepper or to taste
2 Tbs Italian flat leaf parsley- whole leaves, not chopped
1/3 Cup thinly sliced onion
1 Cup ripe fresh tomatoes, peeled and chopped. Canned Italian tomatoes will work.
1/3 Cup dry white wine
6 small basil leaves or 4 large ones, torn not cut into small pieces
6 green olives in brine, quartered
1 1/2 Tbs capers
1 Lb box dry pasta, penne is good choice
Slice eggplant in half. If seeds are dark, or if there a lot of seeds, scoop seeds out. Cut eggplant into 1 inch squares, put into colander rinse in cold water. Salt and let set for 45 minutes. This brings out the bitter liquid if there is any. Rinse again afterwards.
Split bell pepper in half, scoop out seeds and pith, then peel skin with swivel peeler. This removes the bitterness in the skin once cooked. Cut into thin strips.
Warm 3 Tbs olive oil in 10 inch skillet, then add garlic and chili pepper. Increase heat to medium, no more. Stir often just until garlic scent rises, no more.
Add whole parsley leaves. Careful, they will pop and sputter for a couple of seconds. Stir a couple of times, add onion and turn heat to low. Cook slowly until onion is soft. This increases the flavor by cooking slowly, and the garlic flavor is not entirely lost.
Add pepper strips, some salt and cook until pepper starts to be tender. Stir occasionally. You should have some liquid starting to build in the bottom of the pan.
Add eggplant, tomatoes, wine, basil, olives and capers. Stir several times to mix well. Slowly simmer with lid on for 40 minutes, watching liquid level. It should slowly decrease, and have almost no liquid at the end. Add a small amount if it looks dry. Stir occasionally during the simmer. Crack lid if too much liquid is remaining about 15 minutes before the end, or when you put the pasta water on.
Time cooking the pasta so its done just before the sauce, about 7-10 minutes. Toss pasta with sauce, adding 1 more Tbs olive oil and serve hot. Cheese is really not needed, but you can add a small amount of pecorino if you want. Don’t drown the delicate sauce in cheese!
Enjoy and let me know what you think! Please leave a comment!